The American Association of Variable Stars Observers has been having a Saturday series (2020) of online events highlighting each observing section. Last week was the section highlighting short pulsating stars. Some of the stars change brightness significantly over the course of an hour or two! Instant result, no patience needed! The techniques used to capture a light curve of these stars is very helpful to me in my Central Stars of Planetary Nebula project.
We had clear skies at dusk so opened Temple 10 (AR102 refractor). I put in my old Celestron apochromatic 2x Barlow and got it focused. Just when I finished the alignment the clouds came over and lightning on the horizon said it was time to close. Two hours later it was clear as a bell, but I digress.
In using a 2.5X Barlow earlier I had obtained a decent image of M 57 with this 4″ telescope by stacking 60 or so 9 second images in v. This was also with an almost full moon. If I use a 2X Barlow instead of the 2.5X it should still give good enough resolution to have an acceptable signal to noise ratio with a shorter integration time but still provide a cadence that will work.
AR102 Refractor ATIK 414 EX CCD Orion Sirius mount Johnson-Cousins V filter 2.5X Barlow
ZZ Ceti (DAV class) stars include the central stars of PN. Also called PNN stars. Part of the problem in studying these stars is the nomenclature. There are numerous names for these objects, but this class was not finalized until a few years ago. So, when you tried to find articles on Planetary Nebula Central Stars all you got were thousands of descriptions of the nebula itself or articles on white or red dwarf stars. Having a real classification makes the process of research much easier. Up until the 1980’s it was thought that they weren’t variable at all.
The biggest issue in trying to image these stars is the needed cadence. The hotter the star the faster the pulsation, so it is thought. In looking at light curves for 50 pulsating white dwarfs several years ago, there was an apparent temperature to pulsation connection. Hotter is faster. So, using an AAVSO 11″ telescope (2010) to record the PNN in M 57 there was some small evidence of a sinusoidal Light Curve. However, with a 30 second integration time, then a 30 second upload time, the light curve was not complete. Since ZZ Ceti stars in the 20k-30k degrees Kelvin, have a period of 2 minutes to an hour, you will obviously need to shoot in seconds to get a light curve of a star that is 125k+-5k degrees Kelvin if there really is a connection.
The ATIK 414 camera is much more sensitive (about 10%) and has an upload speed of slightly less than 2 seconds. So instead of 60 seconds I will image for a total of 13 seconds with a 2 second upload. This gives a cadence of 4 images per minute. Hopefully, this will capture a true light curve. However, 4″ aperture may not be enough to get a good signal to noise ratio.
If this is not enough aperture, then will try it again with the 11″ after it is rebuilt. I had an hour run from a 24″ telescope at the University of Wyoming but the software (multiple) that I was using refused to read the images. My HDD crashed and took those images with it! So much of Citizen Science type research is trial and error with techniques. It has taken years to get to this place in my research, but it is what I find “fun.”
With haze from high winds and the moon I did not open up Temple 10 awhile back. Temple 28 was awaiting a new power supply. So I got out the Celestron Firstscope 80mm F/11 and a generic F/8.8 Meade 90mm I bought on ebay about 8 years ago and a Meade 70 mm. I am working on doing a telescope review of my 70, 80 and 90 mm scopes.
After looking at the moon I decided to try something. If you put on the Star Analyzer (diffraction grating) you can actually see the amount of Chromatic aberration in the shape of the spectra. Since an achromat normally only brings 2 wavelengths (green and red) of light to focus you see what is called a fishtail at the blue end. This is a cone shaped smear of violet and blue light. The spectrum is clean and tight in green/yellow and depending on lens makeup and quality of manufacture often has a slight widening of the spectra in deep red.
Celestron 80 mm Firstscope.
The 80 mm Firstscope has a fishtail in blue which extends to the edge of green, which is common to achromats but goes nice and smooth right to the near infrared region before it widens a bit. So it indicates that using a Minus V filter would probably negate a lot of the bad effects of CA but not all. The 70 mm Meade F9 had a very similar spectra to the 80mm except that it showed signs of pinched optics.
This is what is weird. My assumption going into this testing was that out of the 3 telescopes I tested the 90 MM F/8.8 Meade would be the worst. I bought it off of a vendor on Ebay and paid about 40 bucks for the Optical Tube Assembly. Turns out it is the best. When looking at the moon or Venus there is only a hint of purple and you have to look for it. So I tested this scope with the grating and found a fishtail in violet but not blue. This means that it has much less CA than my other scopes! The red end looks like the 80mm and is better than my 6″ achromatic refractor. Over all there is substantially less visual CA in the 90mm than the 80. Yet the 80 mm is an F/11 and should have better color correction. That very small shift in the wavelength makes a lot of difference. So a Minus V filter would really reduce the CA in this scope.
Meade 90mm scope F/8.8 with Solar filter on it.
In the 3 telescopes I tested in and out of focus the Meade was also the best. The 80 and 70mm both have about 1/2 wave of spherical aberration. The Meade is at a 1/4 wave.
So after writing most of this I went out and did the tests with the grating again and then just looked at some bright stars with a homemade 26mm eyepiece. The Meade 90 mm really does have a nice view. In fact I put a 4mm planetary eyepiece on it with the almost full moon and saw just a tinge of blue but really nice crisp views of the partially illuminated craters. When a 90 mm F/8 can look this good I think I got the luck of the draw on this telescope!
So a 40 dollar telescope that I have had for years turns out to be the best of the 3 refractors I am testing, go figure!
When I woke up this morning I didn’t expect to buy another! I just can’t seem to help it. It’s an addiction!
We finally got our stimulus check…note to self…use automatic deposit next year. So I had intended to buy a small apochromatic refractor with some of the money. You know, make sure we spread it around a bit and not spend it all in one place. That idea sounded good until I took a look at some bills and my wife decided to use most of it for the kitchen remodel. So only had 300 dollars left and that would not get what I had in mind. So I noticed while perusing astromart that a guy was selling a fully functional Meade LXD-75 mount and after some negotiations it is on the way to my house.
Meade LXD-75
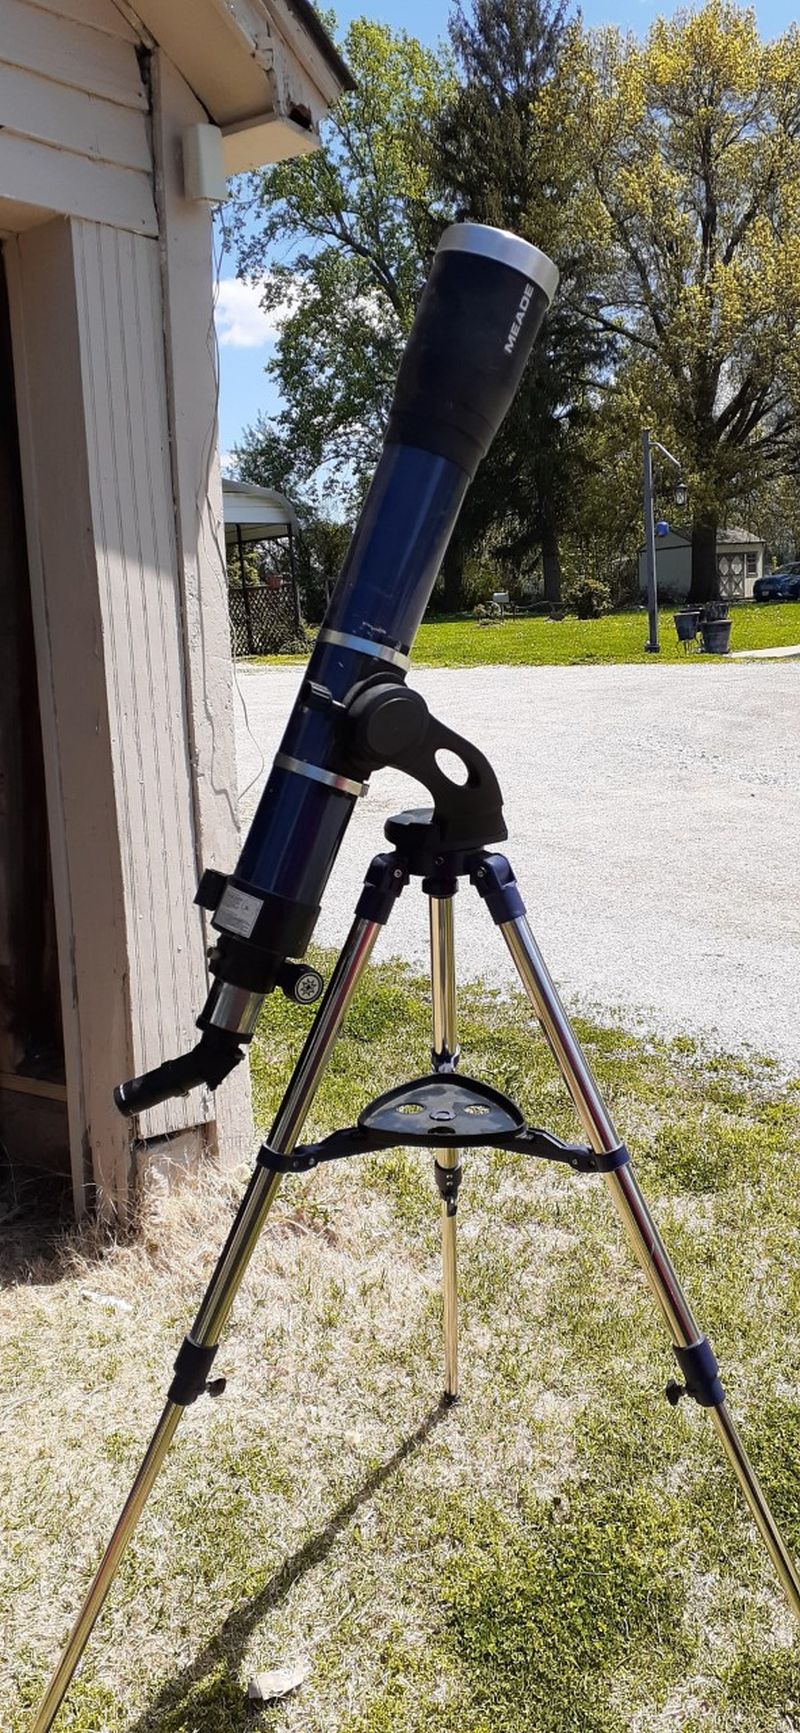
So why another mount? I’m glad you asked me that question! I currently have 7 achromatic refractors, two 60 mm, a F8.8 and an F12, 70 mm F10, 80mm F/11, 90mm F8.8, 102mm F6.5 and the 150mm F/8. I have 4 Alt/Az mounts for the smaller telescopes, an Alt/AZ for the 80mm, the AR102 is mounted on the Orion Sirius mount and the 6″ resides in it’s blue carry bag on the shelf only to be taken out for planets once in a while.
I would like to do some testing and imaging with each of these scopes. One of the projects is taking spectra of stars to show the Chromatic Aberration of each telescope. Actually being able to measure the CA would be interesting.
I am almost finished with “Choosing and Using a Refracting Telescope by Neil English. In that marvelous book it gives a delightful history of the different types of refractors. It is hard for today’s amateur observer to realize that a cheapo Meade or Celestron (read trash scope to many) is as good or better than the most expensive telescopes of yesteryear. In fact a 90mm F/11 would have been considered to be a large quality telescope to people of the 1800’s. We are really spoiled!
So this new mount is to use for the refractors. Primarily visual but you can pulse guide with this mount. Astrobin has a lot of high quality images taken with an LXD-75 so it is suitable for these smaller refractors. Before I bought the Celestron ASGT in 2010 I almost bought the LXD-75. The lack of an ST-4 port to autoguide the internal chip of the ST-7E was the deciding factor on purchasing the ASGT. So I believe The LXD-75 will work even for the 6″.
Many people thought the LXD-75 was too light to image with the 6″ scopes when they first came out. Virtually every review trumpeted that “fact.” However, I did quality imaging with the ASGT mount and the 6″ scope along with the ST-7E. The LXD-75 had just as good of reviews as the Meade mount except for the missing ST-4 port. So I know it will work for the kind of imaging I have in mind.
Ok so what happened today? Well, I bought another telescope! Big surprise. I saw a lady in Kansas City had a Meade DS-90 advertised for sale for 100 dollars. I offered her 75 and she took it. I used to have a DS-2090 that featured a 90mm F8.8 telescope but gave it to a kid when I got the Celestron 6″.
New Meade 90
However, I was not really interested in the mount as much as the scope. It is a 90mm F/11 telescope. If the optics are just ok, it should give very good views. The color should be much better than my other telescopes, except the 60 mm F12, and I am looking forward to getting to play with it. Of course it is raining tonight and all day tomorrow. In fact it has been raining on and off since May 10 and it is still raining on May 16.
The 2 eyepieces that come with this telescope are not bad just not real good. A 25mm Modified Achromat and a 9mm Huygens. They work but I would not call them good. Still great discoveries were made with much worse eyepieces than this! I have 2 new eyepiece adpators on the way from a guy in Ariaona so that my Meade 90 F/8.8 and the new Meade will both accept 2″ eyepieces and diagonals. A quality dielectric diagonal and good eyepieces really help the performance.
The couple I bought it from indicated that they had never figured out how to even put it together. Most of the parts were still in the original unopened bags. They won it in a contest then couldn’t figure out what to do with it. The only issue that I have found so far is 2 of the 3 tripod legs won’t stay extended without some kind of help. I remember having this issue with my old DS 90. Finally took off the crappy levers and just added small c-clamps, that worked better anyway.
Some of the pieces had never been taken out of the bag!
After reading the book on refractors I am really pumped about achromats! They are relatively cheap and a lot of fun. With the premium refractor bias of many observers today the achromat is a great deal!
So now that we have pretty much spent all of our stimulus money I won’t be buying anything else real soon, err, unless you know someone that has a real cheap Meade LXD-750 mount…
First 2 images of the Globular Cluster M 3 in the second autoguiding test. So far so good!
After all the articles that have been written in this blog over the years about the 11″ CPC (Temple 28) it would seem that it ought to be running flawlessly! This is not the case. In the past it has run well enough to get some pretty good images but it has never really worked like it is supposed to.
Several months ago I noticed that one y axis was no longer working in autoguiding. Now in my defense I don’t get to open up the telescopes very often here in the midwest. In fact I went 2 full months without one clear night! It is very hard to troubleshoot something when you can only test it out every couple of months!
In past blogs I mentioned wanting to take a sledgehammer to the scope several times. This was another one of those time. In fact I was mad enough that I decided to just take off the camera and autoguider and just use it as a visual scope. My stubborn nature soon reasserted itself and I began to troubleshoot…again!
We moved to Missouri in 2017 and one of the first things I realized was that the the conditions in Missouri really limited the number of stars that the internal guider could see. This is a very small chip and if you got 3-5 stars in it that was a win! So after getting a wedge and adjusting the gears I put on an external guider. Made it much easier to find a suitable guide star.
A short focal length guider was what was tried first. It was lightweight and I thought it should work pretty well. But it seemed the focal length was not long enough to keep up with the guiding chores of an 11″ F/6.3. There were still occasional images that would trail the stars. An Orion ST-80 was added with a ZWO 120MM camera to guide. This seemed to work well. At the time though, I was having issues with my control software so I ran most of the tests just using Maxim DL 5. In maxim you can still track even if your errors mount and you get above a certain error range. So it appeared to work except for some out of round stars from time to time. For ever 3 images I got 1 with trailed stars.
I finally got CCDCommander to work with the setup and that is where the issue with the Y axis became apparent. I had the error set to .75 of a pixel. So if the errors go outside of this value it will wait to start the next exposure until they numbers go below .75. After an image or two the program would try and correct the errors then stop! When you used PHD you could easily see that the north axis wasn’t working at all and this was causing the stoppage.
So…played around with balancing and it still didn’t do the trick. Tightened up the set screw on the clutch assembly, that fixed some play but didn’t fix the issue. Found an actual weight and slider bar and added that. This way you can just slide the weight up and down on the bar to balance the tube. Still didn’t fix it. This all took around 3 months because of weather.
After some thought I realized that the last time it had really guided well was in Northern New Mexico using an internal guider. It would still crash after a period of time because the gears were incorrectly adjusted when I got it and they would slip during an observation. Still the internal guider chip worked pretty well.
So I removed the uber heavy ST-80 and rebalanced the scope. After orienting the ST-8E and calibrating the autoguiding system it was ready for a test. There was a period of around 2 hours before the almost full moon came up. With moisture, high clouds and gusty wind good images seemed to be out of the question but it would serve to test the guider.
Result using 20 images of 60 second length, ST-8E and Sloan g filter.
For about 20 images I imaged M 42, then moved to M 44. With a total of around 70 images the stars were round in most of them. There was some trailing in the first hours due to wind gusts around 15 mph. Still it is a start.
Now before I get excited (been here a few times already, then your emotions are dashed by harsh reality) there needs to be further testing. A 2 hour run is not really enough to declare victory! The fact that CCD commander did not crash and burn during the 2 hours is a positive. I also went out to the telescope, pulled the DEC gear and found the scope was still way out of balance. The gears fit so tight on the shaft that they won’t free wheel even when you loosen the clutch knobs. You have to take the gear completely off to achieve really good balance.
If this is the solution to the issue then it is most likely too much weight with the ST-80. I have seen other CPC’s with 2-3 extra scopes mounted on their tubes. However, with this scope it mounting an external guider has not worked very well. Temple 28 had it’s point of balance moved to accommodate a heavy camera when a carbon fiber tube was added. So the typical procedures for a regular CPC just don’t seem to apply. In fact I have had to add weights to the front of the scope, on top and bottom even without the heavy external guider. This is with the change in the point of balance.
The sky tonight has unexpectedly cleared. So test number 2 is going on as I write. The image of M 3 is the result of the first two, 60 second images taken using the internal autoguider. Overall the run is on # 10 and so far the errors have been acceptable. If I was going to do “pretty” pictures this tracking would probably not be acceptable. However, for photometry this should work well.
The program was set to take 160 images then move to M 57 before dawn. Then the mount would park and calibration images be taken. Before I could post this blog a 10 mph wind came up with 15 mph gusts and that does it for testing tonight!
Like it has been for years now, this is still a work in progress. Stay tuned for more updates!
While working from my home office I noticed a worn and tattered paperback on the shelf. It was my 2nd copy of Tony Simons “The Search for Planet X.” By the time I was in college my original Scholastic copy purchased at a grade school book fair had fallen apart to the point where tape couldn’t hold it together any more. Taking this 2nd copy off of the shelf last night I was soon immersed in the quest to find Planet X or Pluto!
13″ Pluto Astrograph
The thing that jumps out at you is the search telescope Clyde Tombaugh used to find Planet X was a refractor. An achromatic refractor as well. It was 13″ in diameter and only had 2 elements in it’s objective. Modern, high quality, expensive refractors have 3 or more lenses. This means if you could look through the 13″ planet hunter the bright stars would have a purple fringe. Now this scope was an astrograph which means that it was dedicated to photography so it was not designed for visual use. In fact it was maximized to deliver good performance in blue light since that is where photographic plates were most sensitive at that time.
Once Clyde Tombaugh discovered Pluto, the 24″ refractor was one of the telescopes used for follow up observations, both visually and photographically. It was a “short” focal ratio refractor 24 inches in diameter that would have chromatic aberration, the scourge of short refractors. This “CA” is what gives achromatic refractors such a bad rap today.
The 24″ Clark Refractor at Lowell Observatory
At the time the 24″ was still a front line telescope being used for science every clear night. In fact Vesto Slipher used the 24″ telescope and a custom spectrograph to discover the redshift of galaxies. Edwin Hubble took the redshift concept to the next level but without Slipher’s groundbreaking work, Hubble’s expanding universe would have been delayed.
With this level of historical precedent why is the achromatic telescope so maligned today? Log onto the Cloudy Nights forum or just about any other amateur astronomy site and you find refractor proponents bad mouthing any but the most expensive “Apochromatic” telescopes. With 2 lens you always get false color because some of the wavelengths of light don’t actually focus properly. “Common wisdom” is that an achromat is almost worthless for observing.
Over the years I have looked through the 24″ Clark telescope at a variety of objects. The one I remember most was looking at the “Ring Nebula” or M 57 in the constellation of Lyra. A faint violet star floated in a ring of green! The image is sort of frozen in my mind and I can readily call it up for remembrance. Turns out the central star of the ring nebula is violet and through a large telescope the ring would appear green. I have also looked at Saturn, Jupiter and several other deep sky objects through this scope and never noted any false color in the images. The fact that I could see a 15th magnitude violet star says that a filter was not being used since it would have filtered out the violet color.
One thing that is driving amateur astronomy these days is imaging. Thousands of amateurs worldwide are using off the shelf components to take breathtaking images of the night sky. If you are using a one shot color camera to take images then you probably don’t want a lowly achromat. The chromatic aberration is hard to process out of color images. When you have violet fringes around all of the bright objects in your image then an apochromat or other type of telescope would be better. Thus, “old salts” in the imaging world pronounce any refractor but the most expensive apochromats to be “worthless.”
Are they really worthless? I have a number of achromats in my telescope stable. A Celestron 6″ achromatic refractor, a Explore Scientific AR102 mm and a stable of simple 60-90 mm fun scopes. Using a cheap Celestron Minus V filter takes away all but a small amount of false color around the image when observing with eyepieces. This cheap but no longer produced filter was made by Baader of Europe and does an excellent job visually. You do lose some of the wavelengths of light and it does not make your telescope perform like an expensive apochromat. Still an achromat is usually 3-6 times cheaper than a similar sized apochromat.
It has also been found that if you use a good quality color #8 Yellow filter it works just about as well. It’s negative is that it gives a yellow tint to white areas on a planet. Still a good quality filter can be purchased for a achromat and it is still less than a apochromat
What if you were using filters to image with? Then the CA (chromatic aberration) is no longer a factor. Filters were part and parcel of 20th century astronomy and are still being used today. The biggest negative of this system is that each filter comes to a slightly different focus. This becomes a non-issue if you use a motorized focuser like a moonlite or robo focus. With a computer the program will automatically set offsets for your filters and this allows smooth change up between filters without the need to refocus. Even one shot color cameras rely on a system of red, green and blue microfilters (one color on each pixel) to make a color image. A lot of the best imagers use red, green and blue filters to make color images. This puts the achromat back on an equal footing with it’s more expensive cousins.
The AR102, Sirius mount, ST-8E Camera and a laptop to control it all!
Temple 10 ( A mentor named all of my telescopes for me) is an achromatic 102mm refractor. It uses 3 different cameras depending on what the target is. For planets I use a ZWO ASI 120 MC color camera or the ATIK 414 monochrome camera. For deep space I use the ATIK 414 or the ST-8 camera. Though I have the hand controller for the Orion Sirius mount I use a laptop to control it.
Though I occasionally use Temple 10 for planetary work it is used primarily for science. The ST-8 has a full range of Sloan photometric filters to measure the brightness of the stars. The ATIK 414 uses a Johnson V filter (green), a Johnson I filter (infrared) and a Sloan z (infrared). Since these filters have a narrow bandpass it negates the issue of Chromatic aberration. No rings around stars and it gives the achromats, more bang for the buck.
Approximately every 2 years I get out my 6″ Celestron refractor and put it in place of the AR102. Turns out the 6″ is a great scope to use for imaging planets and Mars comes close to the earth about every 2 years. Even with it’s chromatic aberration issues I really enjoy using this scope for imaging and visual astronomy. Since I bought it in 2008 for 350 dollars and it came with a mount, it has given me years of astro enjoyment.
However, I have used my 102mm Celestron achromat refractor to image planets in color. These images have come out good and CA does not seem to be much of a problem using a filter. The image below was taken with a Celestron Minus V filter and a ZWO 120 color camera. Recently I purchased a Ultra Violet-Infrared cutoff filter and use it with the Minus-V filter. This sharpened up the planet images since it blocks the infrared light leakage of the Minus V. For visual use the leakage doesn’t show but for imaging it can blur the definition a bit.
Here is Mars with Temple 10. AR102 refractor
Should you buy an Apochromat over a achromat? Absolutely! If you can afford it. If not then the above can help you make the most of a historic, low cost, high quality achromatic refractor. Happy observing!
“It’s the most wonderful time of the year”…not! At least for astronomy! Last night it was around 19 degrees F with a low of 16. Growing up in Arizona these conditions are challenging for me! My AR102 on a Sirius mount recently got a new Hand Control and I am trying to get it set up and running effectively. All of the telescope and computer cords are stiff and inflexible when the temps go below freezing. This caused a power malfunction when the power cord pulled out of the laptop when the table was inadvertently bumped. It is an old laptop and the battery is bad so all of the hard earned adjustments were lost when the power went bye, bye. With the moon almost full and high clouds moving in it was time to call it a night. However, it wasn’t because of the cold if you know how to dress appropriately.
Here are some tips for cold weather observing. My heaviest coat is a bright orange camo coat that is wind and waterproof. It is for hunting so I normally never wear it around town. However, for observing who cares if it is orange camo? Wear the heaviest and most functional coat you got! I also use a down vest under the camo coat with a sweater and/or hoodie. Hoodies are nice since it complements your head gear.
Fingerless gloves from Bass Pro Shop rock. Putting on, then taking off gloves, gets old quick so I just leave on the fingerless gloves and put my hands in my coat pockets when they need to warm up. Heavy stocking caps are the ticket for your head. It is always fun to wear my Denver Broncos cap here in Kansas City Chiefs country. Of course no one but my wife ever sees me wear it to observe anyway. If you have a stocking cap, hoodie, then a coat hood, you can stay reasonably warm even in freezing temps with 3 layers of head coverings.
Gore tex pants (or nylon warm ups)over my regular jeans or sweat pants really help the legs to stay warm. People always talk about your core temps being important but I have found that I need to have my leg area insulated and protected as much or more than the core. If you can keep the chill out of your lower extremities it helps make the core much warmer. Remember the legs expose a lot of area, and the more area, the more heat loss. One of the differences between observing and most other outdoor activities is that you do very little physical exercise with observing. When you add in exercise, especially walking, the lower extremities are not as important to insulate. The sedentary nature of the hobby changes some of the common wisdom.
Foot comfort is huge. You can buy a pair of expensive boots and socks to help you stay warm or buy some hunting socks and 18 dollar “muck” boots at Walmart. The “muck” boots are just rubber boots that are often used in mud or “mucking” stalls for horses. I keep a pair at the back door for wet or cold nights. If it is really cold put on 2 pairs of hunting socks!
The last two are my “secrets” for staying warm! For 12-20 dollars you can buy a heating pad. Since I have power near my telescopes I just plug in the heating pad, put it inside my coat then observe in comfort! I got the idea from reading about the Palomar 200″ Telescope. For years they used heated flight suits leftover from WW II! A heating pad is much easier (and safer) to get today than a WW II vintage electric heated flight suit. If you need to move around just get an extension cord!
The second “secret” is the best one! I don’t do much visual observing anymore so everything is automated. You open up, make sure the scope is still aligned ok and head indoors where you can log into the computer from a nice warm spot inside. I use Teamviewer so you can use, computer, phone or tablet to control the scope. You add the destination, program the exposures and even have it shut down when it is done. Usually, I go to bed and upload the images in the morning! However, much of the above advice was learned when spending hours calibrating and setting up the scopes for automated use like last night. The higher the level of automation the longer and harder it is to get everything set up.
Don’t let the cold spoil your astro adventures. Winter skies are not only interesting but also give some clear views. Dress well and continue to enjoy the night sky!
Technology is a wonderful thing! It has provided the means for an amateur astronomer to do high level scientific research. Enthusiasts can do imaging from their backyards with a small telescope that only professionals could do with a large telescope just a few years ago. One of these amazing areas of science opened up by technology is spectroscopy.
At a conference in 2009 in Big Bear California I met Oliver Thizy from France. He was there promoting spectroscopy for small telescopes for his company Shelyak. (https://www.shelyak.com/?lang=en) One of the products featured at that time was the “Star analyzer” a 100 line per mm blazed grating maximized for low resolution spectroscopy with amateur equipment. While there I bought the “introductory priced” Star Analyzer.
This opened a new world of observing and imaging. Though you can use the grating visually, it really works best when coupled with a camera. Though spectra are mostly portrayed in color, a mono camera is preferred for imaging, but not required. In fact you can use a web cam or video camera, color or mono, as well as more traditional types of astronomy cameras. The main difference is sensitivity, since mono cameras are approximately 3 times more sensitive than a color camera. Plus, when measuring the lines with software, color does not matter.
From Robins astro pages on spectroscopy. http://www.threehillsobservatory.co.uk/astro/spectroscopy.htm
The above image and link shows the type of work that is possible using a simple grating, telescope and camera. The Three Hills Observatory site is filled with useful info and links. With a simple setup it is possible determine the spectral classification of a star as well as velocities and variability in many instances. The article linked below shows how the velocity of a quasar can be obtained using a small telescope with a grating! http://www.astrosurf.com/buil/us/quasar.htm
Here is a mono spectra of a quasar from the above link.
In recent months the American Association of Variable Star Observers has premiered a new spectroscopy data base. It is already features hundreds of spectra from a number of observers. This type of effort opens up new possibilities of research when combined with light curves from the same or similar type stars.
A “must have” program is Tom Fields, RSpec. The web link below is loaded with information about amateur spectroscopy as well as a download page where you can download RSpec and try it out for a month before you buy. RSpec is easy to use, low cost, has thorough documentation as well as tutorial videos, and is geared to the basic amateur astronomy user. In fact with a Star analyzer grating (which is available for purchase on the website) and a DSLR you can take useful images of star spectra. Tom Field, the developer, is very accessible and accommodating. Often he is available for a live chat when you are on his website. Here is the link.
Using an 8″ Schimdt-Cassegrain LX200 telescope and a Meade DSI Pro mono camera I obtained the spectra of 13th magnitude stars. Using the 8″ I reproduced the results of the article from Christian Buil’s website using 3C273 with a magnitude of 12.9. With this spectra and RSpec it was easy to measure the red shift and come up with a velocity very close to the professionally derived value. Unfortunately, that data (and much, much more) went bye-bye when a hard drive crashed or I would include it in this post. Still it goes to show the possibilities for the amateur astronomer.
Amateurs are just beginning to scratch the surface of this growing field of research. In the years to come as prices of components fall and usage begins to grow it will be interesting to see what kind of new ideas and discoveries will come to light.
There are two givens in life…Death and taxes! Everything else is uncertain. One of the most uncertain segments of life is the weather. The summer in Lexington, Missouri is no exception. Because of clouds, fog or rain the observatory has not seen light for over a month. Plus my wife and I were out of town for a couple of weeks. I think Mid-July was the last time I opened up the observatory! Obviously there is little to report when the clouds are out!
Before this long hiatus I did some observations on a nova and sent them into the Center for Backyard astrophysics and the AAVSO. These are always fun since you know that your observation is helping to do science. While visiting Toronto Canada, I was able to visit with Dr. Brian McNamara and Dr. John Percy. McNamara is one of the world’s leading experts on black holes and Percy is a an expert on variable stars. These were very interesting conversations.
We are in the process of buying the house we have been renting and when(or if) that goes through I will begin working on upgrading the facilities for TRO. I would like to pour a concrete pad and add my 8″ LX200 to the other scopes. This one would primarily be for spectra and would sport an ST-7E Camera and Star analyzer grating. However, after buying the house it may be awhile before I can afford to upgrade the observatory. Meanwhile I will be waiting for a clear night!
Bright Dwarf Nova TCP J21040470+4631129 Maxim DL5 screenshot
It is a lot of fun to take images of the sky. Pictures that only professionals, with professional equipment, could take, are now possible for just about anyone with a telescope. People are using cell phones held up to simple mounted telescopes to image all sorts of objects. As much fun as this is, my passion goes a little deeper.
When I was about 8, I remember reading astronomy books and dreaming of owning a large telescope. The pictures in magazines beckoned me with a Siren’s call that was hard to resist.The Sears catalog would automatically open to the telescope page. Of course not having any money of my own I could only dream. Until one Christmas when I was 9 and I got a Tasco, 50mm, spotting scope. To a 9 year old it didn’t get much better than this. The passion began.
Sometime around age 13 I decided to join the American Association of Variable Star Observers and be a citizen scientist. So like Leslie Peltier, I sent off for beginner charts hoping that my parents would fork over the money to actually join later on. Every day I waited for the mailman then would rush to the mailbox to look for my charts. Two long weeks after the initial letter was sent they arrived.
Looking at the charts was puzzling. Where was the star? There was only a cross in the middle of it. Being a kid I had no clue how to interpret the field of view, much less getting the right orientation in the eyepiece. After a couple of nights I gave up. At the time I never even thought about trying to find an astronomy club.
Fast forward a few years. With a wife and 4 kids it did not look like there would ever be a time when I could buy a telescope bigger than 60mm. Enter the low cost Coulter reflectors. Even though the Coulters were pretty cheap, I still couldn’t afford it! So I called up the Coulter factory and asked if they had any “second” optics. They did! So a mirror and diagonal was obtained to build an 8″ telescope. Amply titled the Bargain Bucket, it cost 25 dollars to build over and above the 50 dollars I paid for the optics. The focuser was a .965″ from an old Sears 60mm refractor that broke. The eyepieces were from the Sears scope as well. The best view I ever had of the Orion Nebula was on a -5 degree night using a cheap, poor quality, 4mm eyepiece!
This led to a desire to actually do science, like I wanted to do when I was a kid! In Sky and Telescope was an ad for ground observers for the Hubble Space Telescope. I contacted the organizer and volunteered my scope. I even tried to get time on larger telescopes but after broken telescopes, assistant observers leaving the observatory a month before the observation, rain delays and clouds I never got any observations done. So I joined the AAVSO to try and continue doing science. This time I had no problem finding the variables! At last, citizen scientist!
It is very exciting to contribute to the knowledge base of astronomy. To realize that your work and studies will be used by amateur and professional alike to study stars is very rewarding. Technology has made the tools way more accessible and affordable. At present I have running almost every clear night an 11″, a 4″ refractor and am working on setting up an 8″ to do Spectroscopy. These telescopes use software to remotely control them from computers or even my cell phone!
Below is a Light Curve of a bright Dwarf Nova. This shows the fluctuations of light as well as a steady decline in Brightness. The last image is of the results of the worldwide effort to record this star!
Dwarf Nova TCP J21040470+4631129A light curve from the AAVSO database showing 20,000 plus observations of TCP J21040470_4631129