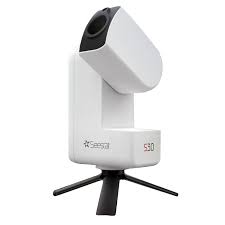
Morrison Observatory at Central Methodist University has a new telescope! We were able to purchase a ZWO Seestar 30mm refractor. This is a do it all electronic telescope that is incredibly easy to use. It was purchased with the idea that the students could easily use it and then download the results.
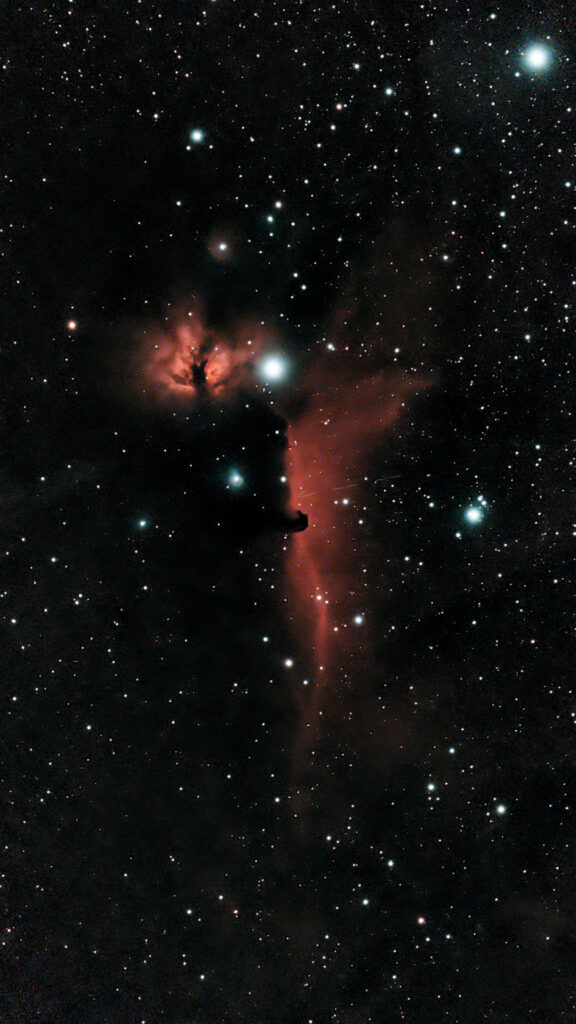
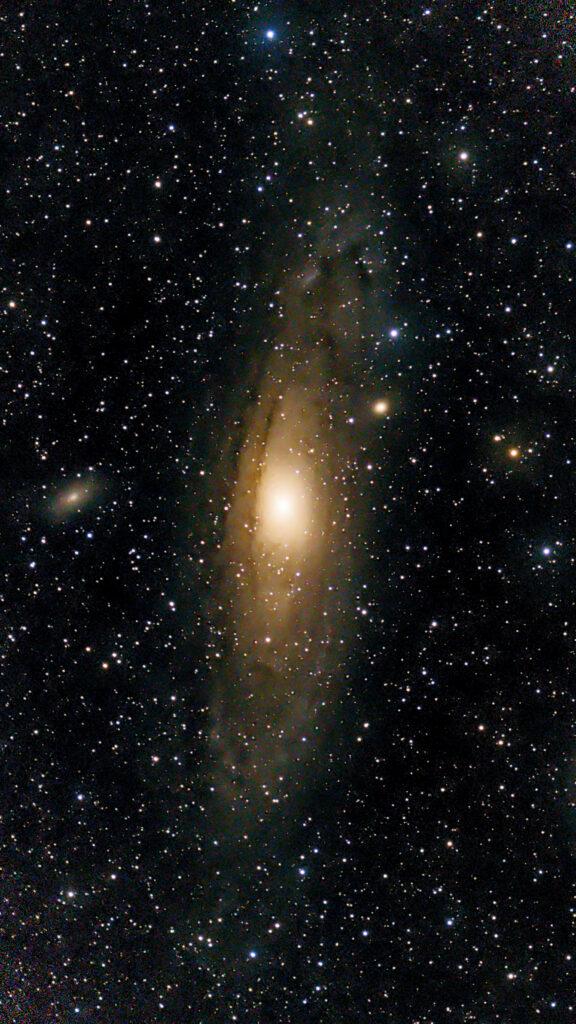
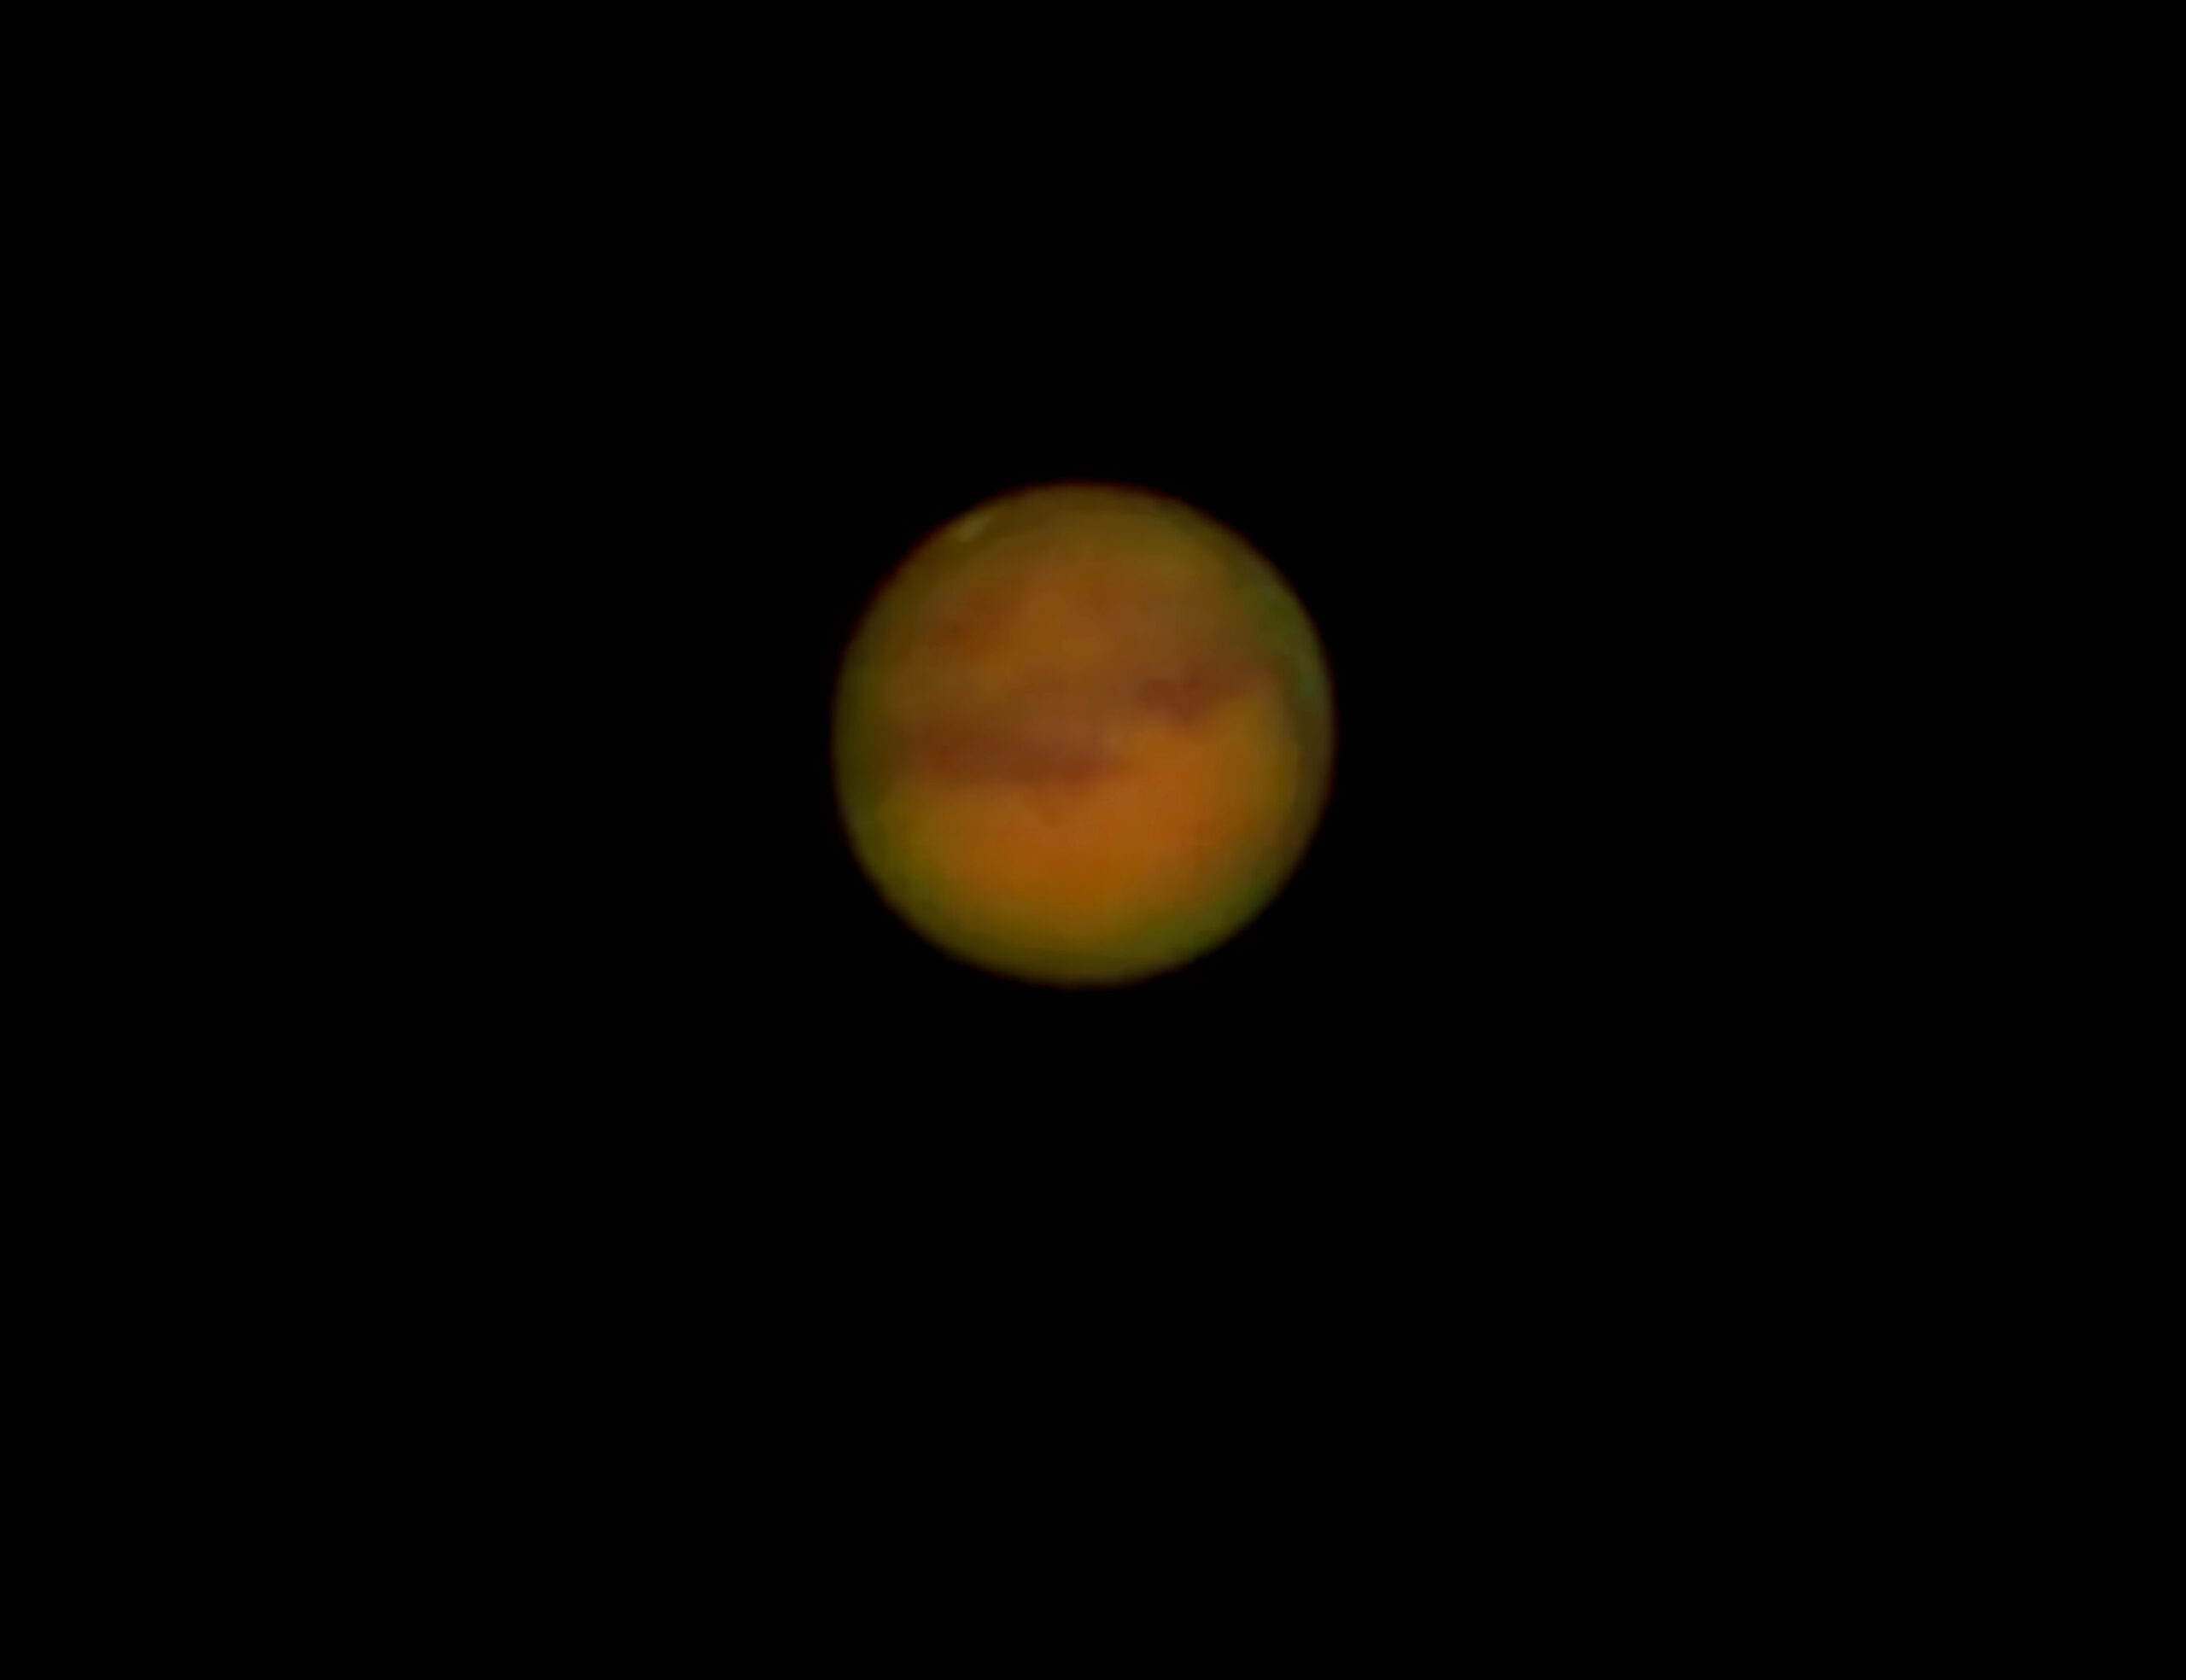
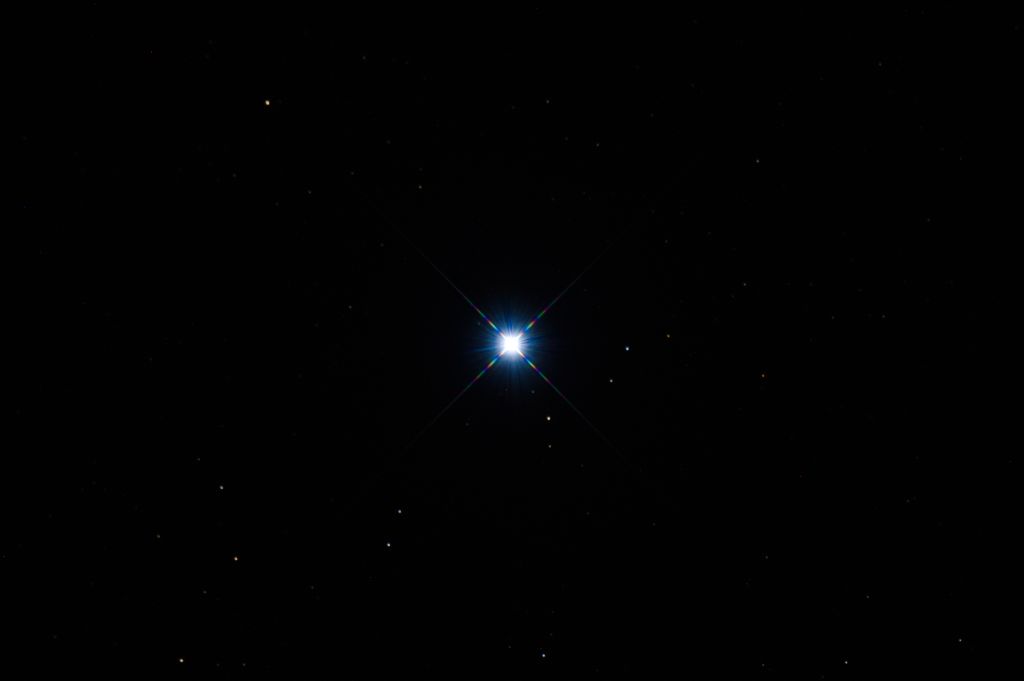
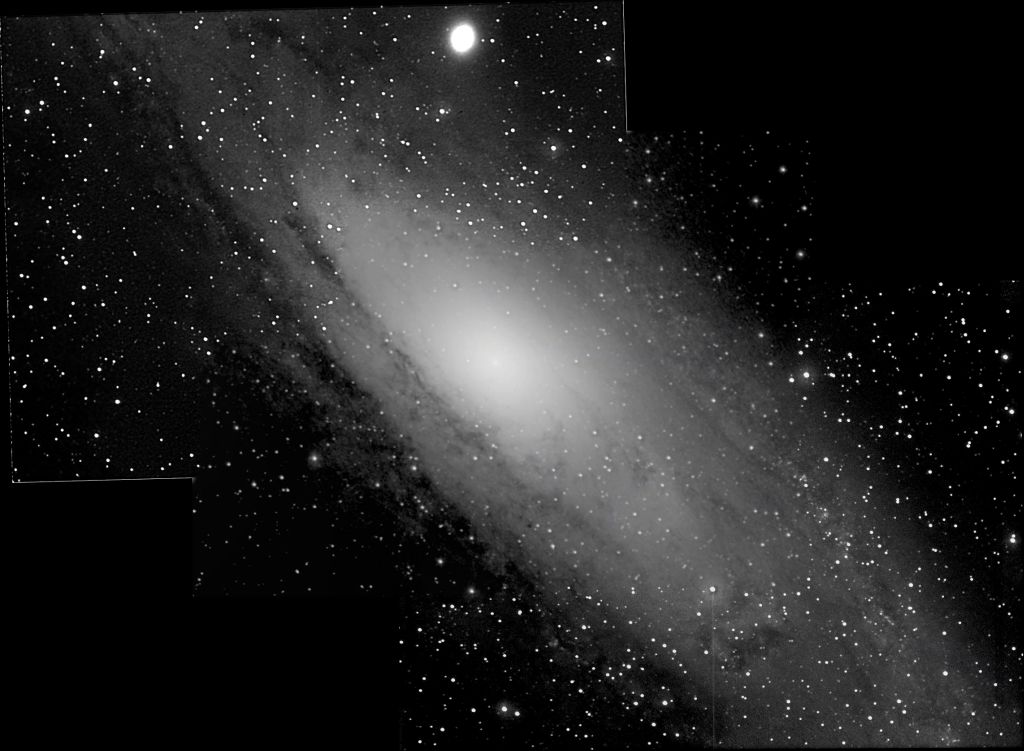
M 31
The telescope has several elements to make it apochromatic and using a small sized sensor and electronic goto control through a phone app makes it easy to use. A student can download the free app then connect with the telescope. You raise the “arm” that holds the scope, punch the auto focus button when you get to a patch of stars, then tell it what target to image. That is it! If you puch AI Denoise throughout the exposure every few minutes you get a slightly better image but that is not really a must do.
ZWO Seestar 30
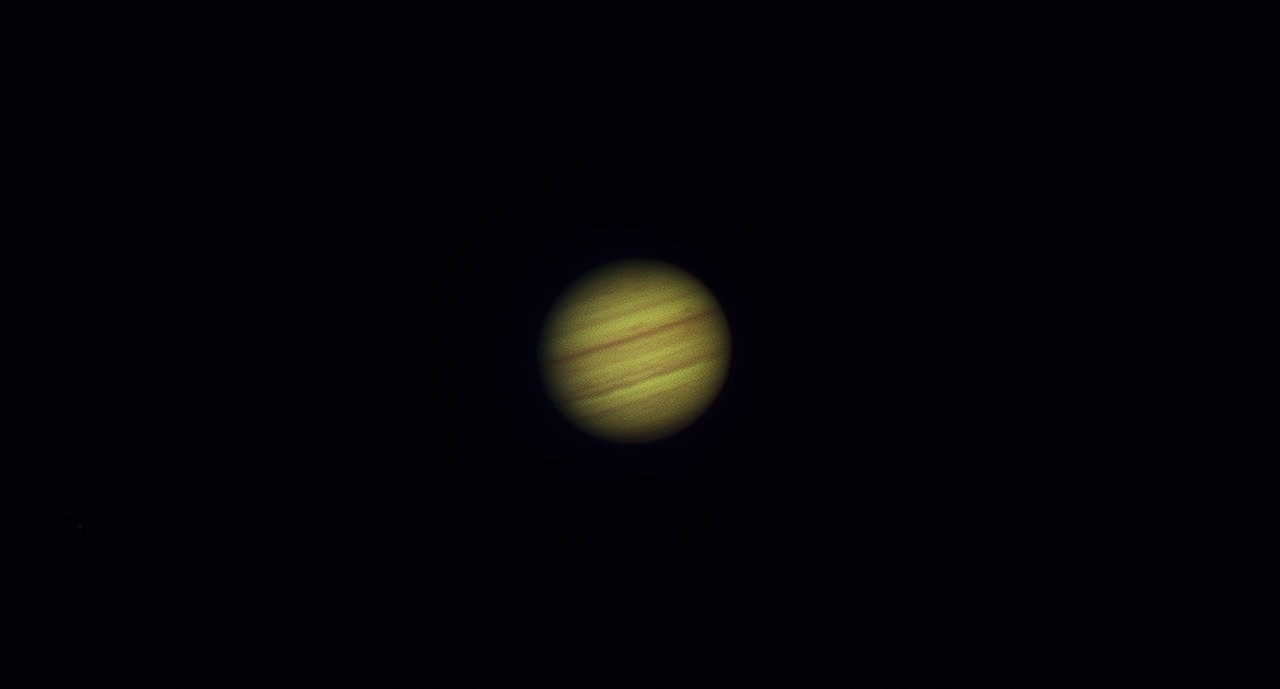
The telescope takes 10, 20, or 30 second images then stacks and rotates them. The longer the imaging session the better the image…to a degree. Like anything else there are limits. The darker the sky the longer you can image and stack. However, this stack and rotate method is the reason why you get such amazing images with such a small telescope! Below are some images taken with the Seestar 30.
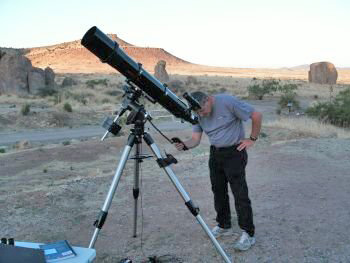
At The “City of Rocks” State Park New Mexico getting ready for an all nighter.
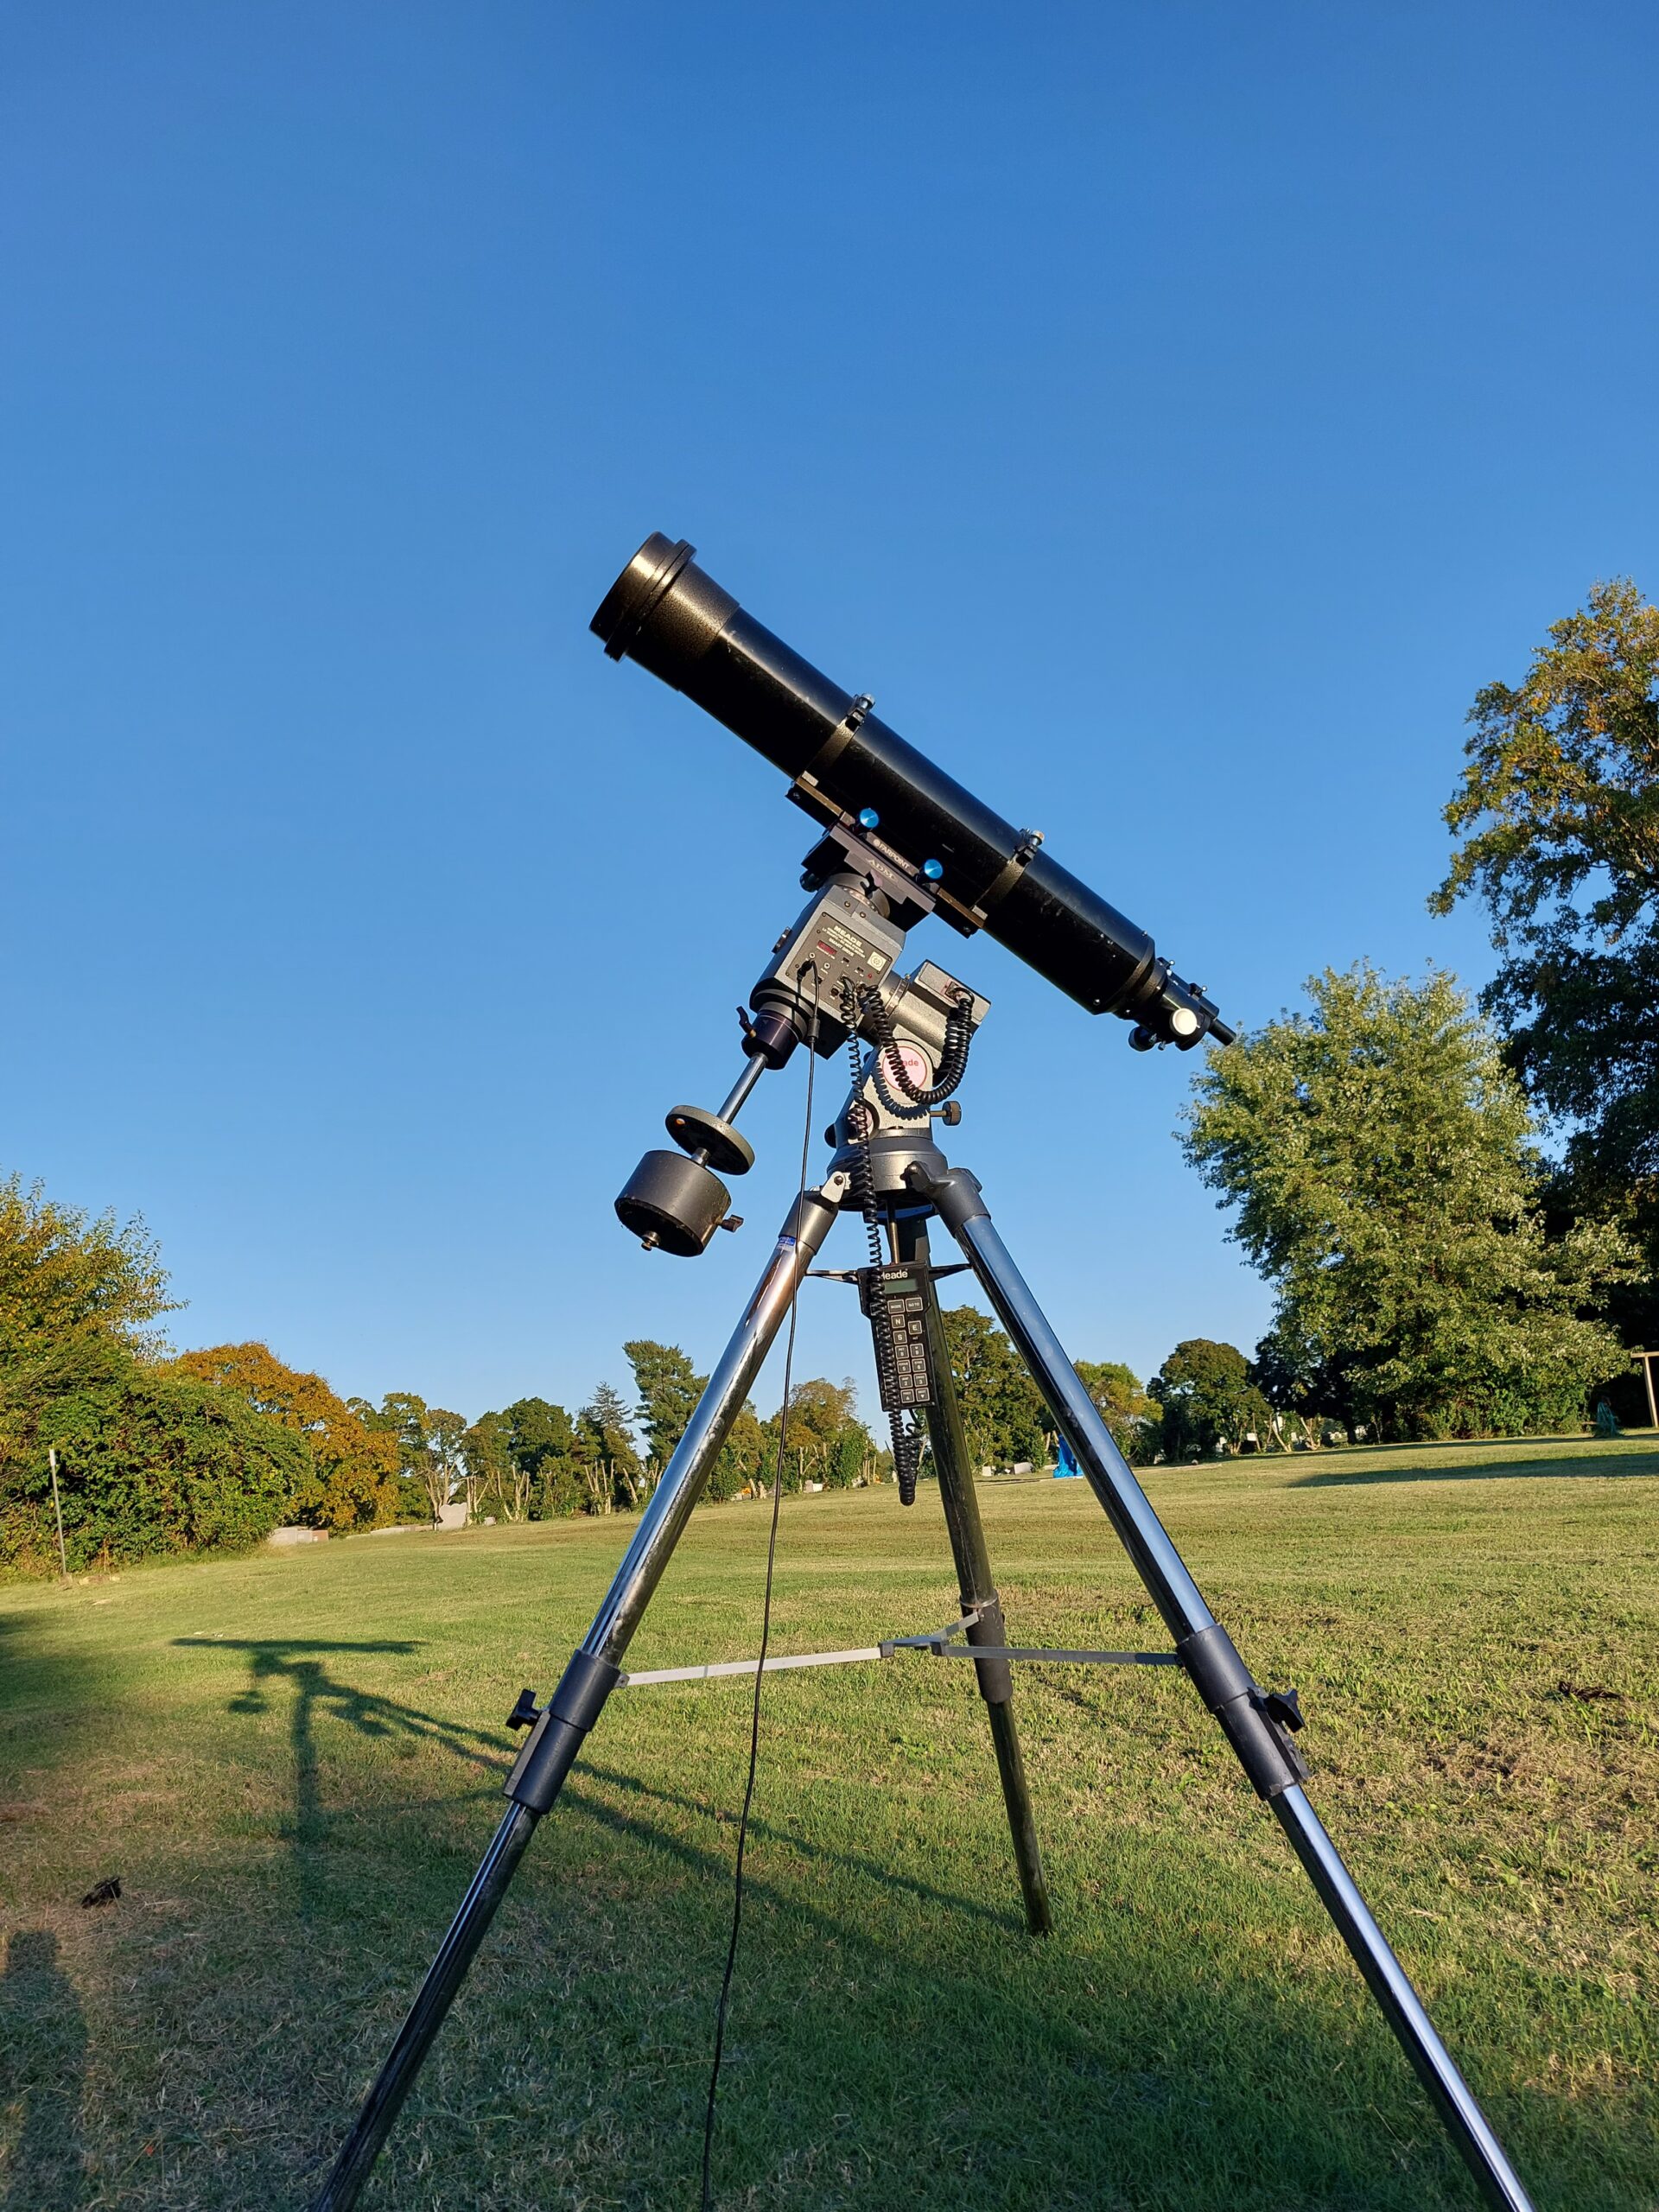
In 2008 the bug of a bigger telescope bit me hard. For years I had wanted a 6” refractor. Why? Because it was the recommended minimum size for planetary observation according to “The Association of Lunar and Planetary Observers” Mars booklet, most likely from the 1960’s. So that size refractor had been on my astronomy dream list, right below a 7” Questar or top of the line Unitron. That is until it became a reality.
After moving to New Mexico where you got clear skies around 320 nights a year, I decided to take the plunge and get a bigger telescope. My goal was to get a 10” dobsonian but that was shoved aside when I saw the ad for a used Celestron 6” achromatic refractor with a mount for 300 dollars! Almost too good to be true. After paying for it, my wife picked it up for me on a trip back to Missouri. She announced that “it was too big to take on the plane so my son would bring it out at Christmas.” When my son showed up several months later, I was helping him unload the trunk and said, “Where is the telescope.” He responded, “Oh that things a beast and it was too big for the trunk so its in the back seat.” In fact, it took up the whole back seat and barely fit between the rear doors!
Mars in 2020 taken with a ZWO120MC camera using a Minus-v and UV/IR stack of filters.
Anyone who has owned one of these scopes knows that moment. That moment when you say, “Oh My, it is bigger than I thought it was.” That moment when you realize that the mount you have will work, but not very well, for a scope of that size! The moment when you realize the optics are amazing, but the focuser is terrible! There are a lot of moments for a 6” F/8 optical tube!
In the 1990’s, Celestron and Meade began importing large Chinese manufactured refractors. When you read reviews, the consensus is that the optics are really good but like so many low-cost scopes, the mount leaves a lot to be desired. They were also known to have false color in the views because of the short focal length. However, just about every reviewer finished that statement with “but not as much as would be expected for such a short focal length refractor.”
My Celestron (CR-6) 6” came with an Orion Astroview Pro mount. This mount was seriously not heavy enough for “The Beast.” If you put a weight on the tripod and were careful not to touch anything you could make it work. In fact, my first astro-imaging was done with this mount and a SBIG ST-7E camera. Photometry of a 15th magnitude star no less! The heavy camera made the scope less stable and more prone to vibration, but you could still use it with some care.
How were the optics? Fantastic! The scope was pretty much on par with an 8” reflector or Schmidt-Cassegrain visually. Stars were really amazing to look at, especially with a 2” eyepiece. They were pinpoints of light, often with their intrinsic color easily noticed. There was false color (chromatic aberration) but none of it showed on the surface of the planets or around any stars but the brightest.
Mars showed a lot of detail with just a light fringing of color around its outside edge. Venus showed more violet edging but again outside the image. The moon was amazing, especially when you put in a 4 to 6 mm eyepiece and really gazed at the detail. I eventually found that a Minus-V filter attenuated the color in visual and a Minus-V, UV/IR stack got rid of most of the color in imaging.
A few years ago, I stumbled on a Meade LXD650/600 mount. This series of mounts were the first Goto mounts commercially available and were made for 4-7 inch refractors. The LXD600/650 held the smaller tubes and the LXD750 held the larger ones. The only difference between the 600 and 650 was the 650 was 19 volts and the 600 was 12 volts. So, the LXD600 became my mount of choice for “The Beast.”
Since then, I acquired a Celestron CGE mount. This class of mount is really the first I have used that holds the 6” rock steady. With a 70 pound payload capacity it holds the long tube of the CR-6 vibration free. You could easily use the 6” F/8 to image deep sky objects and not just the planets.
Jupiter taken with the CR-6, LXD600 mount and ZWO120 MC camera.
Recently I was doing maintenance on the SC that usually rides on the CGE so I mounted the 6.” What an amazing experience. Using a 2” 36mm eyepiece I cruised around the winter sky doing some astro tourism. I could see the trapezium easily in M 42 and when you put in a 10mm eyepiece could see 6 stars. I could not see the Horsehead nebula but that is not surprising in a small town near Kansas City, MO. The Pleaides were amazing actually showing a little nebulosity with the 36mm eyepiece. M 1 was impressive for this diameter telescope. It is hard to beat the clarity of a refractor, even with the inherent chromatic aberration.
If you own one of these “beasts” here are some tips to make it more useful. Use a Minus-V filter for visual. Stack a Minus-V with a UV/IR for imaging. A Losmandy style D dovetail is more stable than a Vixen style dovetail for this long a refractor. It seems that the wider base makes it much less prone to vibration. Make sure your mount has tight nuts and bolts and that you can add a substantial weight to the tripod. You can also bungee cord the telescope tube to the weights. This helps to dampen vibrations as well.
The stock focusers on these imports work ok for visual but really need to be replaced for heavier eyepieces or cameras. Plus the black glue that they call grease needs to be removed. This “glue” removal goes a long way towards smoothing out the stack focuser. Early on I bought a GSO dual speed focuser. This addition has made the OTA into a real powerhouse for imaging or visual. Before the upgrade I would tape the focusing tube so it would not shift when it moved to a new target! Now it just works and works well!
The LXD600 mount with a Losmandy D and Vixen dovetail adapters added.
If you are contemplating buying your own “Beast” make sure you remember the good points and bad points about ownership. There is just something special about using a 6” refractor but it also can be a challenge as well. These things are big, unwieldy tubes that are hard to mount and use. Make sure you have enough mount to keep the frustration level low! As for me, I expect to have this telescope until I can no longer lift it up onto its mount. Then I will weep farewell as the new owner drives off with it sticking out of the side window of their mini car!
Well maybe not Nobel prize groundbreaking, but groundbreaking nonetheless.
In 2008/2009 I purchased a used SAC 7 camera. This was a modified webcam with a teensy tiny sensor. It was cooled and you could shoot FITS format images with it as well as movies. The big issue was the fact that it was a color webcam.
Now you might be saying to yourself…”Color sounds good to me.” But you would be wrong! To get color you have to put mini filters over 1/3 of the pixels on the chip. Each third is a different color. Then a mini-computer puts them together to form a color image. Why is this bad?
If you think about it, that means each color loses 2/3 of the other pixels, reducing resolution, and increasing the exposure time over a monochrome sensor. You also have no control over the spectral characteristics of each filter. Each actual photometric filter (these are used to calculate the magnitudes of stars) have very narrow spectral features to make magnitude calculation easier. So a monochrome camera with a filter beats a color camera in photometry just about anytime.
Ever since I was a kid I wanted to be an astronomer and here I was with a telescope and camera but no filter. So an email to Arne Henden at the Naval Observatory solved the issue. He said “why not extract the colors separately and use the Green filter to do photometry with your SAC-7.” So this I set out to do.
The attached paper outlines the procedure. In fact you can do this with any DSLR, point and shoot or even your cell phone! Since the photometric filters are so expensive and hard to come by, this is a pretty good way to get into science imaging at the bargain basement level. There is a manual that was written for DSLR but can be used for any color camera. Here is the link. https://www.aavso.org/sites/default/files/publications_files/dslr_manual/AAVSO_DSLR_Observing_Manual_V1-4.pdf
So where does the groundbreaking come in? It turns out this may have been the first magnitude observation done with a color CCD webcam! At the time it generated a lot of interest at the AAVSO headquarters because it could provide a new avenue for amateurs to cheaply contribute to science. There was a professor from a university that also presented a paper on using color cameras for photometry but no actual data. Seems like I was first.
Today this technique is used all the time by amateurs. It eliminates the need to purchase a lot of expensive equipment. Photometry can literally be done with a tripod, DSLR, Cell phone or Mirrorless camera. This allows almost everyone to become a “Citizen Scientist” and make a real contribution to science!
“The Beast” on the LXD600 mount with original 2.xx version hand control.
In June 2021 I drove to Phoenix to see my mom. On the way home I went through Tucson heading to Southern New Mexico to visit my son. On a whim I set the GPS to take me to Stellarvison Astronomy shop. Bad idea. When I got there I asked Frank Lopez, the owner, if he had any LXD750 mounts. He said without batting an eye “Yes three of them.” He also had several LXD650’s and even a few LXD600. This series of mounts are up to30 years old, not an expected find even in a used telescope store!
The mounts were Specifically developed for Meade’s lineup of ED refractors in the 1990’s. It’s very difficult to find information online about these scopes and mounts. Much of the information you do find is very negative. The 7″ ED refractor that uses the LXD750 mount and tripod had a lot of issues and often had to be returned to the manufacturer. This obviously did not set well with customers. However, the mounts were some of the first to use “Goto” technology. They are set up to be similar to the feel of a professional observatory of that day. Big thick “paddle” controllers and lots of numbers to input. The optical tubes are also some of the first commercial “Extra Dispersion” glass color corrected refractors and had the usual teething issues of new products.
So why in the world did I want an LXD750 mount?
Size and cost, that’s why! Years ago I bought a used Celestron 6″ F/8 refractor (the “Beast” in a parody of David Levy naming his telescopes) and I needed something that could handle it. The first mount used for the 6″ actually came with the scope when I got it. It was an old Orion Skyview Pro with a dual axis drive. It worked, but not well. You could get a 45 second, unguided image if your polar alignment was good, the wind wasn’t blowing, you didn’t touch it and a large truck did not pass by! Then only every other image would have round stars!
After a few months a Celestron ASGT mount was purchased but still not sturdy enough for all conditions. However, with a lot of patience I did get a pretty good image of M 57 with the Celestron ASGT. After a freak 120 mph windstorm demolished the ASGT mount I purchased a used Orion Sirius mount. This was better but it still was not made for a refractor this long. It was not the weight but the long “lever” action of the 1200mm focal length tube that made these mounts unsuitable.
M 57 with the 6″ F/8 achromatic refractor using a Johnson-Cousins V photometric filter and a SBIG ST-7E CCD camera.
The Celestron 6″ F/8 achromatic refractor mounted on a Celestron ASGT at the City of Rocks north of Deming, NM.
Because the LXD mounts are so old the prices are usually pretty low, as well as being massive. A new similar weight mount can cost 5000 dollars and up, and that’s for the low end of the price scale. Plus the mounts can hold a lot of weight, somewhere around 100 pounds. The 7″ refractor was big around, long and heavy. You needed a substantial mount just to use it visually, much less for imaging.
The motor drives are odd on this series of mounts. They are essentially a “slot car” motor geared down to drive the mount. They actually run over 10,000 rpm but by gearing them down, have pretty good torque. This contrasts to the mount itself which uses heavy metal and even steel bearings on the shafts. No plastic here! If Meade would have made the drives as robust as the mechanical part of the mounts they would still be a mount of choice to this day. However, if the drives ever die I plan on using the mount without them and it will still handle a large telescope well.
Unfortunately, I had a problem in buying the 750. Being on vacation and not having planed on buying a large mount, I had not left room in my car for something this large. So I settled for the next best thing, an LXD650. This is a scaled down version but with an effective weight limit of around 50 pounds. Most forums say it only holds about 30 pounds but those who have used one for years say 40-50 pounds. Especially if it is a shorter tube than a refractor.
When I got home I promptly blew out a capacitor, since it was a 19 volt power supply. The stock capacitors couldn’t take my ham handed bumbling. Frank at Stellarvison, was gracious enough to let me send it back and then replaced it with the LXD600 which is the same as the 650 but uses a safer 12 volts instead. The higher voltage was added to the 650/750 models (without any electronic changes by the way) to facilitate a faster slew speed. This created an issue with the capacitors blowing out and sometimes taking a ribbon cable or board out with it. I am not in that big of a hurry!
So how does this antiquated piece of technology work?
Quite well actually! Like a lot of these older mounts it has it’s quirks and oddities that you have to work around. All first generation telescopes have these problems. If you don’t believe it, read “The Perfect Machine” about the Palomar telescope. An engineer discoved a fish weight scale in the mirror structure after many years of operation and removed it thinking it shouldn’t be there. Turns out when it was removed the mirror image went bad until they put it back in. After a few generations and lots of observer feedback, these type of “kludge” fixes are no longer needed in new telescopes. But until then you just come up with work arounds.
The LXD600 sat in my garage over the winter. I had used it for some planet and moon images in the fall of 2021 but really did not do more than set it up and take pictures through the 6″. The reason for this was the cold as well as recovering from a serious heart condition. It was difficult in the fall of 2021 to get the energy to do more than just uncover and run my actual science imaging set up, much less polar align, use the antiquated star numbering system, learn the quirks and heave the 6″ onto the mount.
It is “common knowledge” that you can’t take good color images through a short focal ratio achromatic telescope (F/5-F/10). Obviously, this is false. Using a Celestron Minus V filter stacked with a IR/UV cutoff filter eliminates most ( but not all) the effects of Chromatic Aberration with a camera. What remains is easy to deal with. I use Lightroom but there are numerous other software that will do the job. The Celestron Minus V filter, which is a rebranded Baader filter, has a significant light leak in the infrared which can degrade pictures. Adding the UV/IR filter stops this leak and gives an image with less false color. However if you don’t mind a little purple fringing the colors on the disk are terrific without a filter at all!
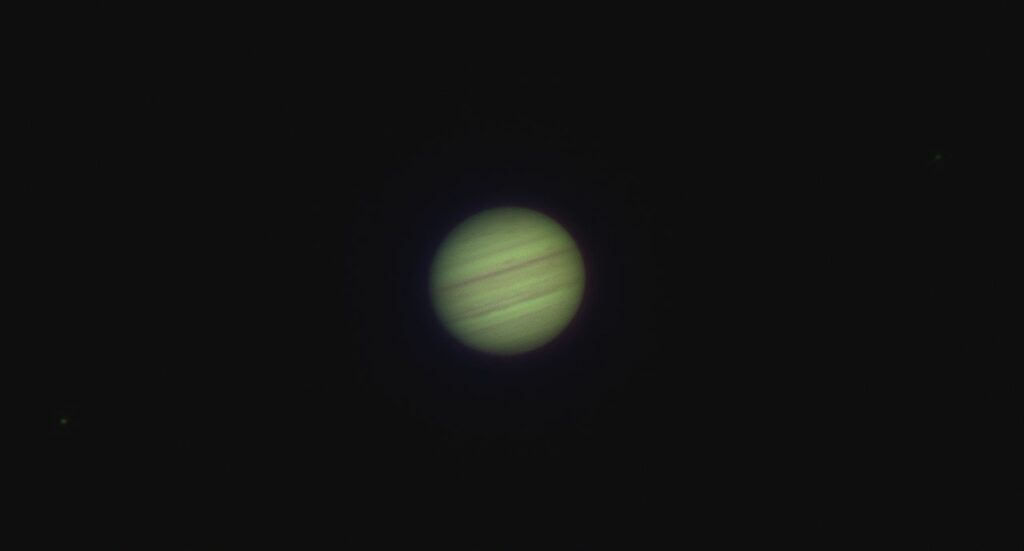
Jupiter taken through the Celestron 6″ with a ZWO 120 MC camera.
Here is an image of Mars in the fall 2020 taken with the 6″ mounted on a Meade LXD-75.
Last month an Ebay a dealer listed a pair of EPROM chips for sale for the LXD600/650/750. For 25 dollars delievered I thought it was worth taking a chance that these were some of the long sought after, seldom found, chip upgrade sets for these mounts. Meade’s early versions (ver2.xx) had a 780 object database and limited menu options. The version 3.xx and above chips had 64,000 objects and a much more productive menu. Meade made a few of these upgrade kits but finding one is rare. Since I had the old 2.xx version I was excited to try out this upgrade.
The biggest issue was that the old v2 Handset was not compatible with the v3 chipset. So after the chips came in they were installed in the old board. The boards had obviously been made for this new chip but the version 2 chips had 4 less pins. Not sure why they would put in smaller EPROMs but they did. After installation of the new chips the motors initalized but the handset never “shook hands.”
Clearline Technology provides a new updated replacement handset for 150 dollars. This replaces the old handset with a brand new contoller with capacitors that can handle the extra voltage of 19 volts, though it still works fine for the 12 volt systems. Clearline promptly sent out the handset and when it came in, it was of course sprinkling outside. Eager to see if this upgrade worked I went outside, raised the tarp cover enough to plug in the handset. After powering up the mount it didn’t work! I went in and sent off an email telling Clearline that the handset would be sent back. After the sun came out I went outside to bring in the mount head to replace the old chips on the board and saw that the RA cord was not plugged in. So I plugged in the RA cord and then the handset, powered it up, and it worked great. Now the handset reads Version 7.2! Success, it is a miracle!
The Clearline Technology Handset.
The alignment system is a bit kludgy. To align the scope you have to set the scope in home position, then use the HC to move the RA to 90″ east of where home position is. There is a 2nd mark to indicate when it is in the correct position. If you don’t follow this exact procedure, the optical tube will hit, the tripod. When you press enter and begin the align, the tube will move to where polaris should be. You then use the manual adjustments to center polaris in camera or eyepiece then hit enter again. It will take you to a bright star where you use the handset to center it, then hit enter again. This brings you back to the Telescope and object menus. To get a fair polar alignment you need to do this process multiple times at least 15 minutes apart. Once you get it polar aligned, experienced users have said that you just don’t bother to center Polaris in the center of the field of view and just click enter to go to the next star to align.
Sometimes you press enter and nothing happens. The hand control is fairly sensitive and a long push or too short of push will not work. You have to at times, press enter multiple times before it responds. Not sure why, but these are some of the quirks refered to above. The clutch knobs also need to be tightened good or the scope slips. This is easy to overlook.
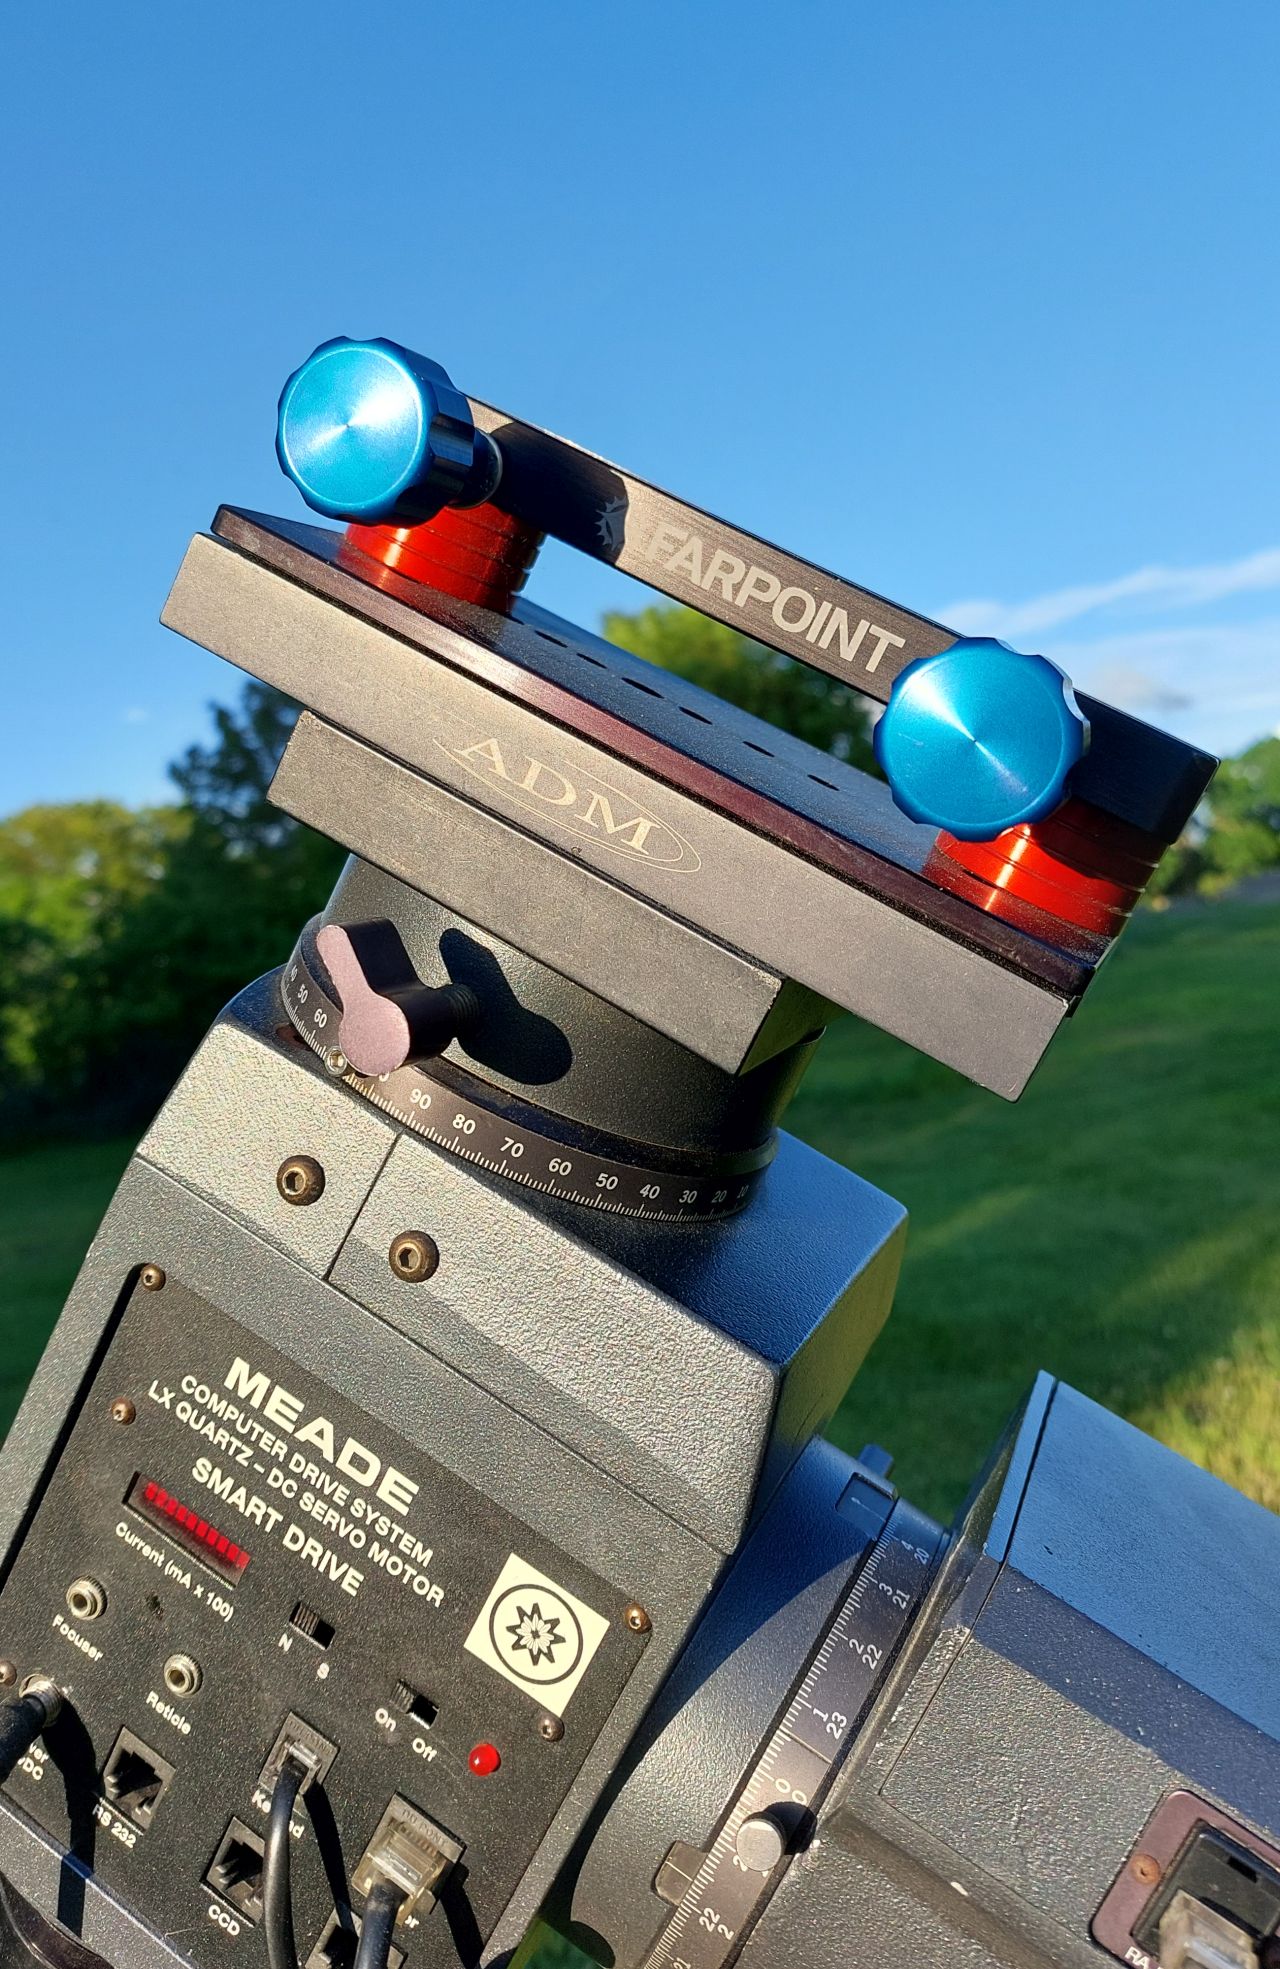
One of the other quirks is that the original setup used a built in cradle for each size refractor in the Meade lineup. So you have to buy 2 adaptors to use a common dovetail of today. Mine came with a Farpoint adapter on an ADM assembly that works very well for the standard Vixen style dovetail. However, the ADM assembly that holds the adapter was actually a little loose and caused the adapter to be “off” a little when you goto an object. When that was tightened down it became much more accurate on the slews and centering.
The Farpoint and ADM adapters.
The # 1697 Manual, part 1&2, will be your best friend! This is the name of the goto system that was added during or after purchase. The mounts orignally came without the goto feature and had to be added to the early models. It was easy to install and most mounts today have this system. I suspect if you were going to spend all the money you had to spend for the telescope and mount you might as well spend a bit more and get it with the goto feature. The stars and objects in the #1697 system are given numbers that you enter in the the appropriate menu. Messier objects use their regular numbering but the stars have 3 digit numbers that you have to memorize or look up in the manual.
There is a “CCD port” on the mount that uses a standard ST-4 cable though you can pulseguide with a modern ASCOM driver. PHD2 guides it quite well but you have to have the ST-4 cable in place for it to pulse guide. The manual gives you instructions on making your own cord which tells you this was a pioneer feature of the mount. This is just another quirk of the system.
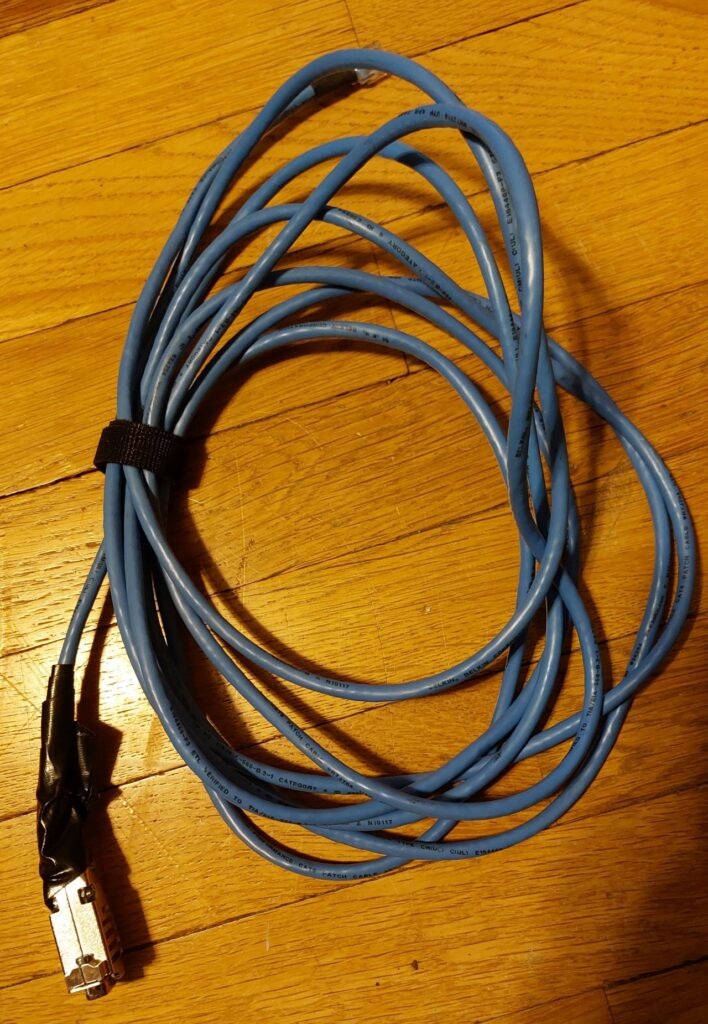
There is also a RS232 port that uses the Meade 507 or LX200 Classic cable. Unfortunately, the one that I originally bought for this scope got trashed when I stepped on it one night testing it. Before this accident it was driving the mount through TheSky 6 Pro, so this means it should run under other planetarium programs. There are several drivers that you can get on the ASCOM website.
I recieved another equivalent Meade 507 cable from Ebay for 20 dollars delivered. This time I am reinforcing the serial cable end with permanent “Gorilla Glue” brand Duct tape. The telescope end is already reinforced. It is just too easy to step on a cable in the middle of the night and tear a wire loose!
Generic Meade 507 cable with Gorilla Tape.
When the mount was purchased it came with one weight. For all but the 6″ refractor it is all you need since the shaft is extra long. For the “Beast” you need slightly more weight, especially with a camera attached. Problem is, the shaft is an inch in diameter which is wider than all my other weights. When I found a weight that would fit, it cost too much.
So I made one! Using a 2.5 and 5 pound weight I bought 1.25″ shaft collars from Grainger and superglued it to the weight. In the first efforts to do this the glue would hold for a week or so then it would come off. The trick is to use alcohol to wipe off the dirt and grease on both surfaces before applying glue. I used a hammer on the shaft collar and it would not come off the weight. Also replaced the set screw with a slightly longer one. In the future I plan on using Alum Bond, especially for a heavier weight. Alum Bond advertises a holding power of 25,000 pounds and it seems to work well with metals. It fixed the broken spreader plate and it is now stronger than what it was before it broke.
Walmart weight with a Grainger shaft collar.
For the money this is quite a mount. It holds the 6″ refractor steady and points accurately. Spent an hour or two in totally wretched conditions the other night going to different deep sky objects with the 6″ telescope. Even with the marginal conditions and 10+ mph winds it held the scope steady and slewed to the target in a wide field eyepiece. Users report that if you fix the cone error mechanically the LXD mounts are quite accurate. With the Smart Drive feature you can correct for irregularities in guiding (PEC).
My plan is to use T-Point under TheSky 6 to correct for cone error and an auto guider for imaging. The 6″ refractor will be used primarily for planets but will occasionally be used for deep sky work. Recently I purchased a 6″ TPO Ritchey-Chretien optical tube. The “Mini-Beast” will be placed on this mount to finish a study of the Central Stars of Planetary Nebula study. It is also fun to use a Orion ST-80 to deep sky image with the mount. Defintitely a case of mount overkill!
Orion ST80 refractor (F/5), no filters, NEX-3N camera.
Overall the LXD600 is a suitable chariot for the the “Beast!”
TPO 6″ RC on the Orion Sirius mount. Not the “low cost” strapping and C-clamp for a counterweight.
Recently I purchased a used TPO 6″ f/9 Ritchey Chretien optical tube. What has been surprising is the lack of reviews or any other information on this TPO branded RC. In fact, there is very little at all on 6″ RCs or RCs in general. TPO doesn’t have an instruction manual, so you have to use the one for Astronomics or Orion.
The first thing that I noticed was that the TPO back focus is not the same as Orion or Astronomics. It comes with 2 one-inch rings and 1 two-inch ring that attaches between the optical tube and focuser. If you use a diagonal and eyepiece, you can’t use any rings at all and my Sony NEX-3N camera only uses a one inch ring. Turns out the ATIK 414EX camera that will normally be used needs one and a half inch rings. The Orion instruction manual lists a much different setup for using the visual and camera modes.
The other thing that surprised me was how easy it was to collimate. Several years ago, I struggled with an 8″ F/4 Newtonian that never got completely collimated. Then I broke a corrector plate on my 8″ trying to shim the corrector perpendicular to the (custom) graphite tube. Being dyslexic, collimating is not my favorite thing to do! However, it took me less than a half hour to get this scope spot on!
Being able to reach around and tweak the Allen screws while looking through the Cheshire eyepiece made it a quicker process. Though I suspect that most buyers would opt for an 8″ scope there are definite size and weight advantages of a 6″ vs 8″ or bigger and this is one of them. Somehow the process seemed much more intuitive than my other experiences. What few reviews you can find often talk about the difficulties of collimating these kinds of scopes. I did not have any of those issues and it had to be collimated a second time after a car ride.
Another oft stated remark is that you will be “disappointed looking through one of these visually.” My experience was just the opposite! The view blew me away. Clear, crisp, very sharp views really dazzled me. First light visually was Sirius, and it was quite stunning. Though I don’t think this would be my first choice for a visual scope it was much much better than advertised.
Because of the mirror, focuser and camera being on the back of the tube, weight needed to be added to the front. So, I used two pieces of strapping metal and a heavy C Clamp to hold them onto the dovetail. Worked great and the tube balanced very well. Having a “beautiful” scope is not as important to me as making it work well so a C Clamp holding on weights works well.
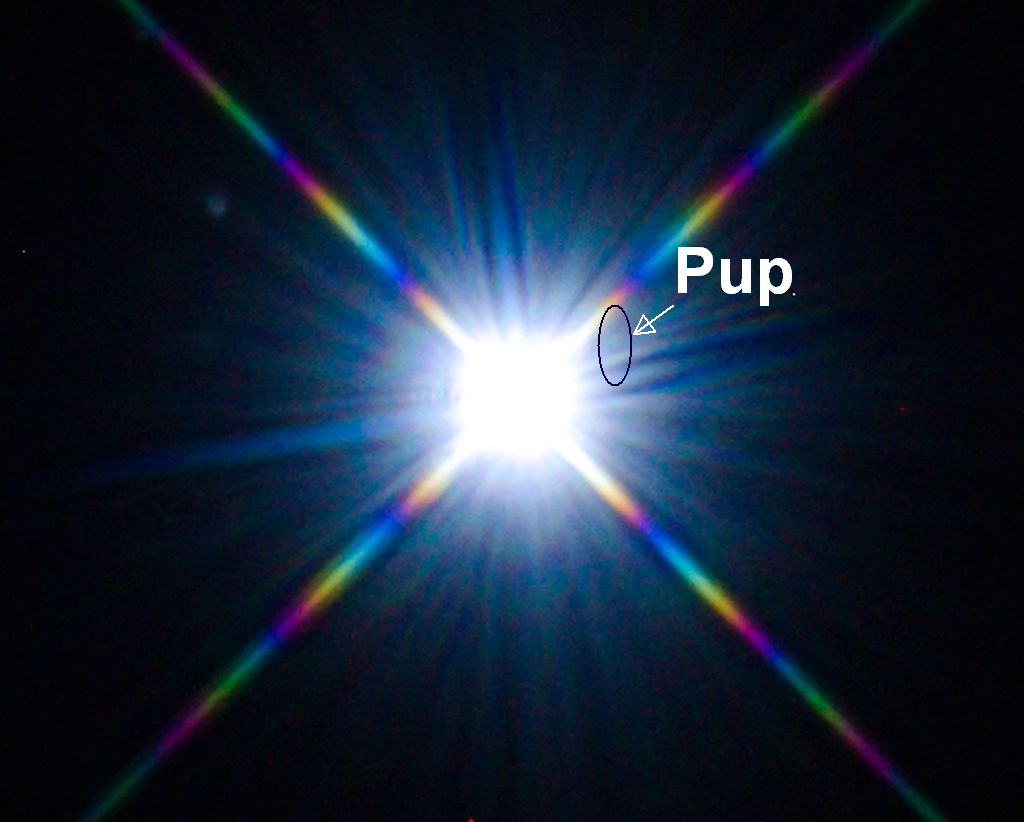
The image below is “first light” with a camera. In this 30 second image, the dimmer stars are a bit out of focus, but the collimation is good and the star Sirius striking.
First light: Sirius with the TPO 6″ RC and a Sony NEX-3N mirrorless camera on a Meade LXD-75 mount.
In this reduced image it is hard to see “the Pup” but it is there. This alone shows the quality of the scope.
Disaster?
After transporting the scope home from where the first light images were taken the collimation was way off…I mean way off! So I collimated it again which only took a couple of minutes. Then it was carried down the steps from my upstairs office and put on the mount. One last check revealed that it was way out of collimation again! So after messing with it for an hour I took it back inside and promptly stripped 2 collimation screws on the secondary.
My first thought was I must really be frustrated. Then logic took over. Just thinking about the design would say that it should not get out of line so quickly if it was all working correctly. My conclusion after testing the remaining screw with the hex wrench was that the other two screws were already cross threaded and probably not seating correctly on the secondary.
So after taking the secondary assembly off of the scope and removing the secondary mirror from the assembley it was time to figure out what to do. I ordered a 5 mm heli-coil kit from Amazon. It came the next day. I drilled out the 2 bad screw holes and inserted the heli-coils. Since the coils were longer than the holes I used a dremel cutter to trim the excess. This took 5 minutes! It took me longer to figure out where my dremel tool was than to fix the issue.
Worked perfectly. Not longer do you have to use brute force to move the adjustment screws. It took about 30 minutes to attach the secondary mirror back to the assembly and put the assembly back on the tube. The screws that came from the stripped holes had aluminium on them so it was easy to pre-adjust them to where they were when they stripped. This allowed me to adjust the secondary back to where it was before it had to be removed. Saved a lot of time fiddling with getting the right spacing on the secondary.
In another 30 minutes it was collimated. So I did something that I should not have done! I picked up the tube and shook it as hard as I could. It was still collimated! Success on this repair!
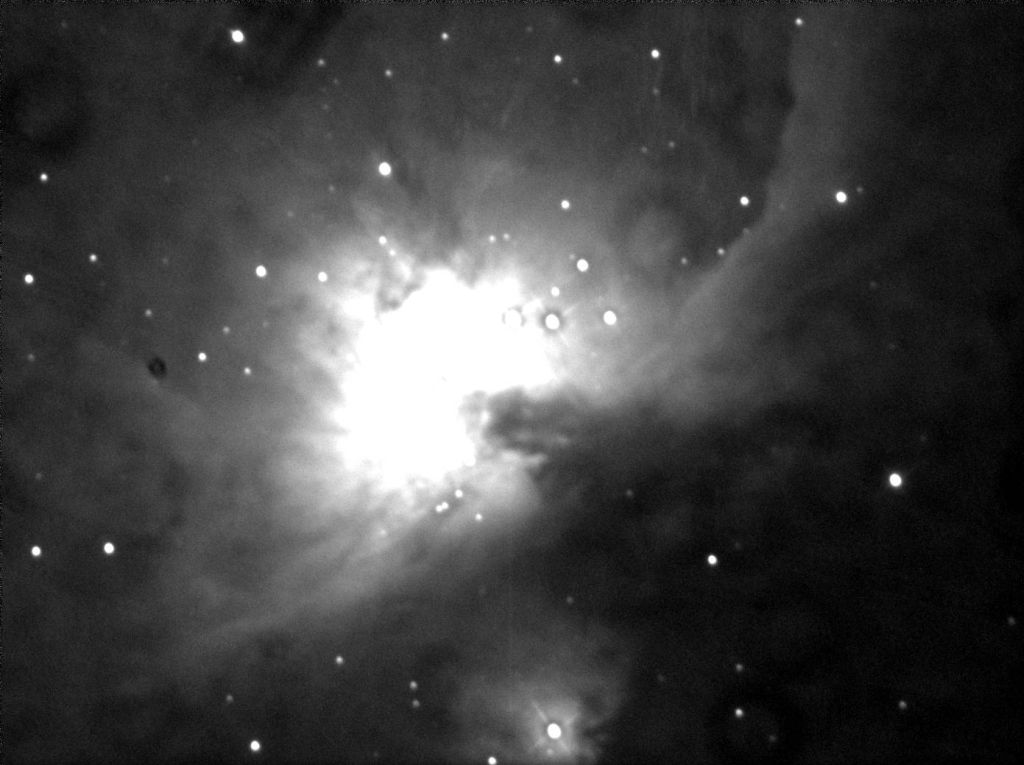
The next clear night ( or what passes for clear in the midwest United States in April) I set it up again, spaced out the ATIK 414 EX camera correctly and shot images of M 42. There were high clouds, bright moon and no calibration frames so it is not a very good image. It did however, tell me all was well with the collimation and the problem was truly fixed.
M42 with the 6″ TPO RC, ATIK 414 EX ccd camera and the orion Sirius Mount controlled with EQASCOM. A 60 mm guidescope with a ZWO 120 MM camera was used with PHD2 multi star tracking. 20×60 second stack using a photometric V filter.
It is unfortunate that these little scopes often get a bad rap. Getting everything lined up correctly and collimated can be challenging but I suspect that most who buy one of these are not really ready for this advanced design. It is not a beginners scope. In fact the increased focal length alone makes it difficult to guide accurately and puts a lot of pressure on a mount to track well.
M 97, the Owl Nebula through the 6″ RC. There were thin clouds and this image has no flats, darks or bias frames subtracted.
I got this scope to replace my 8″ LX200 that I broke the corrector plate on. The 6″ RC was purchased primarily to do imaging of the Central Stars of Planetary Nebula. You need a longer focal length for this type of work to get a good enough signal to noise ratio on these faint CSPN. An RC design is excellent for this kind of work.
PHD2 Beta came out a while back with a spiffy new feature. It can now track up to 12 stars at the same time. It is supposed to even out the tracking errors. I wanted to test this claim against reality.
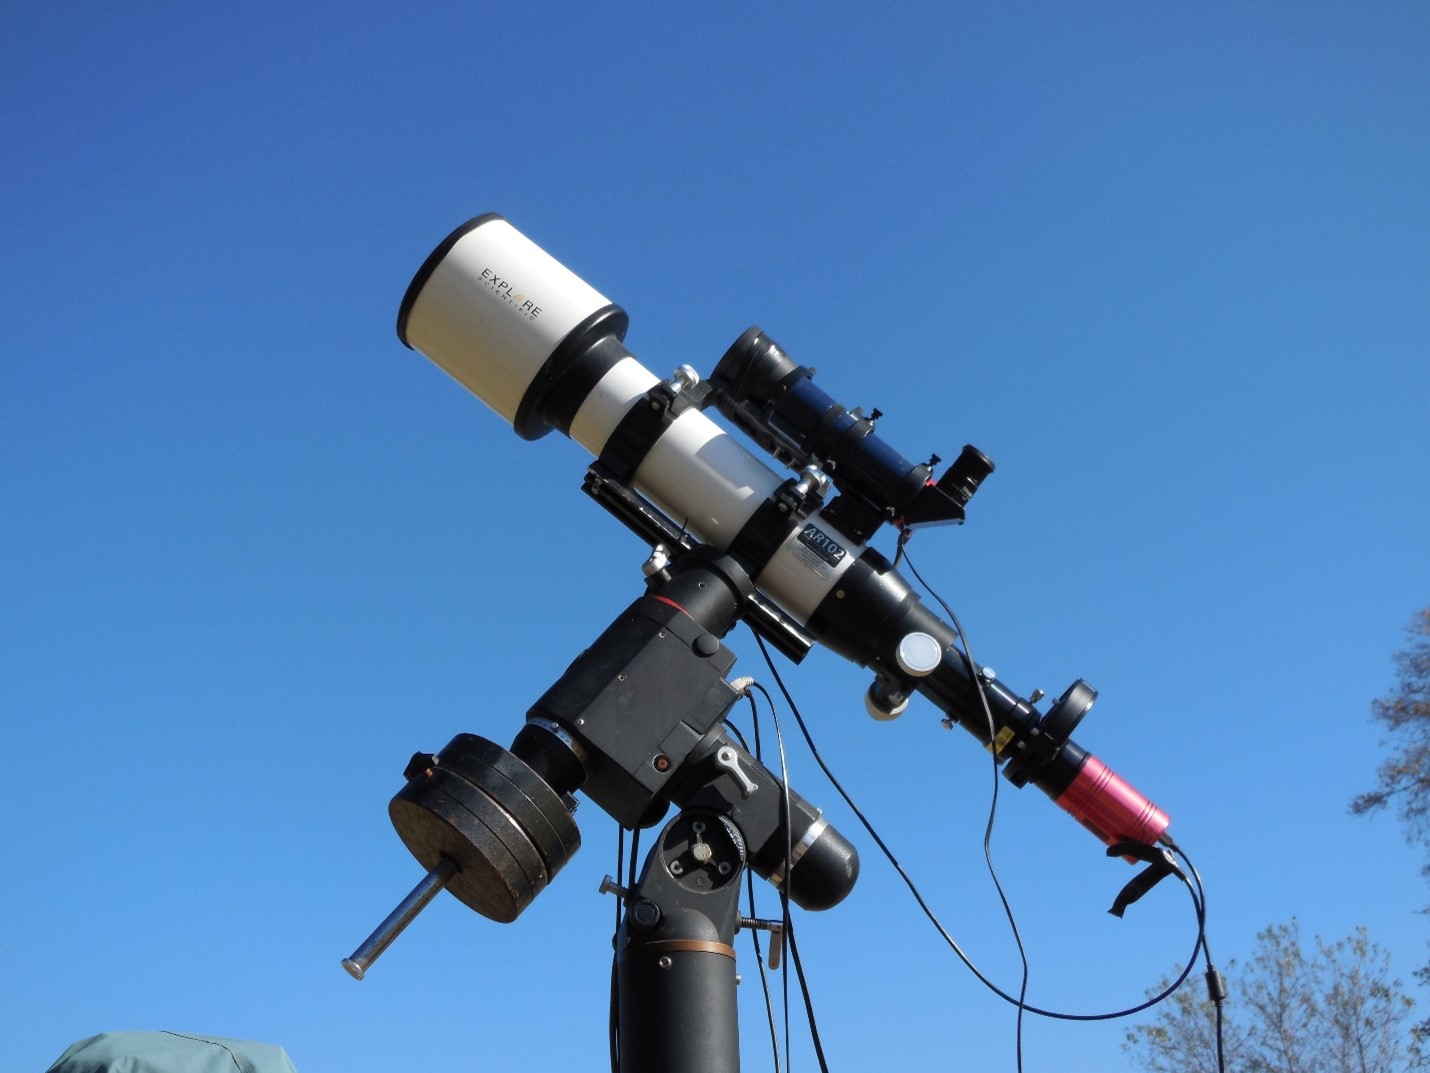
So I updated my PHD2 to the beta version and “let er rip.” The Telescope is a lowly 102 Achromatic refractor from Explore Scientific with a ATIK 414 EX CCD camera using a photometric v filter. The guidescope was made out of a 70 mm binocular objective with a cheap Ebay helical focuser glued on. The mount is an Orion Sirius mount controlled by EQASCOM.
Temple 10
The image of the Andromeda galaxy is a mosaic of two 100×60 second images and one 25×60 (shortened due to clouds) stictched together in Microsoft ICE. They were stacked in Maxim DL5 and tweaked with RawTherapee 5.8.
The PHD2 really worked well. The stars are round and the image is pretty stunning for a monochrome one with a 4″ telescope! The tracking was way better with the muiltiple targets. This version of PHD is a real winner
In June, while on a trip to Arizona I made the mistake of stopping at Stellar vision. It is like a telescope and accessory mall with a very knowledgeable owner, Frank Lopez. I was looking around and asked Frank “Do you have any Meade LXD-750’s?” “Sure” he said, I have 2 and a couple of 650’s and 600’s as well. Wow, he really had a collection. I recognized right off that the 750 was going to be to big for me to handle or even fit the tripod in my car. It is massive.
So I settled on a LXD-650. After getting it into my overstuffed car I headed home with my treasure. To make a long story short I kind of toasted the 18 volt electronics somehow. Back it went to the shop by mail and it was replaced by an LXD-600. the only difference is a 650 is 18 volts and the 600 is 12 volts. This mount was made around the early 90’s so is a bit outdated.
I bought the mount to handle my Celestron 6″ achromatic refractor. It does this very well. Tracks ok and even pulse guides. Just recently added a 60 mm guide-scope to the 6″ and will give that a shot the next clear night.
The bar that the guide scope is mounted on was made from iron stock and a drill press.
I really like the 6″ refractor. It has done some outstanding work on planets and deep sky objects. All it needed was a solid mount. It has found it in the LXD-600!
It’s alive, it’s alive… Temple 28, the 11″ Celestron CPC Schmidt-Cassegrain telescope is back working again. The North-South autoguiding function still does not work but if it is polar aligned well that won’t matter!
The big issue is the dirty mirror! Having holes for ventilation is hard on a mirror. I did not want to ruin the good collimation so I used 91% alcohol in a spray bottle to spray on the mirror through a ventilation hole and clean it off. It helped a little but didn’t clean it off like it should. so I added a drop of liquid detergent to the alcohol and that did the trick…as long as you then wash it off with distilled water. There was a streak under the focusing tube so I resprayed it with the alcohol/soap mix. Then promptly forgot to spay it with distilled water. So there is a film of dried soap on it. Now I have to do it all again when I get home from a trip.
It is good enough to plan to resurrect the scope. Have to set up a new 32 bit computer to run the SBIG ST-8E. The old parallel port camera won’t work with a 64 bit computer. However, a single core computer runs mount and camera just fine so my dual core desktop should work well. I also purchased a PCi parallel port card that has reviews showing it uploads 3x faster than a built in port. When it takes 70 seconds to upload one image this is important!
Hope to get this bad boy back up and running in the next month or so!
Mid-America Regional Astrophysics conference or MARAC met April 23-24. In the past MARAC was at KU, Linda Hall Science Library or UMKC. The meeting was canceled altogether last year and was done in Zoom this year. Zoom and the “Gathering.”
The Gathering was a game like set up where you could walk around, talk to people and look at things. Once you got used to the avatar and crude graphics it was kind of cool. I was able to meet and talk astronomy with another participant. Though doing PPT on zoom is kind of odd compared to a live experience it worked well.
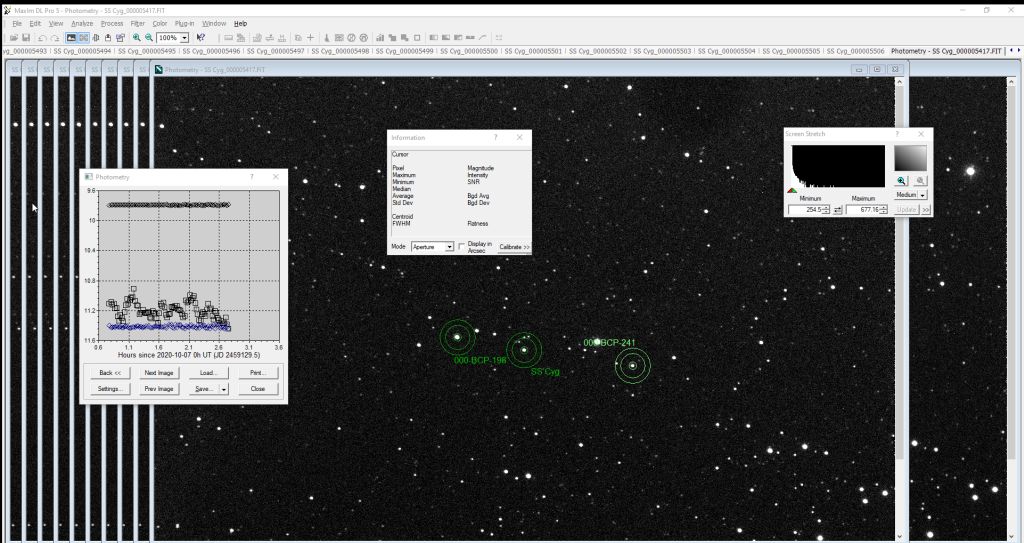
A screenshot of Maxim DL 5 photometry. Notice the flat comp stars and the definite curves of SS Cyg.
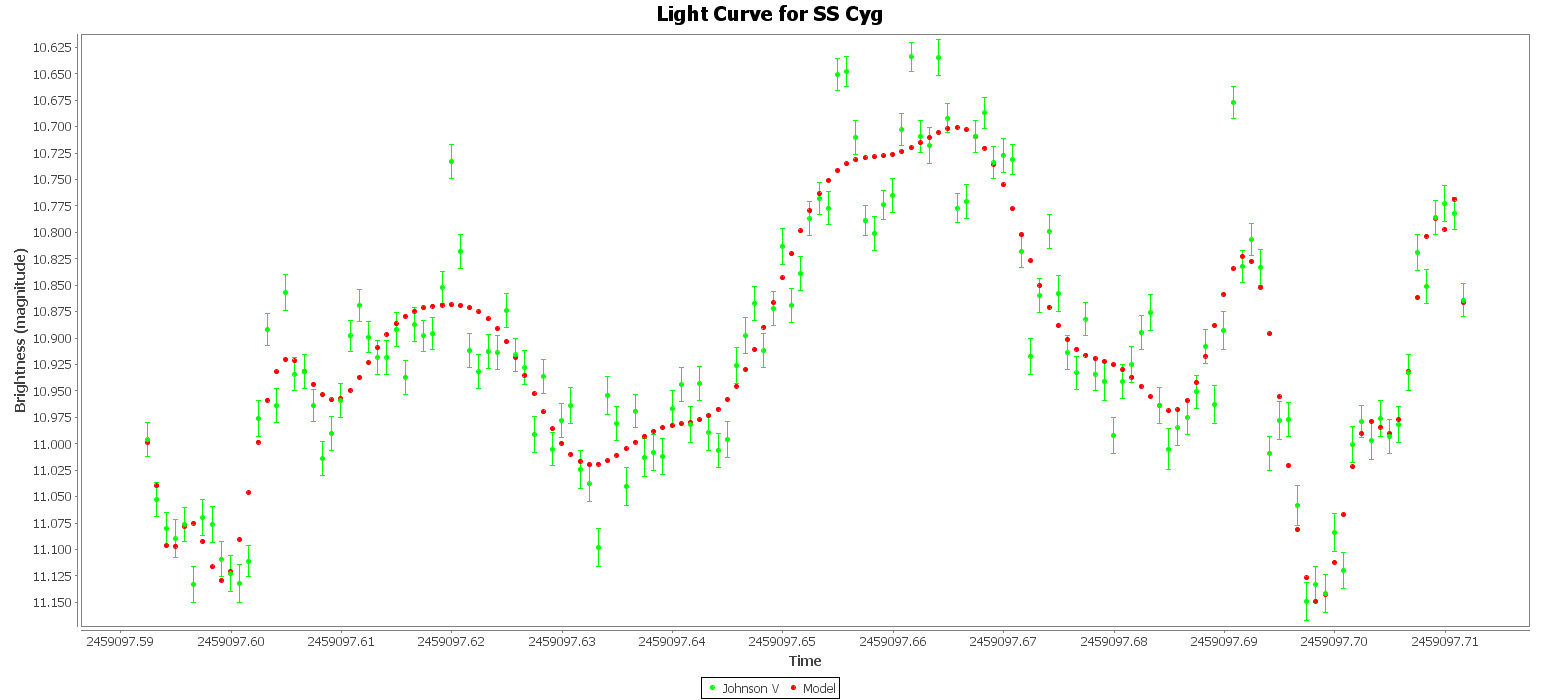
My talk was on the micro-variability of SS Cyg. The AAVSO was asked to help cover observations for a Japanese researcher who is trying to study the accretion disk around the white dwarf star. Using a 4″ refractor I was able to see very definite signs of micro- variability. This has been noted elsewhere but seemed to deserve a talk on it’s own.
I did full nights of observing using a Johnson V filter. 15 second exposure with a 45 second delay. There was also about a 7 second upload and check the guide star. Started in July and went until November.
The talk was well received and caught the attention of a nearby college. I have been invited to visit their observatory and talk about their research. Looking forward to summer and more opportunities to explore the light curve of SS Cyg.
Light curve for SS Cyg taken on September 4 2020. This is a whole nights worth of observation.