Since tomorrow starts the busiest week of the year for me I packed up last night and went in at 11:30 after the scope lost alignment for the 2nd time. Functioning on 4 hours of sleep the night before as well as a high dose of Predinsone for heat induced asthma issues did not help the motivation factor. The 11″ or Temple 28 just would not work! A 4 mph wind came up and started blowing it all over the place so thought I was still dealing with balance issues. I had hoped the ST-8 camera with it’s internal guiding chip would solve the issues that I was having with a heavy external auto-guider. When that still didn’t work I gave up and went to bed!
When the 11′ was purchased I was assured that the mount had been worked on (hypertuned) but that it all needed more work and was unfinished. That is definitely true, everything is well lubed, clean and polished internally but still needed a lot of wiring and work. I had noticed while loading it in my car, that when you bumped the scope you could hear the worm gears skitter over the main gears. Not being familiar with this type of telescope (Celestron CPC) I had no idea that this was not normal and was just a balance/design issue with these scopes in general. The CPC were primarily for visual use and I was hanging lots of heavy cameras and stuff off of it so expected some problems. I had also heard that the tension spring was not very robust and that was a flaw of the CPC series. So over the years I added weight and contraptions to try and get better balance so it would not get bumped or blown and lose alignment. Some of the time it worked some of the time it didn’t.
When I woke up this morning the decision was made that I needed to do some work related chores today and not mess with telescopes. So I got a home office wifi issue solved so I could work at home easier and decided to get busy on my office work. Only to realize I had forgotten to post the file where I could access it at home. Sooo…just couldn’t resist thinking about this problem and decided to do a little research on the CPC instead. After looking at other peoples issues It struck me that the problem seemed like a tensioner on the drive motors needed adjustment. Outside it was 105 heat index but I just had to know if that was causing the issue. After pulling off 5 cover screws and looking at the tensioner the adjustment screw was practically falling out and the tension on the worm was almost nonexistent! In fact the nut that keeps it all tight and adjusted was completely away from where it needed to be. So even if it had been adjusted once, it would not stay that way very long, especially after 3 moves in 1 year! Three minutes later…problem solved, at least on one axis. After the scope was put back together, cranked it through from side to side several times and it worked without a hitch! In fact it sounds smooth and has no slippage even if you put a little pressure on the fork. In all of the trouble shooting articles read today the importance of listening for gear noise, chatter or sounds of strain were emphasized as part of diagnosis and adjustment.
Now the adjustment is not really why I am so dumb and mad at myself…it is because I have had this telescope for three years and didn’t figure it out until now! When you have slipping gears it is no wonder it is hard to internal guide, external guide, balance or anything else! One or two images would look good then 2 bad would follow with no rhythm or reason. Drives you nuts! When I was researching the issue this morning I saw a guy in England that had an CPC with an oversize finder, 102 mm triplet telescope attached, 2 cameras plus the main 8″ scope. I was having trouble with just a camera and OTA! That’s when I knew I was a total moron! His issue was the nylon clutch but in the course of replacing the clutch there was a description of how to adjust the tension. In fact, to make it worse, I know how my LX200 looks internally with a similar design and it has no slippage issues at all! So why didn’t I think there was something wrong with the RA gear from day one?
However, there are two axis on a scope. So after 1 hour, 20 dollars in tools, contortions to take off 6 torx screws to get to the drive unit and a bit of dehydration, (real temp 104 and “feels like temp 117”) the declination is now adjusted as well. So now I am all set to have a productive night tonight…Not. Severe thunderstorm warning until 1 AM and cloudy all week.
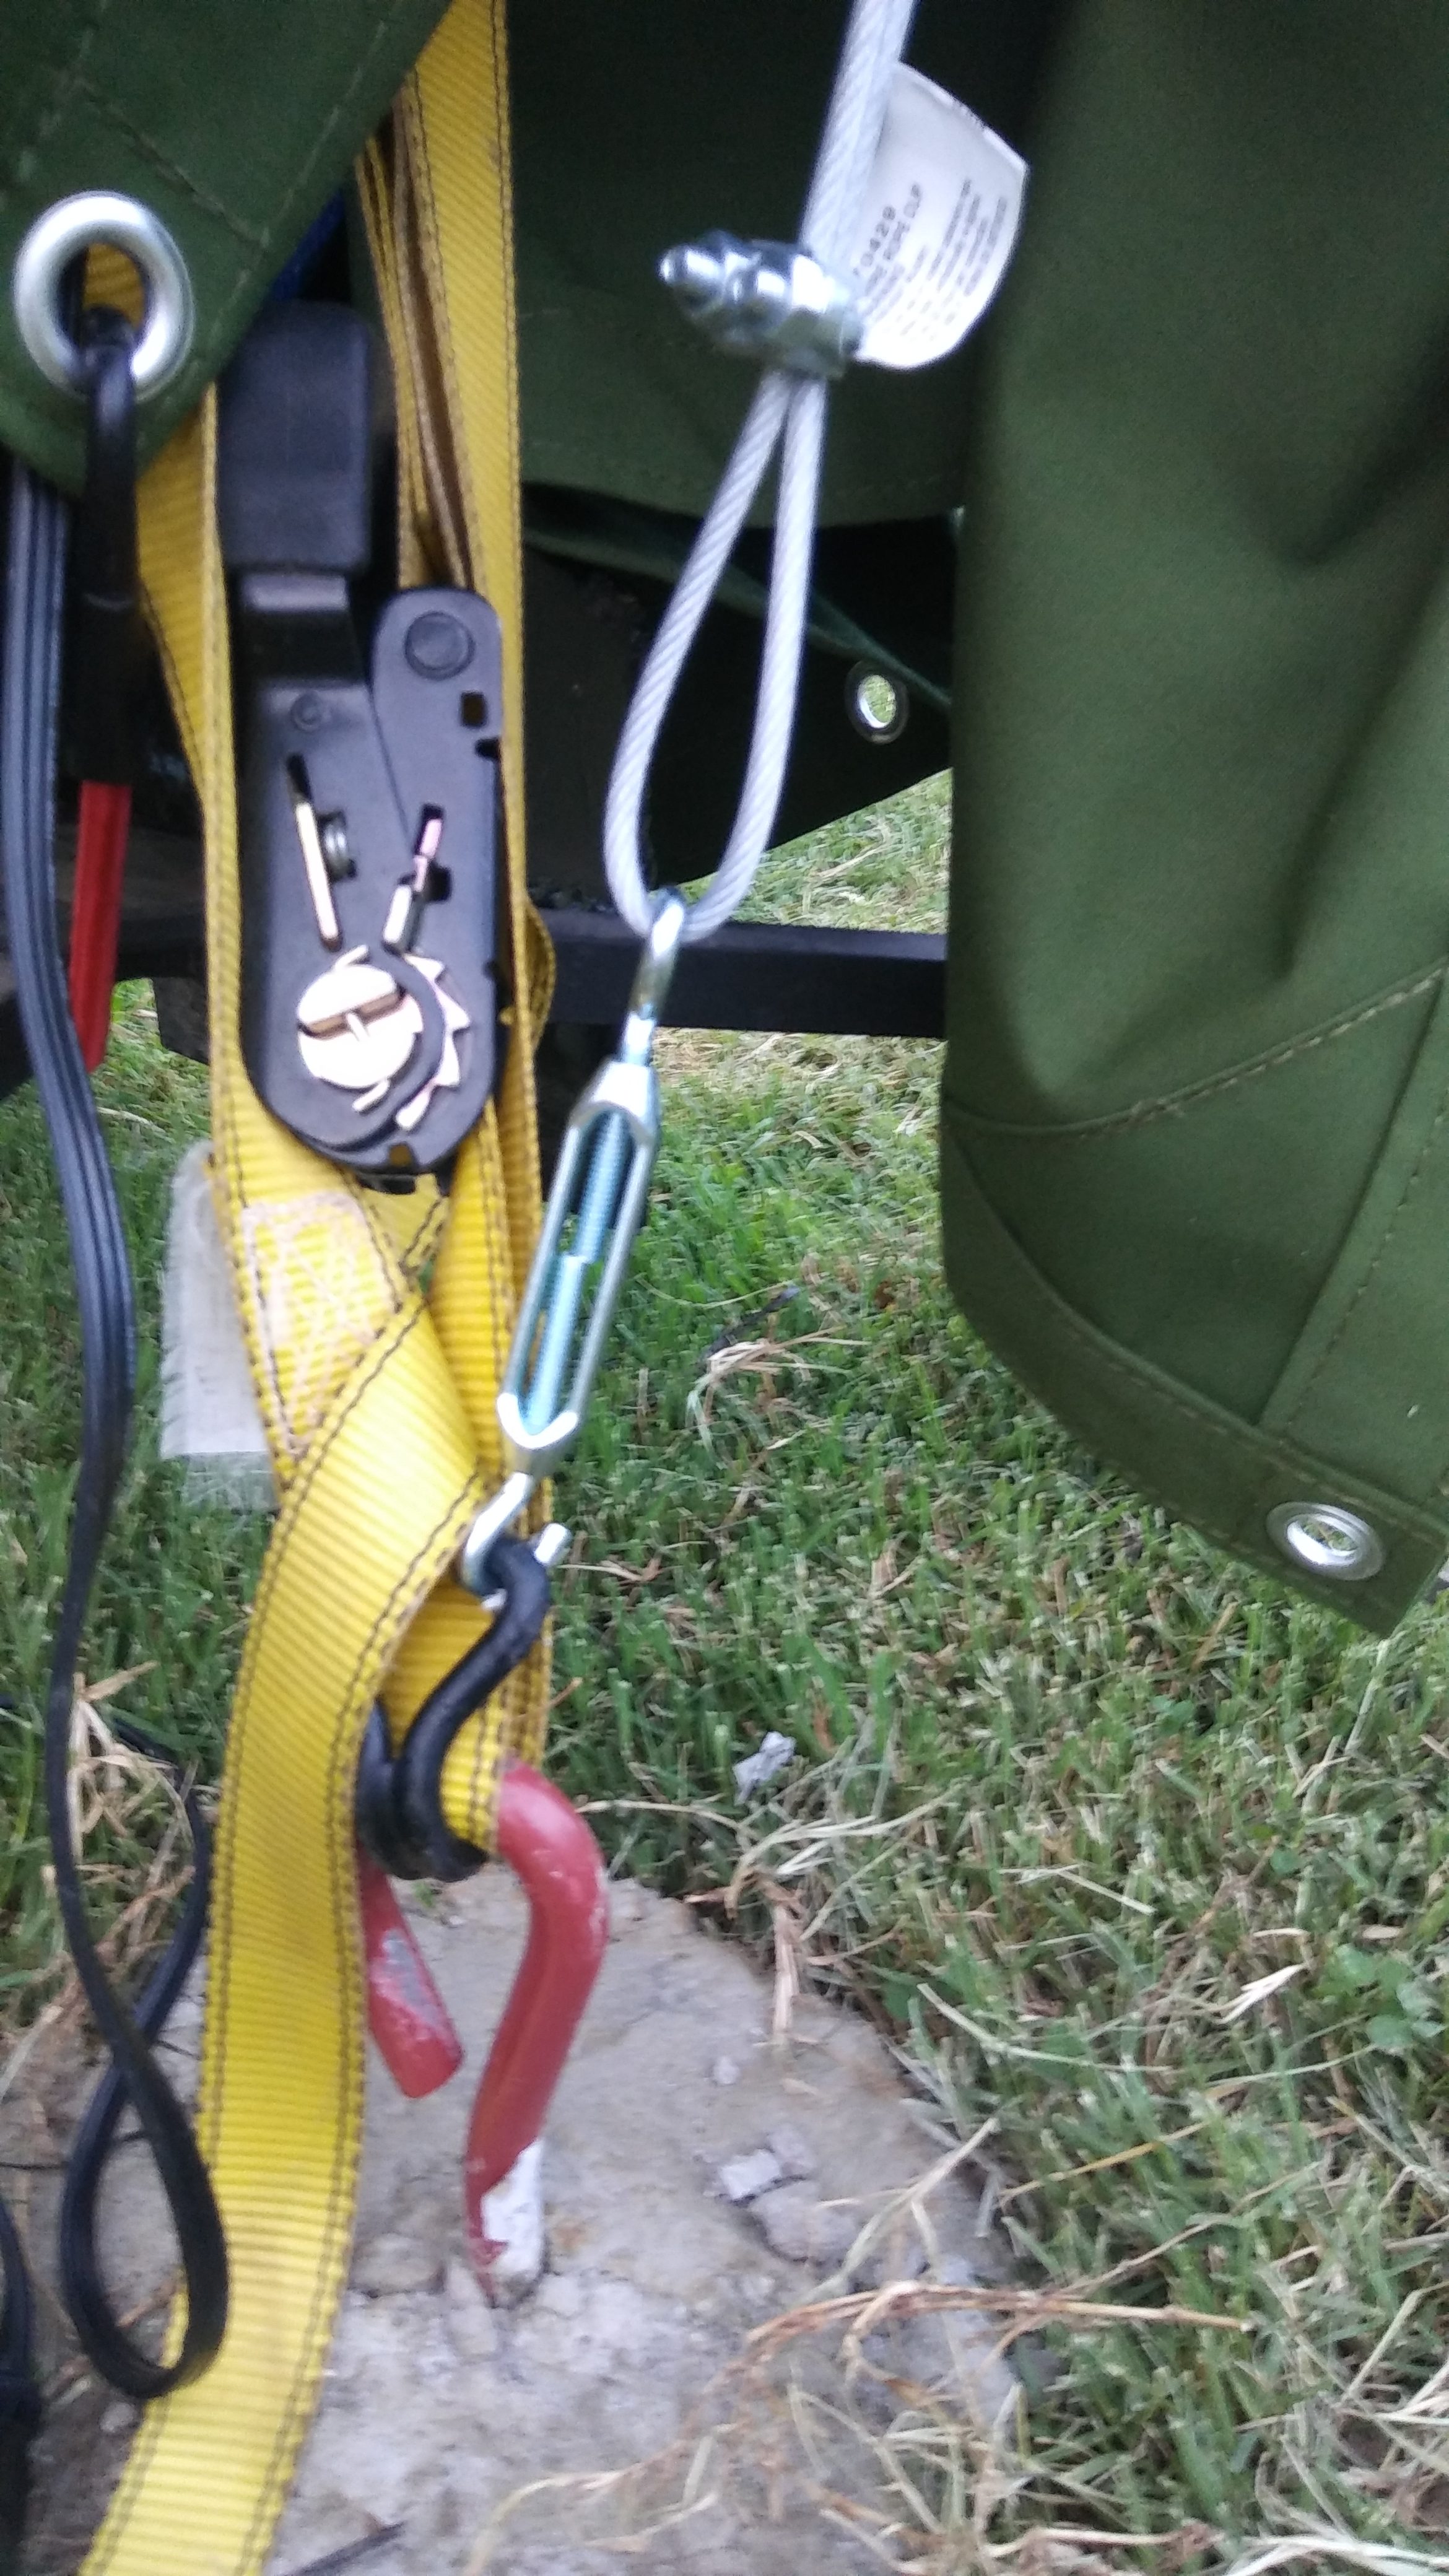
Trying out a new semi-permanent station for the telescopes. Trailer screw cemented into the ground then straps and and metal cable to hold it down against the wind. Thunderstorm in 2 hours so it is a proof of concept night. The left scope is the AR102, and Sirius mount covered by an actual insulated telescope cover. The scope on the right is wrapped in a waterproof tarp covered by an heavy duty weather resistant canvas tarp. It is all bungeed down tight to the trailer screw. Hopefully, things will stay tied down and will not pop up in another blog entitled…”Stupid!”
Two nights ago I was setting up the 4″ refractor for a night of automated imaging. The National Weather Service had been predicting hot, clear skies for at least 5 days. Heat warnings had been issued for that same period of time. Even though my equipment is automated, there is still some set up and programming to be done each night. After getting every program seamlessly talking to each other (after only 1 reboot) I went into the house under predicted dark, clear conditions. Checking on the telescope feed a few minutes later it indicated that I had forgotten to change filters on the filter wheel. So stopping the telescope and clicking on the g filter solved the problem and the telescope went about it merry way of imaging. A few minutes later the image seems to have softened. So going out side revealed it was cloudy. The next morning it was raining all over the area. This would not have been so surprising if the weather service had indicated any chance of it happening at all. Especially since the last update on clear skies was less than 2 hours before it clouded up!
If you want a scary statistic look at the rate of change in CO2 emissions on Mauna Kea volcano in Hawaii. In 2013 the CO2 emission was 395 ppm and in 2017 is 405 ppm. There is no doubt there is a change in CO2 levels in our atmosphere. There is no doubt that there will be an effect on our atmosphere and climate. You can’t shove 8 billion people on this planet without altering something. The climbing temperatures seem to have a valid CO2 caused increase.
Still, when you can’t even model a major, area wide storm 2 hours in advance, either by traditional methods or supercomputer modeling, I doubt the validity of predicting change over 100 years! Much climate change information is being presented as fact when the jury on the long term validity of modeling is still out. Scare tactics ensue.
In complexity theory small changes and factors can have major consequences often unseen in the models. This spring and early summer in Missouri, where I live, was for above average temperatures and below average humidity and precipitation. It was just the opposite. That long range forecast was way off the mark and it was only for several months ahead and not a 100 years. This brings climate prediction back to the same area where Chaos or complexity theory was first born, in the heart of trying to predict the weather!
Still, we are stewards of where we live. It should not take a presidential decree, act of congress, economic incentives or scientific scare tactics to get us to take care of our planet! You know…the place where we live and breathe!
Have you ever looked back in your “draft” file and said “wow that is a good blog”…”I wonder why I didn’t publish it?” So the blog below was actually written in 2015 but never published. Being a “meddlesome soul” I added some comments to it to explore the topic further.
I was reading a review of the Orion Starshoot IV planetary camera and needing low cost camera asked for it for Christmas. Couldn’t believe how small it was compared to my early planetary camera. It does a pretty good job of imaging the moon and bright planets. The images shown on the web page at Orion are magnificent. It is obvious though that the average person buying one of these cameras, expects to take it out of the box and 2 minutes later get beautiful pictures to show the friends and family. If only that were true!
My experience with that camera was a bit more complicated than just putting it on and pointing to the planet to be imaged. On Ebay many years ago I bought a cheap flip mirror to use for imaging. With today’s more accurate mounts it is not as important but it is helpful if your alignment is off a little. In my old modified webcam instructions I used when I first went into imaging, it said to use a 12mm eyepiece in the flip mirror system to simulate the field of view of the camera. So when you centered the object in the eypiece and flipped the mirror up it would be centered in the camera. The 12mm never worked out so well. Eventually a 6mm Astro-tech planetary eyepiece was used and is still used to this day. You also have to make sure you have a good finder scope that is spot on so you don’t spend an hour trying to get the image on the chip. Then comes the focusing. You need to get the camera focused first then try and slide the eyepiece up and down to reach focus. It always seemed like I needed an extension tube but never had the right size!
A few years ago I purchased a ZWO 120MC color camera. This is an excellent, low cost, camera from China and the software is fairly idiot proof. The larger chip size makes it easy to get the image on the chip especially compared to the old webcam or security cameras we used to use. So all the above rigmarole is much less important but I still use the flip mirror system! Imaging planets is getting easier but there is still a steep learning curve for the average amateur.
So when you read the reviews, especially the bad reviews, it is obvious that people do not expect to have issues with focusing, settings, guiding or just finding the object to be imaged. The Starshoot IV camera is touted as simple and easy to use. This is true to a point. It is easy for someone who has been imaging 10+ years. It is can be hard for the average Joe with a small scope and wants to get into to imaging! I learned to image because I was interested in the scientific side of astronomy. This is a demanding area but not as demanding as getting quality color images! In fact with some setups you want the images to be slightly out of focus! This makes getting accurate photometry a much simpler proposition in some cases. In turn the images generated for science purposes often are not very impressive.
Several astronomy imaging friends turn out images that make most of the past work at Lowell Observatory look pathetic! The major attribute for imaging in color is “If at first you don’t succeed, try, try again” and again and again!
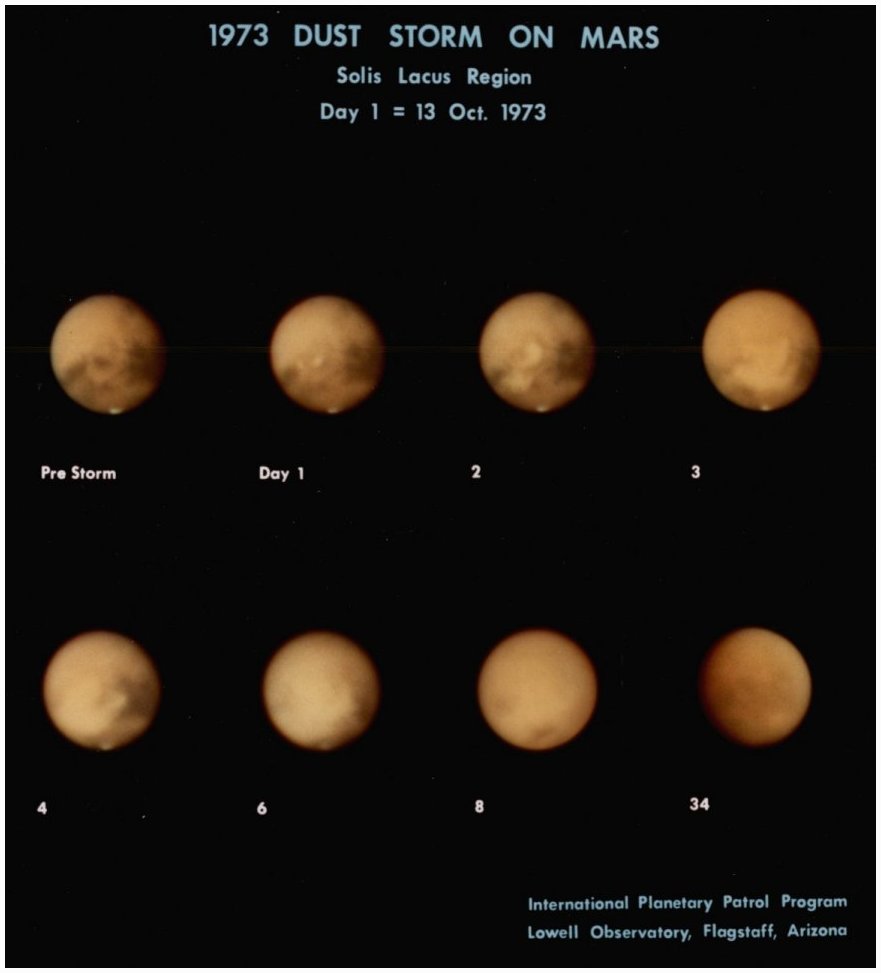
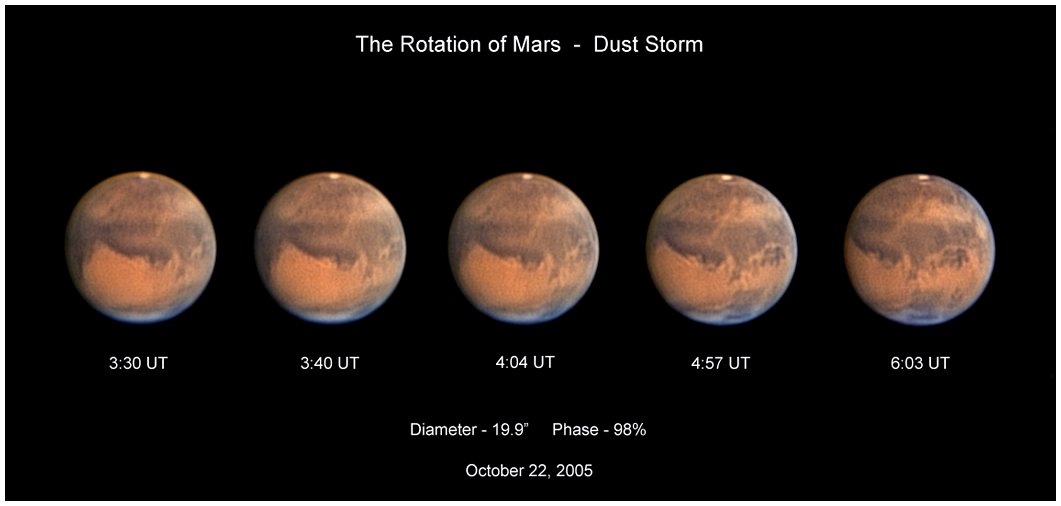
Below is a comparison of several images taken with modern digital cameras and telescopes, then comparing it to old images of Mars with the 24″ Lowell refractor on film.
Good color image from the film days with the 24″ refractor at Lowell Observatory. (Above)CF Capons color film images of Martian dust storm from 1973. 24″ Telescope. Professional astronomer EC Slipher from the 1907 opposition of Mars using the 24″ refractor.Unknown amateur images from 2005. Notice how much better these are than the old film ones. This is due to the increased sensitivity of the camera over film (80-90% versus under 5% for film) thus allowing much shorter exposures which negates the blurring caused by atmosphere.My color image with the AR102 Telescope and the ZWO120MC camera. Though it is a pretty small image of Mars it is much clearer, with sharper details, than the Lowell images with a much larger telescope. So a 4″ telescope with an electronic detector can equal a 24″ using the old film technology!
Life changing move!
Last summer I was contacted by the search committee of a Baptist Church in Lexington, MO. We had not even moved into our rental house in Alamogordo, NM yet. The committee wanted to know if I would be interested in being considered for the position of senior pastor. After a few moments of shock (remember I had just retired from full time ministry…I thought!) I told them we would be interested. After telling Lisa (my wife) we promptly let it move into the backs of our minds. By September, however, they continued to stay in contact and after a visit in December over winter break it was mutually decided that we would come back in January and preach “in view of a call.” So on January 22, 2017 Lisa and I flew to Kansas City where we were picked up and taken to Lexington, MO. The following week the church unanimously called me to come as senior pastor.
This is a great move professionally! Not so good for astronomy! There is a great deal of light pollution from nearby Kansas City and since there is a lot more humidity and haze than in New Mexico, most nights are not ideal for observing, even if they are clear. It doesn’t really matter though! We have only had 2 clear nights in 3 weeks of living here! There is a prediction that the next 8 days will feature clouds and rain.
Somewhere in the next month or so an observatory will be built. Right now we are settling in and getting the “routine” of my new position. This has taken most of our free time so little has been left for building a new observatory. Since I have a insulated solar cover for the 11″ I may just set it up in the backyard and cover it. The cover can go over the scope even when it is in the parked position. The trick of that methodology is getting it strapped down so that the wind doesn’t blow it to St. Louis!
We are talking about hosting a party for the coming solar eclipse. The mid line runs through the edge of Lexington and we will be in an almost ideal place for this coming event. My plan is to use my AR102, Sirius mount and the ZWO120C camera to produce live images on a computer leading up to the event as well as taking time sequenced images of the eclipse. Sometime this summer I will take out a day and do a dry run to test all of the equipment.
I will blog again when the scope is set up or something else astronomical actually happens.
We have moved from Espanola, NM to Alamogordo, NM. This was a move predicated by retiring from one career and taking up another. I am leaving full time ministry and going back into teaching science and coaching football. For the next several months TRO will probably only function sporadically, at least until football season is over. Due to space issues I had to leave the shelter for TRO in Espanola and will build a new one in Alamogordo. Later in the fall I will be doing some observations of Active Galactic Nuclei for a friend who studies that sort of thing.
My intention is to spend more time just doing fun stuff and not so much geared towards science. As is typical I get a bit obsessive about science so dialing it down a notch is good! Keep your eye on this website for more updates!
It has been a long time since I posted a blog. Lots has happened, both in the astronomy world and in our personal life. Mars is past opposition as this is being written, Saturn and Jupiter are still being imaged as well. M57, my CSPN (Central Star of Planetary Nebula) focal object is high enough after midnight to image. Unfortunately the weather is not cooperating! Since January 1 we have had 8 clear nights! 6 of those had either telescope issues or computer issues and the others were making sure everything worked as it was supposed to. We need the rain here in northern NM but it is not good for astronomy.
The ST-2000 camera quit and caught fire last fall. It is too expensive to get it fixed so I am using a borrowed SBIG ST-402 with BVIC photometric filters. In January, February and March I was fighting to balance the scope after adding an external autoguider. The ST-2000 had an internal guider so adjustments had to be made when a new camera was installed. At first I went with a 50mm (converted to a finder from a binocular) this worked well but just did not have enough focal length to accurately guide the 11″.
So I built a 70 mm finder from a defunct binocular and lots of tubes from Lowes! It worked well but I started having some balance issues because of it’s size and weight. The scope would slip at certain positions.
So after a spell of rotten, cold weather I went out and looked at everything. I had a 80 mm short tube telescope from Orion and rings to mount it on. It has a good field of view, offers focusing and should be a big step up from my other finder/auto guiders. However, the scope was really off balance with this monstrosity on it! Looked cool but if I couldn’t figure out how to balance it there was no way to use it.
So after much thinking I added a 90 degree weight holder and put a 5 pound scope weight on it. That did the trick! See the image below.
Holding it out at an 90 degree angle on the bottom of my scope counterbalanced the weight of camera and autoguider. So now that I had that problem licked I waited for the next clear night. When it finally arrived the computer quit! It is a dual core Lenovo Thinkcentre (M57) with 4 Gb. It looked like a power supply issue so I ordered another one, installed it and still no go. So I wired in a new SSD drive to my old TRO 32 bit Optiplex computer. It drove an 8″ robotic Newtonian for several years with 2 Gb of memory so I figured it would work OK. It booted up and seemed to work well but would drop the autoguider driver periodically. There did not seem to be a rhyme or reason for it’s unruly behavior. Since it was cloudy just about every night I decided one day to take apart the Lenovo. Turns out that there is an issue with it’s memory slots. If the modules are not completely pushed in and locked it acts like you have a bad power supply. So I shoved in the chips and fired it up. Since it was still cloudy with no relief in site, I decided to upgrade a bit. After some research I found an 18 dollar used quad core processor on eBay and installed it. When we finally had a clear night I hooked up the SBIG ST-402 and my guider camera, a Meade DSI Pro. Worked like a charm! Haven’t had a clear night since! Here is an image of M 3 taken with autoguider and Lenovo upgrades.
The week of July 25-31 our family is moving to Alamogordo, NM. I have accepted a science position there teaching Earth/Space Science and Physics at the high school. I’m sure I will miss my current position as a senior pastor at a church but I am excited about getting back into the classroom as a teacher. We are only looking at houses that will allow a good view of the night sky and will be taking the observatory with us to set up. TRO will be down for most of July and probably August as well. Alamogordo has more clear skies and slightly less light pollution than our current location. Because of Apache Point on the hills behind Alamogordo they strictly enforce a light pollution ordinance. This should improve the output of TRO significantly.
In the next issue of Astronomy Technology Today an article I wrote about my new AR 102 telescope will be featured. I am really excited about getting published! The last blog was a review for Cloudy Nights Website. This was the basis for the ATT review but it was completely rewritten for the magazine. If it ever clears up I intend to write a review of my ZWO120MC camera and submit it as well. It is kind of frustrating to have the equipment but not the cooperating weather!
As a guy with a robotic telescope that primarily does variable star photometry I actually miss looking through a telescope sometimes! Staring at a monitor from your warm house is a plus, but as I get older I long to grab a scope let the photons roll into the Mark 1 eyeball while I still can! So a couple of months ago I began to think about a “grab and go” scope.
In my storage area was a 8” F/4 Astrograph that I no longer use. So I decided to sell it and use the proceeds to buy the “grab and go” scope. Luckily, I had a friend looking for this kind of scope and sold it to him. There is also a Celestron GT mount in the storage area that I have never used that would probably work as a mount for a light refractor. The remaining question was what to buy?
As a life-long astronomy buff I have a lot of telescopes. My first real scope was a 60mm Sears refractor. I used this for years until it got broken while I was cleaning gunk off of the lens. In my current “stable” of scopes is “ The Bargain Bucket” a 8” homemade F/5 Dobsonian, “Little Eye” a Meade ETX 90mm, “The Beast” a Celestron 6” F/8 refractor, “Temple 28” a Celestron 11” CPC roboscope and a “Temple20” a Meade LX200 8” roboscope. One of my favorite telescopes is “ Dimestore,” my Meade 60mm, “junk” telescope. I got tired of listening to snooty APO and ED Refractor users saying “the 60mm scopes are just “junk” and you can’t do any real astronomy with them.” So I bought one on EBay for 21 dollars delivered. I used it in its stock condition to view Mars at the last really good opposition. I did a color sketch with watercolor pencils. This watercolor got used in a montage of images from the Mars opposition and made one of the “image of the day” websites! After doing the sketch, I upgraded the focuser and use it for a “grab and go” scope. However, there’s just not enough aperture and though the Alt/Az mount is Ok, it could be better!
With $300 (US) to spend, my first thought was to buy the 72 mm ED from Astro Tech. All of the products that I have ever bought from them, including the 8” F/4 astrograph that was sold, have been great. The reviews on that scope were terrific, however, it just seemed to be a little on the small side. Though 72mm is way more scope than the 60 mm, I just wasn’t sure I wanted one that small, especially since it was over the budget by $75. Unfortunately, larger ED’s or APO’s were out of my price range. Just about everything else I looked at had some major flaw (bad focusers primarily) or was out of my price range. After perusing Astromart and seeing only one scope that I was interested in and it was over $450, I decided to check out slightly larger achromats. Better “bang” for the buck!
As mentioned earlier, “The Beast” is my 6” achromatic F/8 refractor that sits on a Sirius mount with an Atlas Tripod and an extension pier. Since it is over 100 pounds set up it is definitely not a “grab and go” scope! The optics are excellent though and the Chromatic Aberration is surprisingly well controlled for a scope like this. Plus, the Celestron Minus V filter (Same as the Baader Fringe Killer) does a good job on the CA and doesn’t change the color of the view much. With the experience of using “The Beast” I felt like a short Achromat would be a good telescope for me and even give me a bit more aperture for the money.
I looked at the High Point Scientific website to check out the AR series optical tube assembly from Explore Optics. These are nice looking scopes that come in 102mm, 127mm and 152mm diameter lenses and F/6.5 focal ratio. By the way I am not affiliated with HighPoint Scientific or Explore Scientific in any way! However, Highpoint has been extremely helpful in all my dealings with them. The 127 caught my attention first but the price was way over my budget. Plus the weight and size seemed to be going the wrong way for a “grab and go” scope. So I began to seriously consider the AR 102.
Email was sent to Highpoint and they responded quickly with links to reviews. Most of the reviews praised the build, optical quality and size of the scope. There was not a negative review that I could find on the internet or in their links. That is very unusual for just about any product. The only negative was the CA inherent in the short focal ratio but every review commented that it was not as bad as expected, nor did it hinder the quality of the views. So I pulled the trigger and ordered the scope. Did I mention that it went on sale a day or so before I ordered it? Did I also mention that I got an open box unit for a 30 dollar discount under the already lowered price of $299 US. It also came with a 25mm, 70 degree Bresser 2” eyepiece that wasn’t even mentioned in the ad!
Included in the purchase price is a 2” dielectric diagonal, finder scope and two speed focuser. In many achromats on the market today their weak point is the focuser. This was true on my CR 6,” “The Beast.” The first time I used it, it became very evident that it needed a $200 dollar focuser upgrade just to make it a quality scope. So when you add the $100 eyepiece, the $100 dollar 2” diagonal and a $200 dollar, 2 speed focuser that comes with the AR 102, the telescope was pretty much free! Over all the fit and finish is outstanding. Light weight, (11 pounds) but well built. The focuser is very smooth and sensitive. This is important in short focal length telescopes since focusing is much harder to get right with the shorter focal length. The rings and dovetail are very sturdy and supply a convenient handle to carry the scope. The interior of the rings are covered with felt to keep the tube from being scratched. Clamps help to make sure the scope is oriented the way you want it.
The scope comes packaged in a double box with plenty of internal support. It arrived in good condition and quite fast. I also purchased a 5x Barlow lens and it was packed in a box and placed with the other accessories. Assembly, was primarily taking off the rings and stripping off the protective foam, then putting it back together. At 11 pounds it is easy to transport and as was mentioned earlier, the built in handle really helps to make it an easy carry.
I mounted the optical tube assembly on my old Celestron GT mount. This set up has flimsy tripod legs and lots of backlash but it is light and easy to use. With a 4,000 object database it will take you to most of the brighter optics a 4” scope can see. It also has a Baader dovetail clamp attached. This means anything with a vixen style dovetail can be mounted on it. Even with all the issues, it does track well and puts most objects near the field of view. Sometimes you have to use the finder but it is usually right on the edge of view in the eyepiece. To try and strengthen the mount a bit I tapped the mounting plate of the Nextstar GT and mounted it on my unused Sirius Tripod. This Tripod has one and a half inch tubular legs and is much more stable than the stock GT tripod. This small change has made using the AR 102 much easier to view with.
Now what about the optics? All of these fine tube features are of no avail if the optics are substandard. It has been a difficult task to test the optics this winter due to the bad weather. We live between two 10,000’ plus mountain ranges so the conditions are usually less than optimal, but this year has really been bad for astronomy. With a quick look at the ¾ moon in twilight (clouded up at dark!) I was impressed. There was a bit of purple fringing around the limb of the moon but not really any worse than “The Beast.” I used the 25mm, 70 degree, 2” eyepiece first just to check it out. This only gives you 26 power, but man, what a field of view! The view was crisp and the face of the moon was very contrasty and showed rich detail. As expected, focusing was a bit more demanding but the 2 speed focuser made that chore much easier. The next time I got out the scope, I looked at Capella and did some basic star tests. At high power (165x) the diffraction rings looked good on both sides of focus. This test was a bit tricky since the conditions were so bad. There were high clouds and even stars overhead were twinkling. So the next time it was out, there were high cirrus clouds but a much steadier atmosphere. The moon was full so any CA would really show up. Using an 8.8 mm Meade 82 degree eyepiece and the Celestron Minus V filter there was only a hint of CA around the moon. When I switched to the 25mm, 2” eyepiece there was some purple fringing around the edge but I did not see it as being objectionable. It definitely did not affect the detail visible on the face. Before the sky was completely covered with a layer of thicker clouds I slewed to M 42 in Orion. Wow, even through the clouds I could see the Trapezium clearly with the 8.8 mm and the 25 mm both. It was much harder to differentiate the 4 stars at 26x with (25 mm) power but very easy at 75 (8.8 mm) and even easier at 188x (used at 2.5x Barlow with the 8.8 mm). When you add magnification, the views look very much like views with the 6” F/8, just a bit dimmer. So even with the short focal length, the scope takes magnification well and focusing is quite easy because of the quality 2 speed focuser. Planetary observing was a concern with me since I did want to look at the planets from time to time with this telescope. The AR 102 is not maximized for planetary observing but still does it well.
My overall impression is outstanding! It is a great deal for the money, even at the non-sale price of $399. At the current sale price of $299 it is almost a steal! The optics are very good, the fit and finish are outstanding and it is light and portable. Overall, it is a real bargain. My only complaint is very minor. All the screws and fittings on this scope are metal except for 6 screws on the finder scope. Four out of the six screws on the finder rings are plastic and the two screws that hold the finder assembly on the optical tube are also plastic. It would seem to me that the dollar or so that is saved on the price of the screws isn’t worth it when compared to the total price and quality. However, they do work and hold the finder quite steady regardless of the nature of the screws, so I guess it is not really all that important. You could always replace them yourself if it bothers you that much.
Overall, I would highly recommend this scope as a low cost alternative to a more expensive ED or APO scope. I can live with a bit of purple in an image as long as the image itself is still clear and color free. This the AR 102 admirably does!
As I get older (read less energetic!) it becomes harder and harder to keep up with everything. Busy schedule, lack or energy and much less multitasking ability, combine to make doing a hobby harder and harder. Since 2009 I have been heavily involved in the science side of the hobby of astronomy. Robotic telescopes, science conferences and seeking to improve your differential photometry skills have eaten up the bulk of my time and effort. Recently, I began to think about just looking through a telescope for fun and not a computer monitor for science. When I was a kid I would spend hours virtually every clear night looking through my small telescopes. What a thrill to see the moon, planets and stars even through the modest beginner scopes of my youth! Though doing science is awesome, I do miss actually looking through a telescope from time to time!
It is also good to take stock of where you are in life every once in awhile. I had a telescope laying around that I knew a friend wanted so I sold it to him. This opened up an internal debate of what to spend the money on. My decision was to try and pick up an ED or APO scope that would fit on a simple Alt/Az mount. Something fun to look through and light to carry. However, the size of the ED/APO scopes I could afford were just too small. So after much research I decided on a 102 mm F/6.3 achromatic refractor. Solid build, more aperture and even though it will have some false color just seemed like a lot of “bang for the buck!” Yup, this was the scope I wanted and it was on sale as well! Well at least until I saw an ad for refurbished cameras! Now, do I spend the money on a better camera for “science” or a “just for fun” telescope? Back to Science vs Fun!
There is a compromise in this battle for me. I am working on a way to get a refurbished camera and fun scope, but it has caused me to rethink my goals in astronomy. When a hobby starts feeling more like work it is time to rethink what you are doing! Sometimes I find myself feeling guilty because it is clear out and I am not taking data in the observatory. Sometimes I come home early from an activity so that I can open up the observatory and “get to work.” Lately these sessions that feel like “work” are getting fewer and fewer. Now I look forward to just having fun in my hobby!
When those photometry files upload to the AAVSO database there is a great deal of satisfaction in the completion of a complex scientific task. There is also a great sense of satisfaction when you see the rings of Saturn through your own telescope! Overall, as long as you enjoy what you do it is all good! For me…I intend to actually look through a scope a lot more this year and just do a lot more astronomy for fun!
Alas, my SBIG ST-2000 camera caught on fire! The video processor chip slagged, taking some of the main board with it. It may be fixable…or not! So the AAVSO (The American Association of Variable Star Observers) loaned me a SBIG ST-402 with BVIC photometric filters. However, this created an issue. No autoguiding chip. The ST-2000 had a dedicated auto-guider CCD chip that made high quality images possible. The ST-402 does not.
So time to get the junk box out! I took a hand held monocular made out of one half of a binocular, cut the tube, put in 3 set screws to hold a camera and added a Meade DSI Pro CCD I had laying around. On the one clear night we have had in weeks it worked fairly well as an autoguider. Unfortunately, the focal length of the 50 mm monocular is not enough to auto-guide without errors. So 60 second images were oval not round. There is a 10 to 1 rule for autoguiders. For every 10 mm of focal length on the main scope you need 1 mm of focal length for an autoguider scope. I was about 15 mm short!
So I took a 60 mm monocular I got off a broken pair of binoculars and made a auto-guiding scope out of it. It has enough focal length to make the auto guider more effective. It also has a means to do helical focusing. It is amazing what you can find from Lowes!
Making a auto-guiding scope created another issue. I have been using CCDSoft for about 4 years. Works great with CCDCommander, SBIG guide chip cameras and The Sky 6 Pro. Does not work with an external scope and camera! So I had to set up Maxim DL5 to autoguide. Works very good, but it was a bear to set up! It is a very flexible program but the manual will be your best friend!
Hopefully in the next few weeks the monsoon weather will break and clear skies will dominate. It has been great to see New Mexico so green but it plays havoc on astronomy pursuits!
For thousands of years humans have been looking up at the moon. There is much folk lore about it as well. For example the common thinking is that human behaviors are changed by the full moon. Statistically, there is no correlation between the full moon and human behavior! Still when the moon is full we just seem to notice the weird and abnormal things more. These events happen daily but we seem to notice it when the moon is bright and high in the sky! So the moon is a catalyst of dreams and thoughts!
One of the first telescopic targets was the moon. Galileo turned his new instrument the telescope, on the moon and was astounded that it had craters, mountains and maria (seas). This did not fit into what was thought at the time. All learned men from that age knew that the moon and all heavenly bodies were perfect and unblemished! When Galileo sketched the moon showing all of the imperfections we know about today many did not believe that he actually saw this through his magic glass. In the 1960’s NASA spent a great deal of time and money observing and imaging the moon in order to better identify a landing site for Apollo. The moon is still a great target today for any size telescope! Even a small telescope will show many wonders.
The stark beauty of the moons landscape is unchanged, even after eons of time. When we observe it we are swept out to space to hover over this stark surface. It is the closet thing to actual space travel that we can achieve without actually leaving the earth! Take time to enjoy the moon!
The above image was taken with an 11″ Celestron CPC telescope, an SBIG ST-2000 CCD camera, Ultraviolet filter, 0.02 second image and stitched together with Imerge.