Have you ever worked on a problem and gone backwards? You have an Ah-Ha moment where you know that you have the problem solved and then when you implement the solution it’s worse than it was before? Well that has been my experience with Temple 28, The Celestron 11″ CPC.
In earlier articles you find out about the struggles with a welded, non-adjustable wedge, loose gears and balance issues. Each solution should have led to a better working telescope but it didn’t. In fact Right before Christmas 2018, I just gave up in frustration on this scope, set up my AR102 refractor on the Sirius mount and began using it. Temple 10, the AR102 and Sirius combination, works really well! Since then I have obtained data on 2 close binary stars that no one has recorded since the original survey was done. At least I feel like I have accomplished something.
After much thought and research we finally had a day above freezing so I went out and began to work on Temple 28 again. Looking at online images, I noticed that all the images of the worm gear assembly differed from mine. There is a backlash adjustment screw with a spring on it that is easily observable in the online images. In everyone else’s pictures the spring was at least 1/4 of the way up the shaft, with several being compressed to 1/2. The springs on Temple 28 were fully extended and rested against the spring stop.
So I pulled off the RA cover and began to adjust the spring. It is pretty easy to adjust the spring if you remove the 2 small screws that hold the flexible coupling to the worm gear and swing the motor out of the way. However, I did not want to introduce that level of change. When problem solving, it is often best to only change one thing at a time. So adjusting just the spring was the best way to proceed at this point.
After adjusting the spring about 1/4 of the way up the adjustment screw I loosened the screw slightly. This is to make sure that the worm does not bind on the gear. After testing the motor I then did the same thing to the Dec axis. This was more of a challenge since it is in an awkward place to adjust.

After removing the the SBIG ST-8E, then putting it onto Temple 10, I needed a heavy camera to counterbalance Temple 28. I dug out my old SBIG ST-7E. This camera is an exact duplicate to the ST-8E but with a smaller chip. The ST-7E also does not have the SBIG CFW-8 filter wheel installed…since I can’t find the actual filter wheel for it!
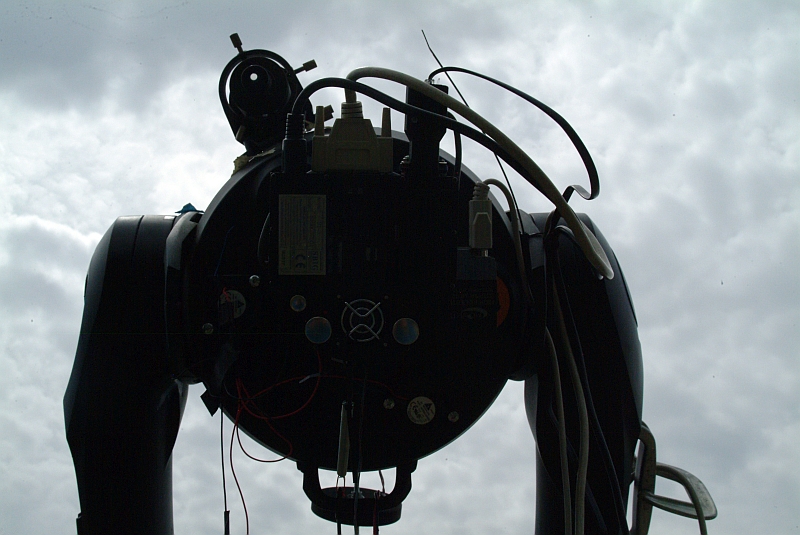
Balance…always an interesting experience, in life and on a scope! When Temple 28 was first re-worked the tube balance point was moved to allow a heavy SBIG camera to be used. This means that what other people do on their CPC’s is not workable on Temple 28! Eventually, after much work I put two flat weights on the nose of the scope, the bottom 2.5 pound weight half way down the tube and strapped it all on tightly with hose clamps. Hose Clamps? Well they are cheaper and work just as well as 80-200 dollar rings or balance bars!
Well, the proof of the pudding is in the eating! So how did this newly adjusted system work out? Better, but not great! There was star trailing on about half of the images. For the type of photometry that I do it would probably still work in most instances but it is annoying none the less. In all fairness, when using the internal guiding chip, any fog, high cirrus clouds, corrector dew or frosting easily throws off the tracking. The conditions for this latest test were bad! High clouds, heavy dew on the corrector and forming fog in the sky. The a dew heater on the scope actually works fairly well. The presence of dew anyway says a lot about bad atmospheric conditions. So this test needs to be repeated when the conditions are better! In Missouri however, especially this year, any clear night, needs to be utilized regardless of conditions.
So what is the next step? Well the first thing is to find the filter wheel! I put it in a box during our move to Missouri where I could find it and haven’t located it since! This would bring the weight of the camera to match the ST-8E and facilitate an easy camera swap. It also makes doing photometry practical since the results are better if you use the right filters.

Second, is to take the RA worm assembly completely off, clean and polish the worm and gears, then re-adjust the whole thing. You can do small adjustments with the backlash adjustment screw but the large adjustments are made by moving the entire assembly, then tightening down 2 screws. When you read the posts about this whole saga, it becomes apparent that this should have been done on day 1! Quoting from the movie contact ” This is the way it’s been done for billions of years. Small moves, Ellie. Small moves.”