“Why in the world did you name a telescope after yourself?” I get that question a lot, either verbally or from the way that people look while I am talking! Well it is simple, a friend of mine named them for me. He called me one day and said “Temple 20 is finished, come up and have a look.” I responded “Temple 20? What is that?” He just started using this designation so I stuck with it. Temple Research Observatory got it’s name because everything else I could think of was already being used!
Around 5 years ago Temple Research Observatory acquired Temple 28, an 11 inch Celestron CPC on a homemade wedge. So for the last 5 years there has been an epic struggle to get it up and running like it is supposed to run. There has been maladjusted gears, the telescope falling over and various other hardships. After trying for 4.5 years to follow the “conventional thinking” of how to set up a Celestron CPC the results forced a change to unconventional thinking.( Links to previous articles)
The balance point had been changed to accomodate a heavy camera before I got it. So instead of trying to achieve a neutral balance, like you normally do, I weighted the front. Added more weight to the West side, not the east! Added a lot of backlash in Declination…lots of backlash! Cranked up the amount of movement in each Declination pulse as well. Stopped trying to get PHD to work and stayed with Maxim DL 5 to guide. Went with an external guider (Orion ST-80 telescope and ZWO 120 mm camera) instead of the internal guider. The internal worked but it had trouble finding guide stars especially when filters were used. No problem finding a guide star when you have an 80 mm short tube telescope as a guider! After getting the tracking and guiding fixed the image would migrate from the left to the right of the image over a night. So after several hours using PHD drift align it was Polar aligned.
All of this is counter to the “common” wisdom of setting up a telescope for imaging. The learning curve is already steep but when the solutions run counter to this wisdom then it really takes a long time to figure it out. Dean Koenig of Starizona really helped with balancing techniques and advice. My astro buddies from the west have always been very encouraging and patient as well!
M 27 with Temple 28
Above is an image that was taken 7-01/02-2019 at TRO. It features Temple 28 with the ST-8E camera, clear filter and control with CCDCommander. It is 50 images of 120 seconds each stacked and processed in Maxim DL 5. After 5 years of frustration it was all worth it!
There still needs to be better cable control, as well as new dew heaters made for the guider scope. Temple 28 is still very rough looking and though I don’t care as long as it works, it could use a bit of sprucing up. Overall, the results of the last few nights lead to “The Triumph of Temple 28!”
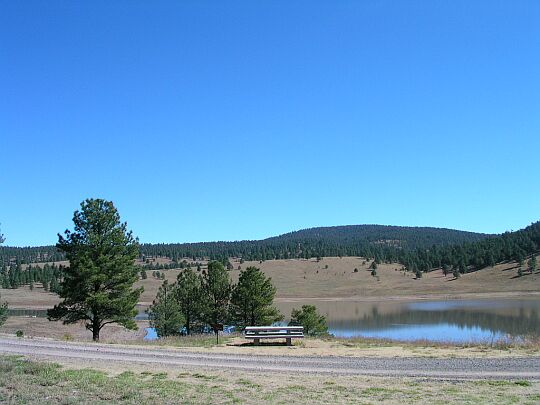
Snow Lake in the Gila Wilderness of New Mexico has one of the darkest skies in the region. Accessed primarily by a 4 wheel drive road, guarantees that this location will continue to be a quality site for years to come.
In amateur astronomy a lot of time and energy is spent “going to dark sites.” These are places with minimal light pollution and the quality of that experience often depends on where you live. Just observing from an unlighted golf course or park in a city can enhance the observing experience.
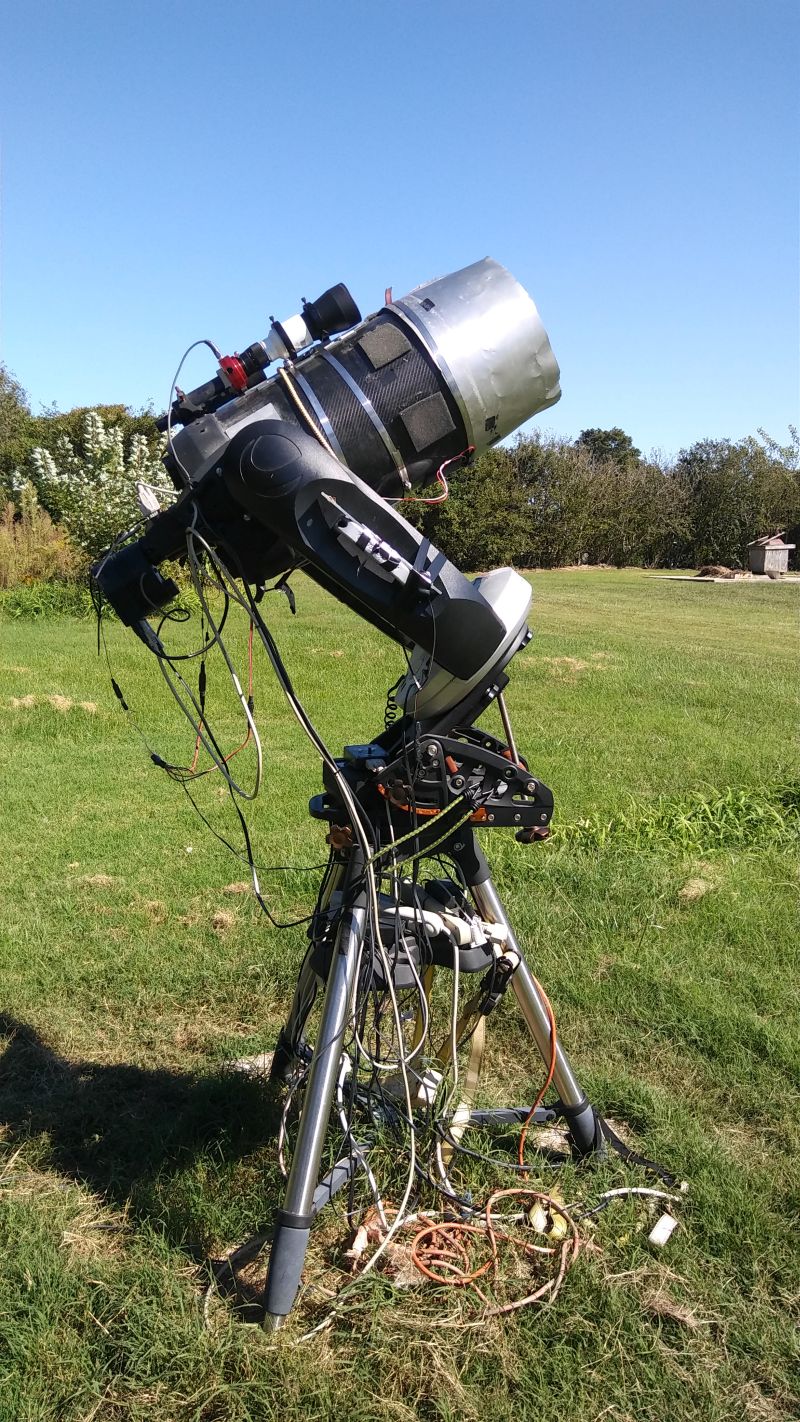
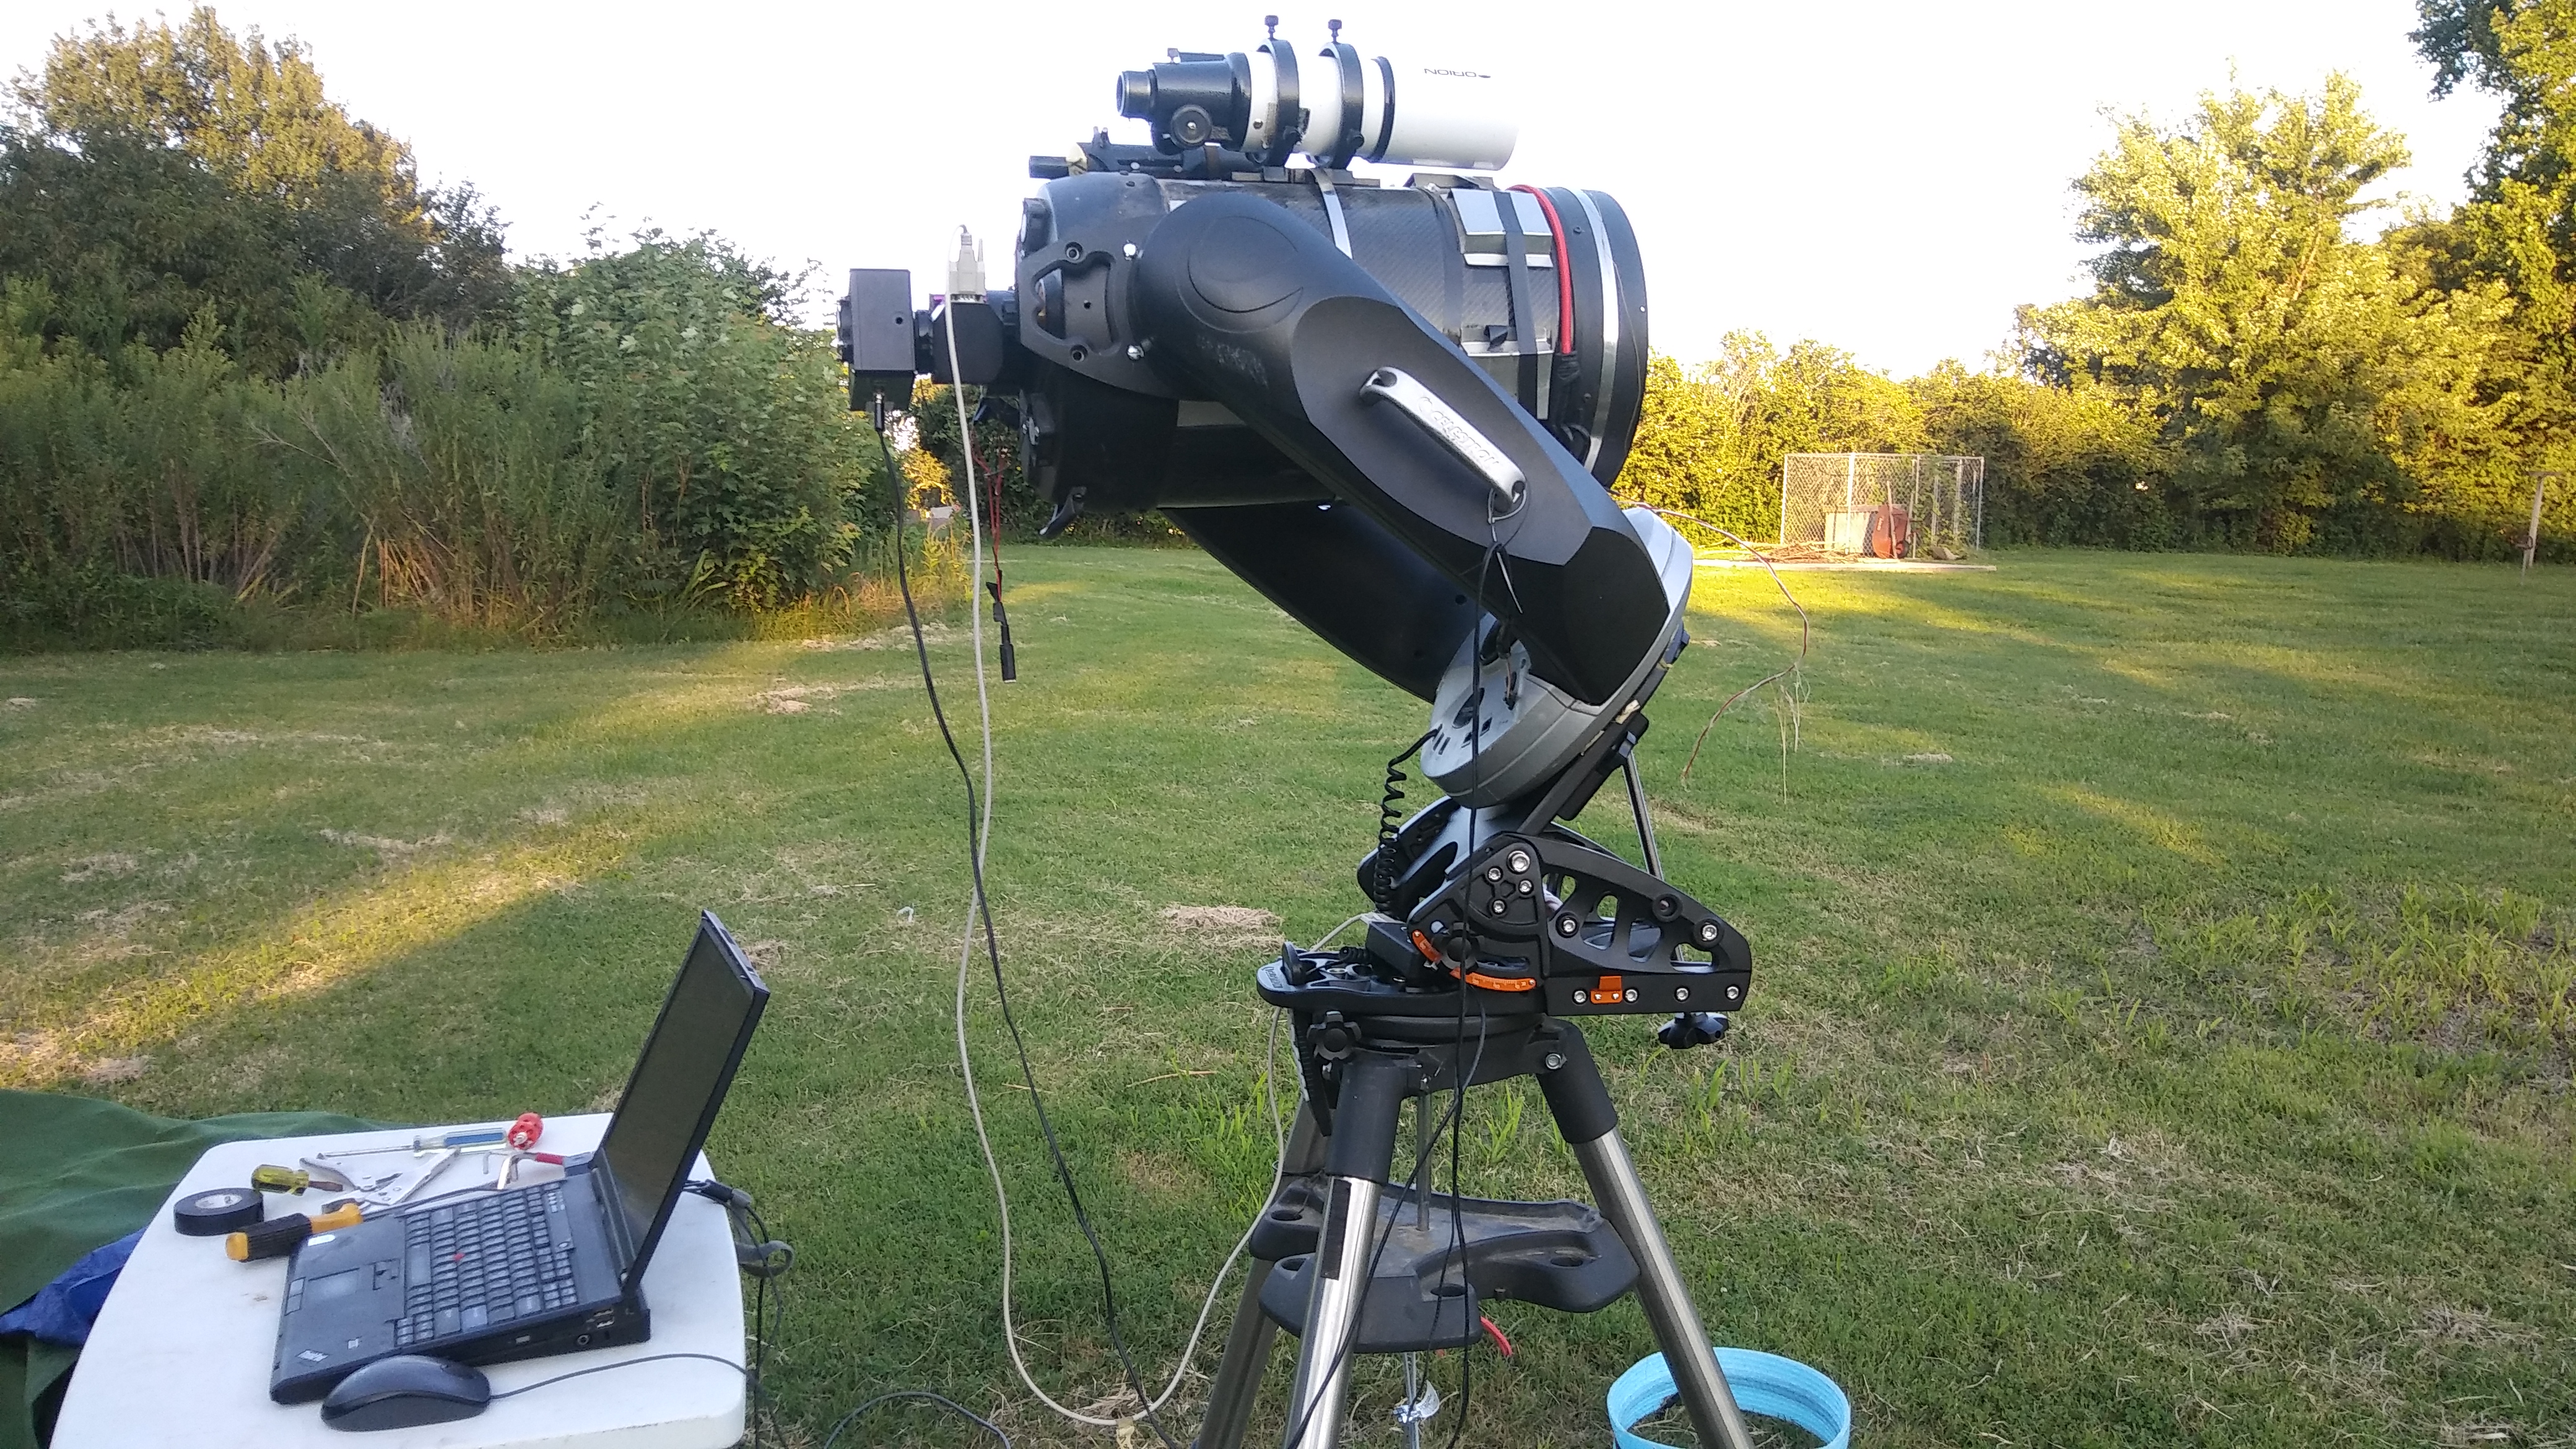
Temple 10 (AR102 refractor) and Temple 28 (11″ CPC SC) at TRO Lexington.
In my current location, smack dab in the middle of a small town in Missouri, the presence of a historic cemetery behind my backyard improves the seeing. Though the site does not compare with any of the former TRO observatory locations in New Mexico, it allows imaging of at least 17th magnitude stars with an 11″ telescope. Even with businesses on the highway in front of my house, it is dark enough to see the milky way from the observatory location. However, if you move towards the road, away from the cemetery, the milky way fades away until you can only see the brightest stars. So location is important even in your own backyard.
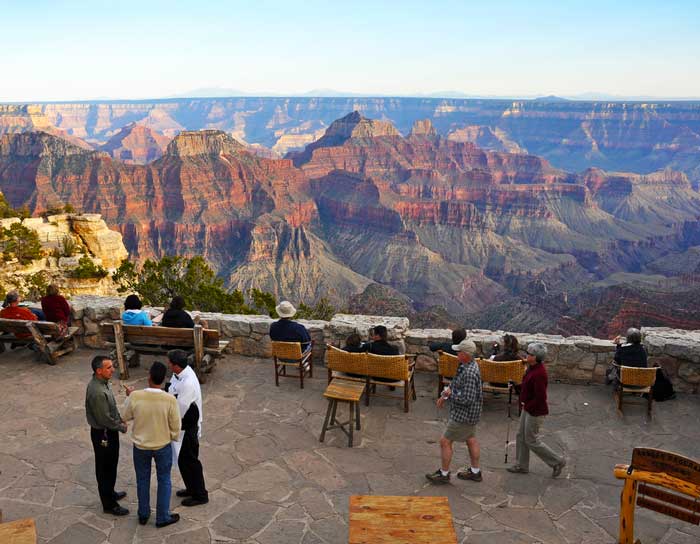
The North and South rims of the Grand Canyon have some of the darkest skies I have ever experienced. When you suddenly realize there are so many stars that you can no longer distinguish the individual constellations, that’s when you know it is dark. We get used to light polluted skies and limited seeing, so that when we get to a dark clear site it can be daunting to find your way around the sky!
This give you an idea of what to expect at the Grand Canyon Star Party!
The Tucson Amateur Astronomy Association has a Grand Canyon Star Party every year. It is definitely worth the trip. Even with some of the South rim light pollution,this area is still premiere for observing. The high altitude, low humidity and clear skies combine to give a great experience. The north rim of the canyon is 1000 feet higher and is even darker than the south but is harder to get to.
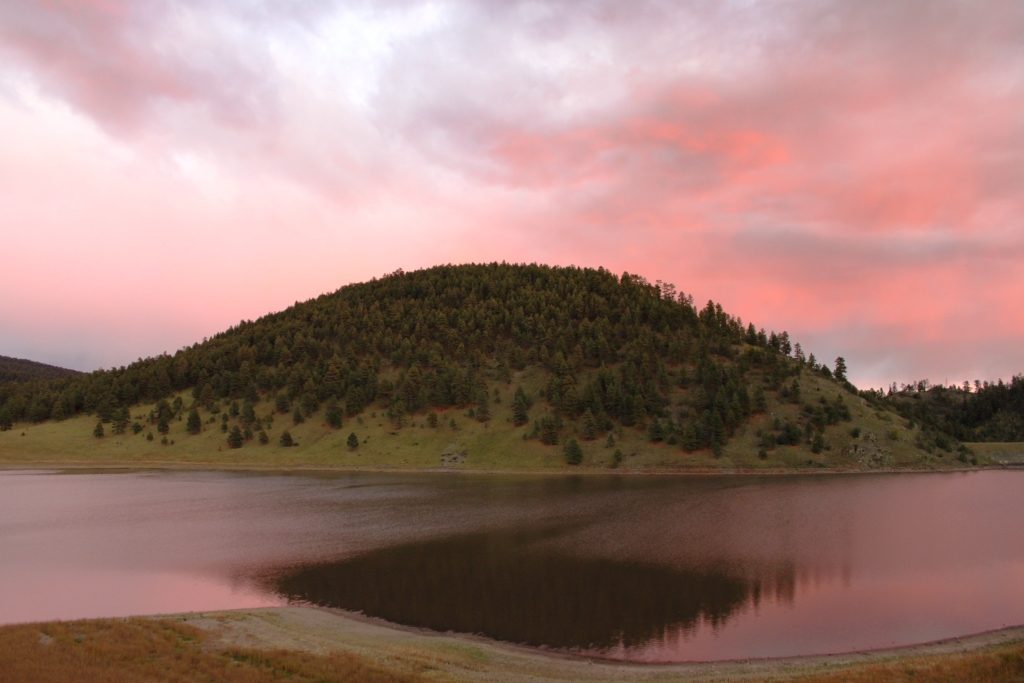
View from the lodge at the North Rim of the Grand Canyon.
My big issue was stamina. After all the hassle to get the time off, the trip up, as well as daylight sightseeing, fatigue was a real issue! At about 2:30 am I was falling asleep at the eyepiece and had to go to bed.
Snow Lake from Dipping Vat Campground.
Snow Lake in the Gila Wilderness area of South Central New Mexico had the darkest sky I ever experienced. I was able to go and spend a few days in September 2009. It is a small lake at 7,313 feet. My first night there featured thunderstorms in the first part of the evening. Around midnight the sky cleared and the stars came out. Wow, what an experience. I had brought “The Bargain Bucket,” an 8″ Dobsonian reflector. With no lights of any kind within 30 miles of that location and only small cities at 45 and 60 miles away there was virtually no light pollution to mar the skies. Seeing was pushing magnitude 6.5 and objects that I had never seen before in a telescope were easily viewed. To top it off, there was no one else at all in the campground, except a herd of over 150 Elk!
The POD, 8″ F/4 reflector and the author south of Deming, New Mexico.
The final location that I will highlight is 30 miles north of the Mexican border and a few miles south of Deming New Mexico. We moved out of Deming into the desert in 2011. Even when we lived in central Deming, I could see the dust lane in the milky way from my driveway! After the move, a friend gave me a POD (Personal Observatory Dome) that was set up in the backyard. It was not unusual to image 18th magnitude stars with an 8″ telescope. With over 300 days of clear night sky each year, this is a hard location to beat.
Wherever you can get a view of the sky is a win for astronomy. If you can escape your light pollution from time to time or even better, move somewhere dark, it is ideal. Still, there is a lot that can be seen even in the midst of the most light polluted city. Take of advantage of where you are to observe what you can and find the the dark wherever you can!
A year or so ago in Astronomy Technology, I wrote an article about my 4 year struggle to get my 11″ Celestron CPC up and running. When the article was written everything seemed to be in order. I used several images from recent runs but still had a lot of reject images during these runs due to bad tracking. However, the final images came out ok so I didn’t worry about it. I had not gone back and looked at the number of rejected images due to smeared stars. One of the curses of being busy!
The telescope was running remotely as I finished the article for the magazine on my office computer. In the morning, the images were uploaded with Teamviewer 13. With a cursory glance using the “large icons”settings in windows, everything seemed to look good from that run. Problem finally solved, article finished and sent off.
A month later I got around to analyzing that last set of images. What a disaster. With the large icons setting, they looked good, but when they were examined at full resolution, not so much. Out of around 100 images only 30 or so were usable to stack. This was worse than before the backlash and balance were adjusted!
Here is the link to the original article and one other blogpost on the subject!
It was too late to retract the article and rewrite it so it went to print! After 4+ years this scope still didn’t work right! So out of frustration I took off the SBIG ST-8E camera and moved it to the AR102 refractor mounted on the Sirius mount. This yields a large field of view and does a good job of photometry. Being ready to take a sledgehammer to the CPC, I decided to give it a few months before I even thought about trying to fix it again. The link to 3 Steps Back 2 Steps Forward gives more details of some of these post break tests.
The “Great Nebula” in Orion. ST-8E and AR 102.
After a few months, the temperature finally went above freezing one day so the ST-7E went on the 11″ CPC until I could figure out why the telescope wouldn’t work right. The ST-7 camera is identical in weight to the ST-8 and would be a good substitute. Of course I couldn’t find the filter wheel for the CFW-8 so it wasn’t exactly the same weight. I did find the filter wheel…it was in the ST-7 case so I wouldn’t lose it. Then the wait on weather and schedule began!
Of course the weather has been just awful. Wettest year in 30 + years. Clouds, rain, fog, snow, hail, freezing rain and sleet, all since the article was written. On most clear nights I just ran the AR102 instead of the 11″ CPC. You just don’t waste clear nights on experimentation if you can help it in the midwest. The AR102 ran flawlessly, soothing my bruised ego a bit!
The first issue I ran into when trying to troubleshoot the CPC was that the ST-7E kept icing up! So I looked at the plug and realized that it was also a dummy plug! Somewhere I have 2 usable desiccant plugs but I can’t find them. Probably the same place as the filter wheel! So I took the dummy plug and drilled a hole in the aluminium stopper placed in the plug. I had an idea of putting in a small desiccant pack instead of the set up the current camera uses. When I turned it upside down, desiccant fell out! Apparently, these non-functioning plugs are non-functioning because they solder in an aluminium stopper, leaving desiccant inside. Seriously? That’s just crazy. To buy a desiccant plug today it will cost you 160 dollars from Diffraction Limited or 70 dollars for the Farpoint version of the plug. After some work I popped out the aluminium plug, pried off the cap, cut a small piece of fine metal mesh to hold the desiccant in, filled the cavity with desiccant material, then put the cap back on with some super glue. Took about 30 minutes. After a short time in the oven, problem solved!
The tracking issue had still not been solved. Went back and read every article I could find on adjusting a CPC. Called Dean Konig at Starizona. Even after following his sagely advice (one of the most knowledgeable about telescopes and imaging I have met!) the telescope was tracking worse than ever. Good grief what else could I do? Several times I went to Astromart contemplating selling this turkey.
So on a night of very marginal conditions I tried out some things. Remember, when you get so few good nights you don’t want to waste them with experiments! First I put my Orion ST-80 on the CPC to use as a guider scope. I moved the ZWO 120 MM camera to the ST-80 for better guiding and a wider field than the Meade DSI Pro I had used in the past. This helped a lot to steady out the tracking but it still didn’t really solve the problem.
Finally, a clear, (kind of) warm day, dawned. The cover was removed on the telescope and work begun. My first task was to replace the ST-7E with the ST-8E then make sure the wiring was routed correctly. Even though there is one stripped set screw this was accomplished easily.
All of the articles and advice had stated that you need to adjust out the backlash as much as possible and make sure the scope is perfectly balanced. After some thought I rebalanced the scope to a slightly nose heavy configuration. Early in working on tracking, I had tried a tail heavy configuration, which is easy since the camera weighs so much. This really made it unstable in DEC. So for this try, a weight was added up front to make it slightly nose heavy instead.
On both RA and DEC I went back and adjusted the gears until there was at least 2-3 mm of slop when you moved the motor assembly. Totally counter intuitive! When the skies cleared enough to try out all of these changes I was shocked! The tracking errors were all below .70 of a pixel. This was on a hazy night where clouds kept cutting off the guide star.
A couple of weeks later (first almost clear night) I was able to get good tracking (below .40 of a pixel) for a half hour and a number of images. The weather went south after just a few promising minutes and ended the session. Still the results looked good. Unfortunately I had been here before only to be disappointed on the next run.
Another couple of days went by, the weather cleared and I was ready to try again. After a full night of imaging M 87, 125 images in all, only a couple were ruined by poor tracking. These were due to high clouds blurring the guide star early in the morning (the dreaded “guidestar faded” in Maxim) thus throwing off the tracking. Still, even with this handicap, those images would have been usable for photometry.
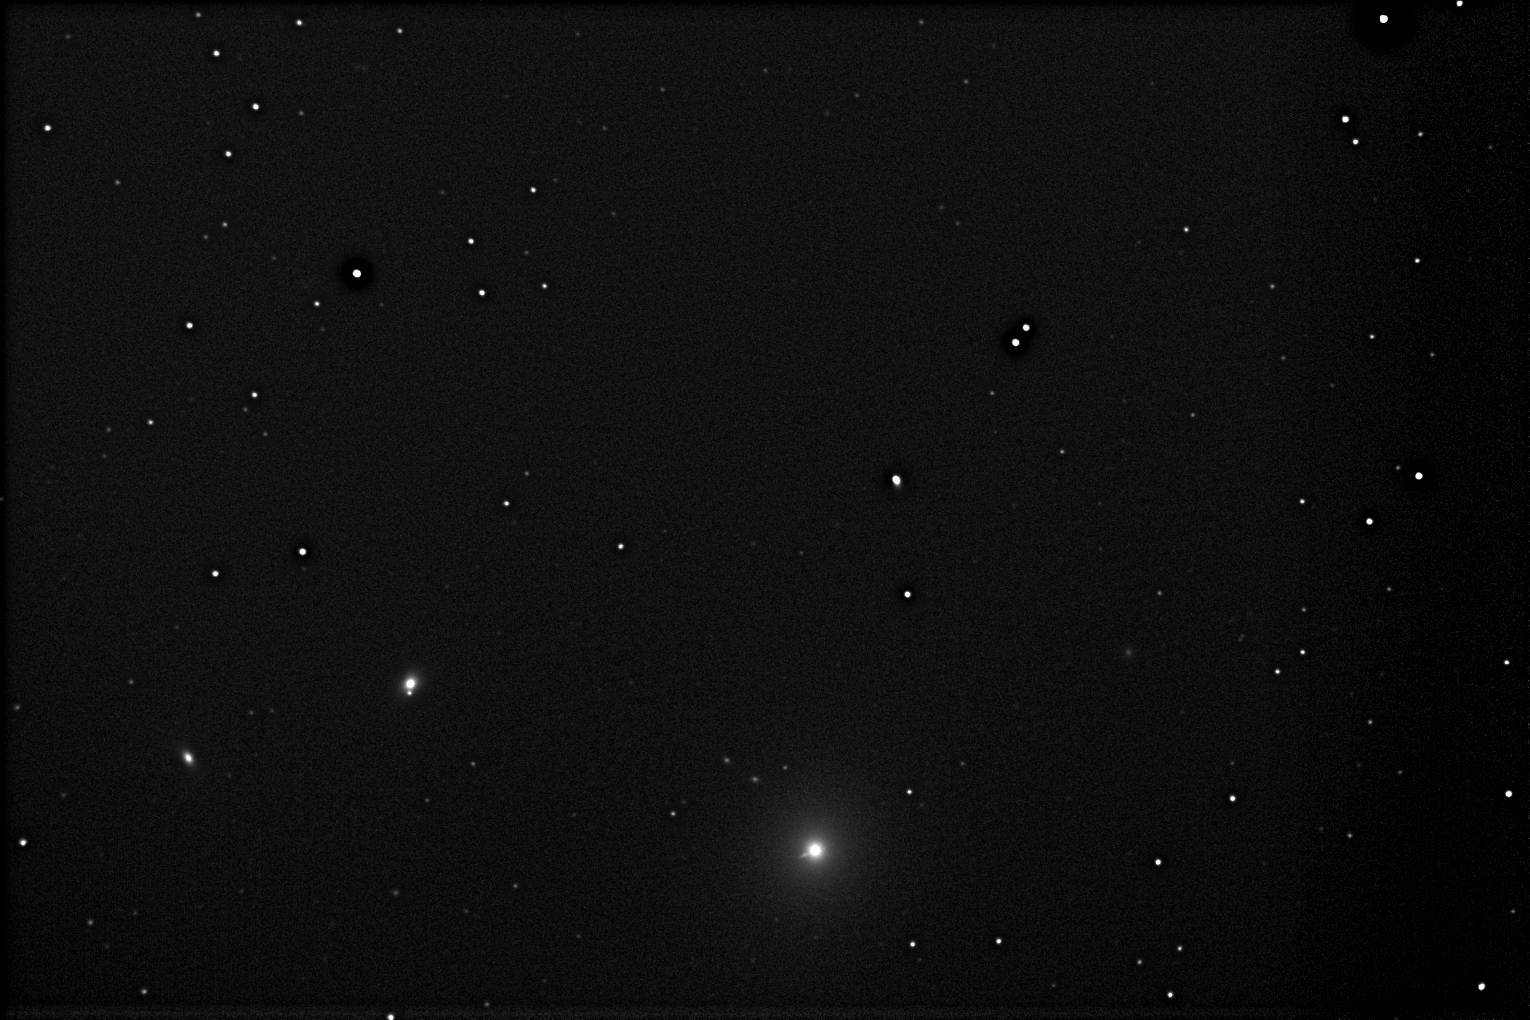
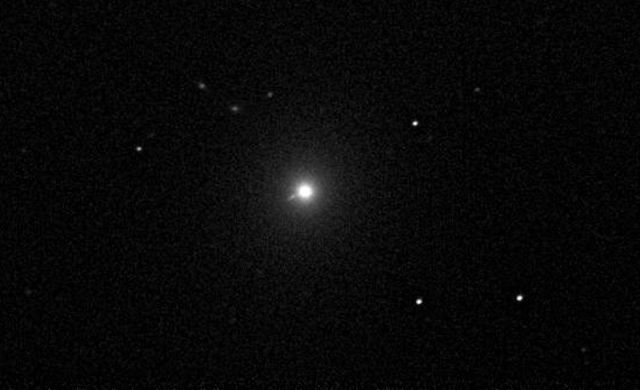
M 87 with the 11″ CPC, ST-8E camera, 125 images in Sloan infrared Z.
M 87 cropped and enlarged showing the jet shooting out of the side. The jet is coming out of the black hole that was recently imaged by the Whole Earth Telescope!
The above images do not show up very well in this web format but there are numerous galaxies in the full resolution image. Even in the full sized image the jet can be seen. With this success the future for “Temple 28″(11” CPC) looks a little brighter!
Why was this telescope so hard to adjust? I think it was because a friend had “refurbished” the scope into a professional level instrument. This entailed moving the balance point and making a carbon fiber tube. The counterintuitive settings are probably due to this change in configuration. The second factor is a constant lack of time. It seems that I have very small windows to do my hobby and this leads to trying “shortcuts.” The mantra of firemen is “to do something fast you need to slow down!”Only time will tell if the problems are truly fixed and Temple 28 is ready to go to work! After 5 years that would be a welcome outcome!
Never trust the internet! Virtually every site that I researched said “tighten your worm gear up until the motor strains and then back it off slightly.” Sounds like a great way to eliminate or reduce backlash doesn’t it? Well on my scope that advice doesn’t work!
After writing the article on preparing a CPC 1100 for imaging, (see an earlier post), I decided the telescope was still not tracking as good as it could. So I took off the gear covers and had another go at eliminating the backlash in the dec gears. After 2 adjustments using the rule of thumb listed above it would no longer move much in DEC when tracking. Not much of an improvement. So I moved the ST-8E camera to the AR102 refractor on the Sirius mount and ran with it on clear nights. Now that was only a few nights! The weather has been atrocious this winter.
With a few clear nights in a row coming up it seemed prudent to work on the 11″ CPC again. The first task was to see if I could get it to move correctly in DEC while tracking. RA was spot on, but DEC was way off. In fact it seemed the gears would not move at all mimicking severe backlash. After trying Maxim DL tracking then PHD with an external guider it just wasn’t working. So I pulled the cover off the fork arm and did something counterintuitive. Loosened up the gears until there was significant play in the system. Tried using PHD and it worked!
I used the PHD Polar Drift Align to get the alignment close. I have found that the built in Celestron routine seldom gets the PA closer than a degree or two. Though it was still off it was a lot closer. Last night I used the drift align feature in PHD to tweak both axis. Now it is as close as you can probably get.
There was still significant errors in guiding and about 50% of the images were trailed. There is also a movement after 100 images off the right side of the image. My guess is flexure from the external guider. The guider started off exactly lined up with the images on the chip. After an hour or so it was completely off. Smells like flexure to me! Using an external guider makes finding mechanical issues way easier. So tonight I will switch to the internal guider chip and see if that will make a difference in the quality of the images. The big negative about using the internal guider is the small field of view that makes it hard to find a suitable guide star. The positive is the lack of flexure.
The next step after testing is to put the ST-8 back on then shoot an actual T-Point model. It would be nice to be able to get back to doing my Central Stars project and do regular stars with the AR102. The field of view is too large on this short focal length scope to be able to measure the Central Stars of Planetary Nebula accurately but it is great for doing regular variable stars.
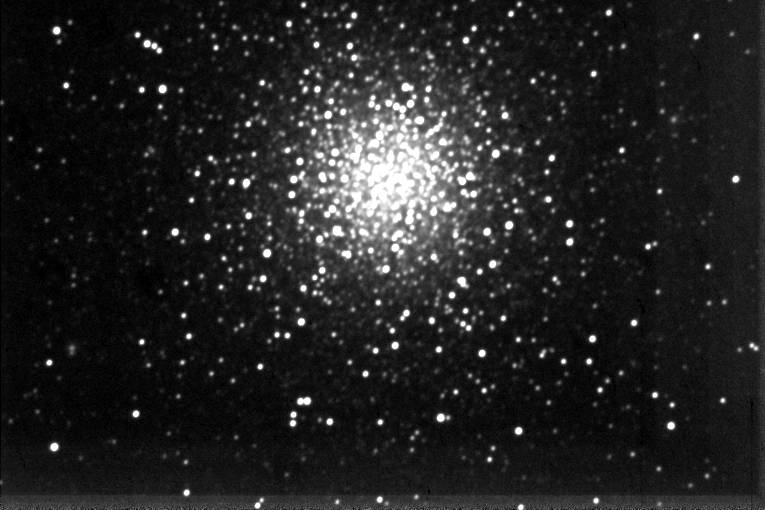
M 53 using an uncooled ST-7E, no filters and using PHD to guide. It uses 79 images stacked in Maxim and lightly processed.
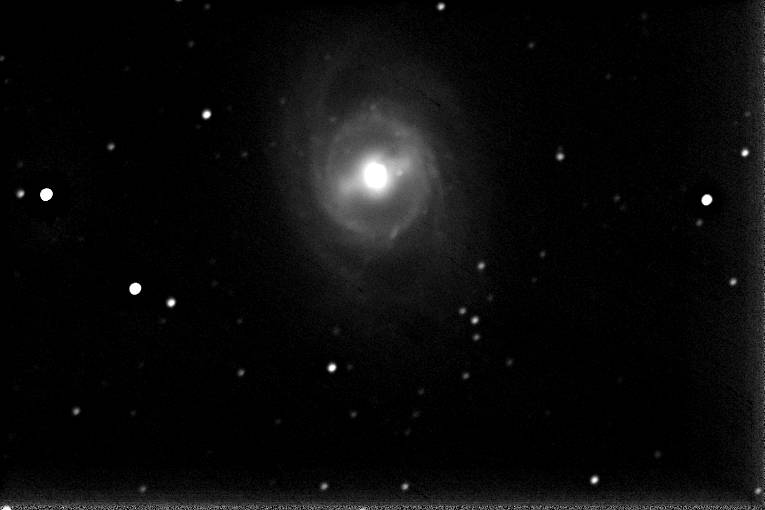
The second image is M 95, 114 by 60 seconds also stacked in Maxim and lightly processed.
There has not been weather like this in Missouri for at least 5+ years! According to weather records it was 2011 the last time we had any weather like this. Actually it seems that the 90’s were probably the last time we really had this type of weather pattern. School canceled, churches and businesses closed, these are the norm for this winter. In 2018 we barely even had snow at all!
One of the first things I noted upon moving from New Mexico to Missouri was the lack of clear skies! In New Mexico opening up the telescope every night for 2 straight weeks was not unusual. Opening up 2 nights in a row is very unusual here in Missouri. You make an adjustment on the telescope and it may be 2 weeks later before you get to try it out!
Since October there have only been a handful of clear nights and many of those those saw significant cloud cover by night’s end. The pattern has been ice and snow on Wednesday night with ice and snow on Sunday as well. One storm rolls out and a few hours later another storm moves in, with lots of high clouds in the hours between.
To add to the issue is the effect of all of this weather. My 2 telescopes are covered by heavy, weather resistant, tarps. Surprisingly enough, they work well. However, I had to cut short the last actual telescope session. It turns out the wind on the tarp loosened a knob and knocked the scope out of polar alignment. We did have a clear night at 7 degrees with a 25 mph wind but opening the telescope and polar aligning was not high on my list!
I also found that my cables get too stiff and hinder tracking when the temperature goes below 10 degrees. My current cameras are parallel port CCDs that use a heavy, stiff cable. This is enough to hinder tracking especially when the wind blows. In fact when my german equatorial mount would track, the power cable got so stiff that it would unplug itself. Obviously this required much more thought in routeing the cabling! None of this includes the ground heave during cold weather knocks the scopes out of alignment!
If these cold weather issues had ever confronted me before it would be easier to deal with them. A heat tape wrapped around the parallel cable is on the summer agenda of telescopic fix ups. Redoing the tripod foundations to minimize ground heave will also be a warm weather project. Hopefully getting some more clear skies will also be helpful!
Have you ever worked on a problem and gone backwards? You have an Ah-Ha moment where you know that you have the problem solved and then when you implement the solution it’s worse than it was before? Well that has been my experience with Temple 28, The Celestron 11″ CPC.
In earlier articles you find out about the struggles with a welded, non-adjustable wedge, loose gears and balance issues. Each solution should have led to a better working telescope but it didn’t. In fact Right before Christmas 2018, I just gave up in frustration on this scope, set up my AR102 refractor on the Sirius mount and began using it. Temple 10, the AR102 and Sirius combination, works really well! Since then I have obtained data on 2 close binary stars that no one has recorded since the original survey was done. At least I feel like I have accomplished something.
After much thought and research we finally had a day above freezing so I went out and began to work on Temple 28 again. Looking at online images, I noticed that all the images of the worm gear assembly differed from mine. There is a backlash adjustment screw with a spring on it that is easily observable in the online images. In everyone else’s pictures the spring was at least 1/4 of the way up the shaft, with several being compressed to 1/2. The springs on Temple 28 were fully extended and rested against the spring stop.
So I pulled off the RA cover and began to adjust the spring. It is pretty easy to adjust the spring if you remove the 2 small screws that hold the flexible coupling to the worm gear and swing the motor out of the way. However, I did not want to introduce that level of change. When problem solving, it is often best to only change one thing at a time. So adjusting just the spring was the best way to proceed at this point.
After adjusting the spring about 1/4 of the way up the adjustment screw I loosened the screw slightly. This is to make sure that the worm does not bind on the gear. After testing the motor I then did the same thing to the Dec axis. This was more of a challenge since it is in an awkward place to adjust.
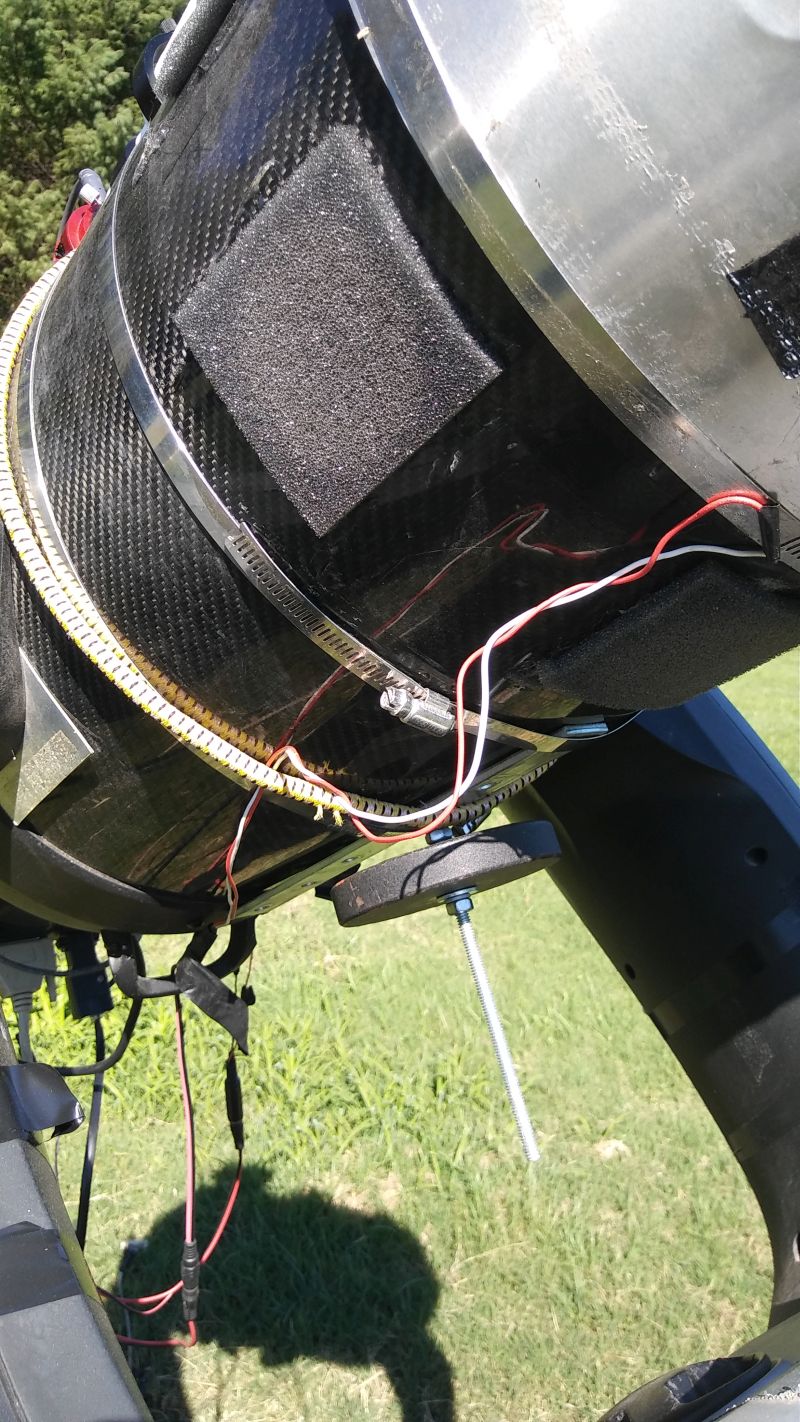
Temple 28 in all of it’s duct taped glory! Wiring has been rerouted and the guide scope removed since this image was taken last summer.
After removing the the SBIG ST-8E, then putting it onto Temple 10, I needed a heavy camera to counterbalance Temple 28. I dug out my old SBIG ST-7E. This camera is an exact duplicate to the ST-8E but with a smaller chip. The ST-7E also does not have the SBIG CFW-8 filter wheel installed…since I can’t find the actual filter wheel for it!
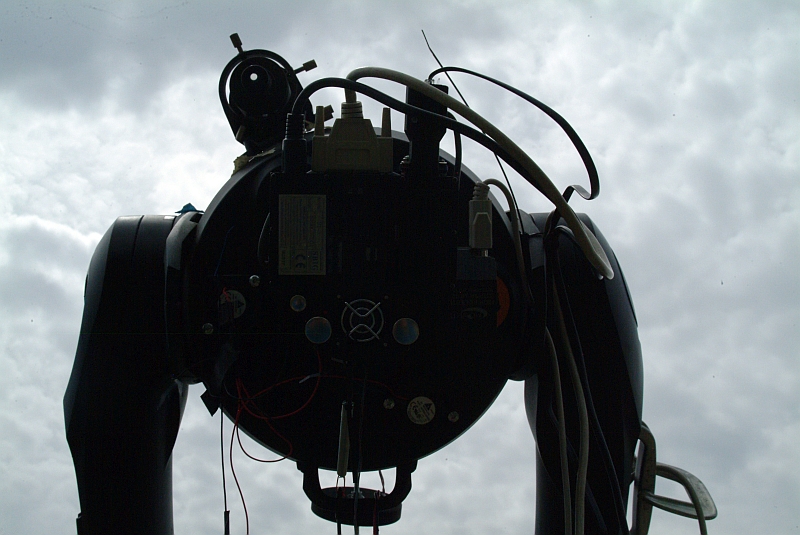
A rear view of Temple 28 showing the extended weight that is a necessity if you want to balance this beat!
Balance…always an interesting experience, in life and on a scope! When Temple 28 was first re-worked the tube balance point was moved to allow a heavy SBIG camera to be used. This means that what other people do on their CPC’s is not workable on Temple 28! Eventually, after much work I put two flat weights on the nose of the scope, the bottom 2.5 pound weight half way down the tube and strapped it all on tightly with hose clamps. Hose Clamps? Well they are cheaper and work just as well as 80-200 dollar rings or balance bars!
Well, the proof of the pudding is in the eating! So how did this newly adjusted system work out? Better, but not great! There was star trailing on about half of the images. For the type of photometry that I do it would probably still work in most instances but it is annoying none the less. In all fairness, when using the internal guiding chip, any fog, high cirrus clouds, corrector dew or frosting easily throws off the tracking. The conditions for this latest test were bad! High clouds, heavy dew on the corrector and forming fog in the sky. The a dew heater on the scope actually works fairly well. The presence of dew anyway says a lot about bad atmospheric conditions. So this test needs to be repeated when the conditions are better! In Missouri however, especially this year, any clear night, needs to be utilized regardless of conditions.
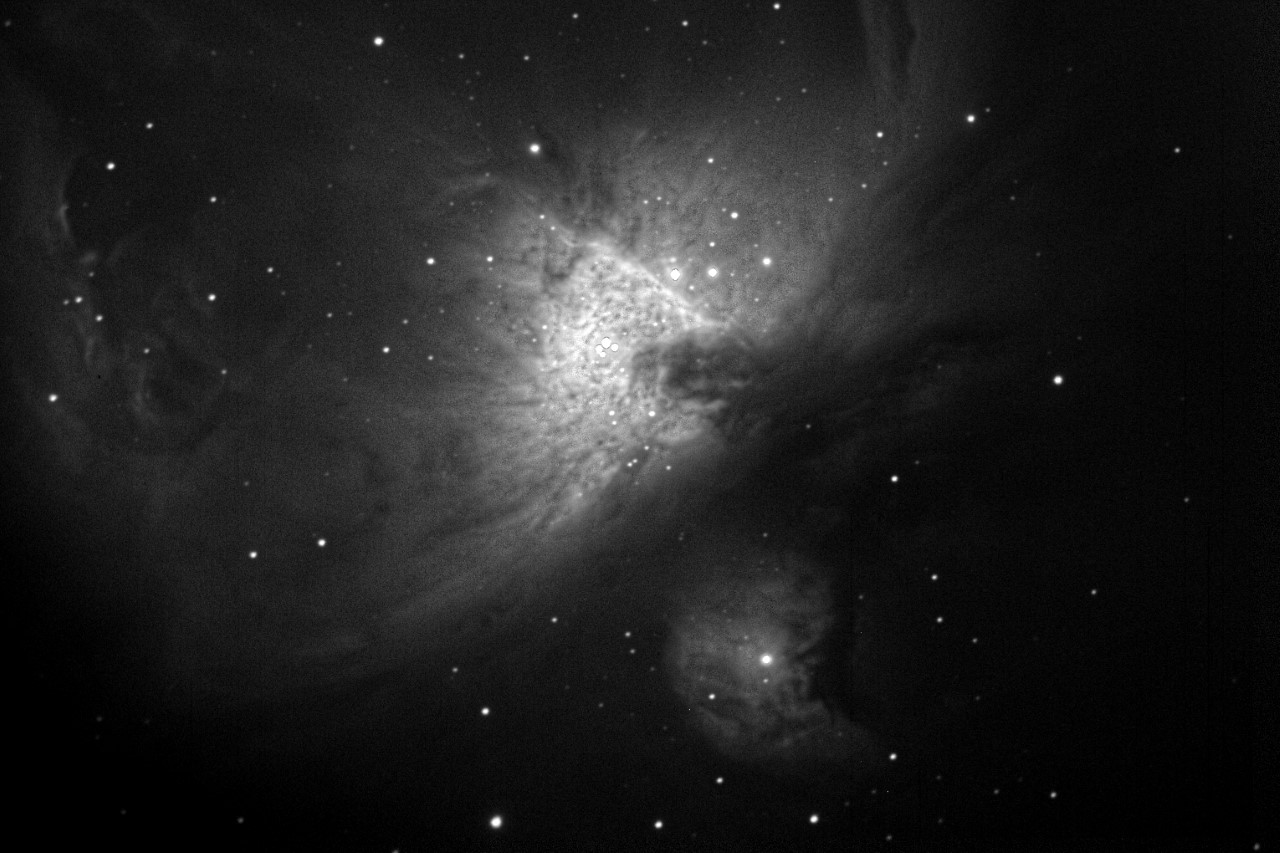
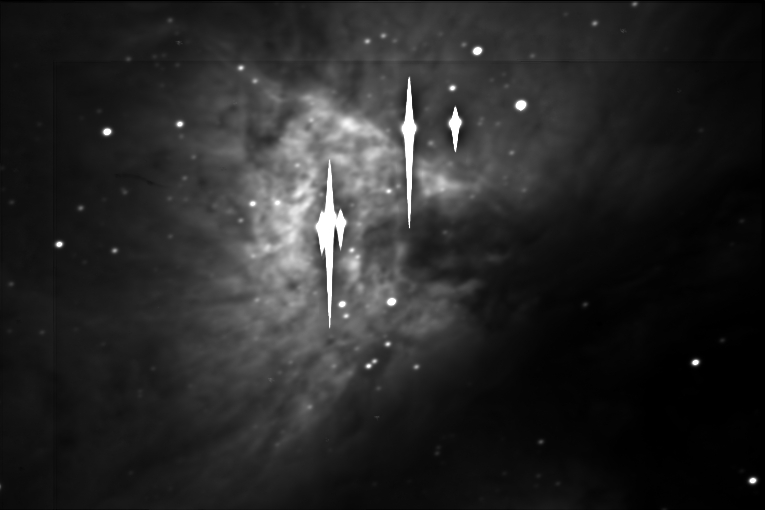
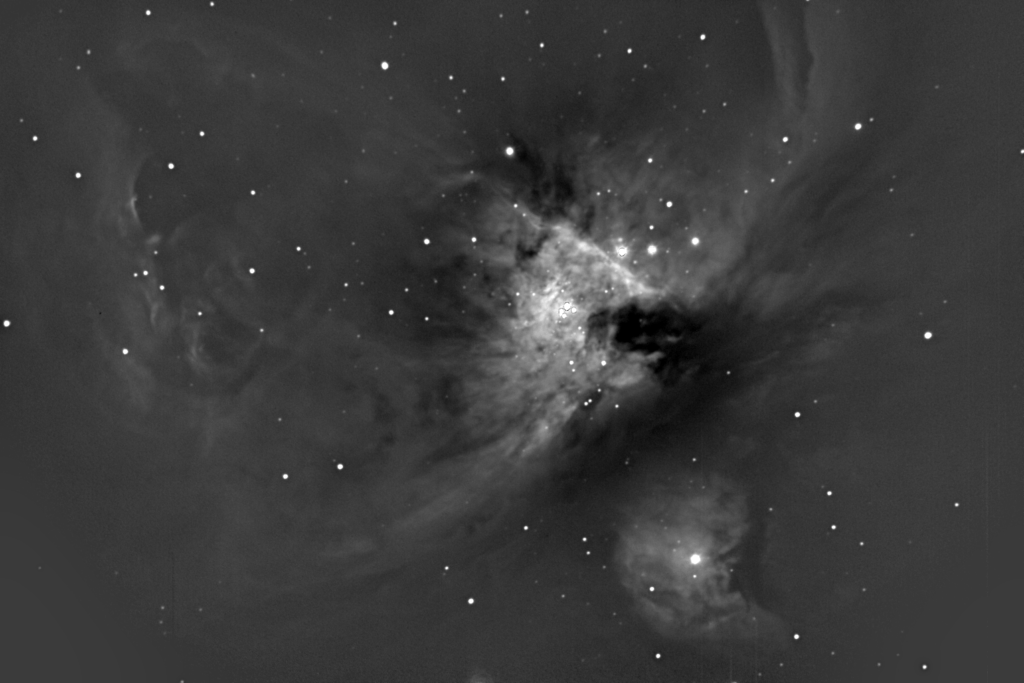
M 42 with Temple 28. SBIG ST-7E, no filters, 47 images of 60 seconds exposure. Around half of the images were rejected for stacking due to trailing stars. Still it is better than not imaging at all! The big spikes are blooming. This camera has no anti-blooming. You don’t want anti-blooming for photometry.
So what is the next step? Well the first thing is to find the filter wheel! I put it in a box during our move to Missouri where I could find it and haven’t located it since! This would bring the weight of the camera to match the ST-8E and facilitate an easy camera swap. It also makes doing photometry practical since the results are better if you use the right filters.
Screen shot of Maxim DL5 showing all the rejections due to star trailing.
Second, is to take the RA worm assembly completely off, clean and polish the worm and gears, then re-adjust the whole thing. You can do small adjustments with the backlash adjustment screw but the large adjustments are made by moving the entire assembly, then tightening down 2 screws. When you read the posts about this whole saga, it becomes apparent that this should have been done on day 1! Quoting from the movie contact ” This is the way it’s been done for billions of years. Small moves, Ellie. Small moves.”
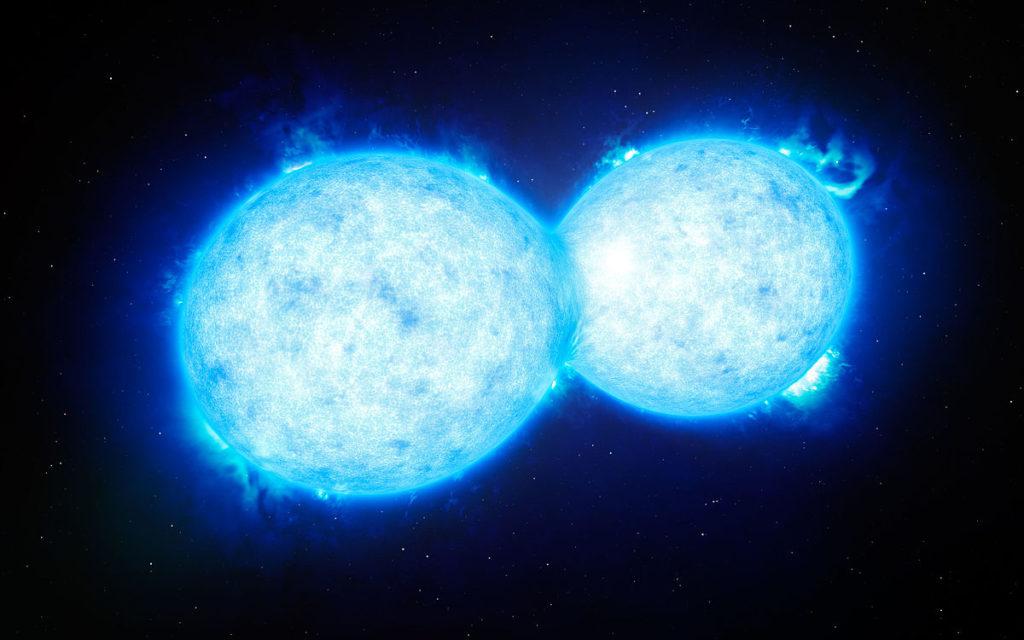
Artist conception of an overcontact binary star from a planets surface.
For the last 20 years or so I have been very interested in doing what is called Citizen Science. For me this entails measuring the brightness of variable stars and building what is called a light curve from that data. The light curve often shows what type of variable star you are observing. There are some examples of a light curve later on in this blog. My favorite targets are binary stars that are so close that their atmospheres touch and they revolve around each other in less than a day!
The American Association of Variable Star Observers has a database of variable stars called VSX. Some of the stars found on VSX have hundreds or thousands of observations over many years but the vast majority of stars have few or no observations. Many of the stars on VSX were found by professional or amateur surveys and have not been observed since. These little observed stars of close binary systems are what I enjoy the observing the most.
Each studied variable star in the VSX database should have a AAVSO Unique Identifier or AUID. Many of the stars in the VSX system don’t even have an AUID assigned to them yet. This is the easiest way to find stars that need observation is to look and see if an AUID has been assigned. If not, any AAVSO member can ask for a number to be assigned.
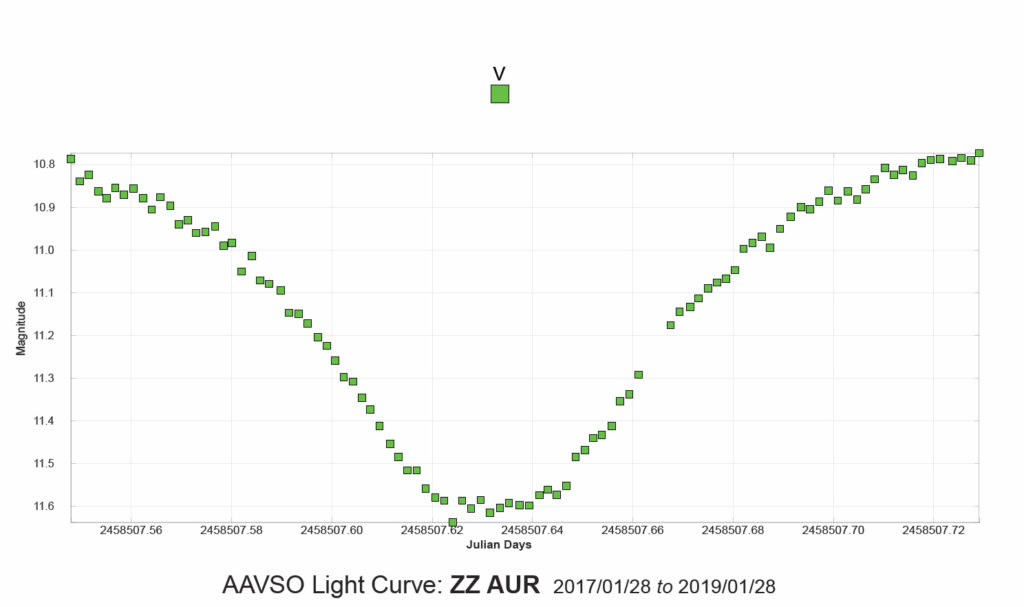
Last week I had the opportunity to image ZZ Aur, a close binary with around a 14 hour period. One of the reasons these types of stars are fun to image is the fact that they actually show pronounced changes in the 6-7 hours that you observe them. Some stars called LPV or Long Period Variables can take more than a year to change and this means that there is little change in brightness from month to month. So close variables are pretty exciting!
The above image shows the light curve of ZZ Aur. There were 97 images taken over an approximate 6 hour period. Each green square represents one image of ZZ Aur.
The AR102, Sirius mount, ST-8E Camera and a laptop to control it all!
The equipment used to image ZZ Aur is pretty modest by most standards. The most important piece of equipment for imaging is the mount. A number of years ago I was able to purchase a used Orion Sirius mount for 450 dollars. I swapped out the tripod with 1.5″ tubular legs for a tripod with 2″ tubular legs. This probably increased the payload capacity from 30 to 35 pounds. The mount did not come with a Hand Control unit but it did come with a cable that enabled a computer to drive the mount. This is done with an EQDIRECT cable and EQASCOM software.
The telescope is a 102 mm (lens diameter) refractor. This telescope is an Explore Scientific brand called AR102. AR is short for a 2 lens doublet objective lens or an Achromat. When the scope was purchased several years ago it was around 300 hundred dollars on sale. The AR102 turns out to be just about perfect for imaging using a photometric filter. This is because the filter only passes a small wavelength of light which negates the effect of chromatic aberration or CA. CA is caused when the violet or blue light does not come to the same focus as the green and red light. Purple Haze is often seen around bright objects or stars in an achromat.
The camera is a 15 year old Santa Barbara Instrument Group (SBIG) ST-8E. This medium format camera uses an ultra slow parallel port cable to upload images. The average upload time is 67 seconds! This creates unique issues but then it is why the camera sells so cheap on the used market. It also has an effective cooling system that keeps the temperature steady. Keeping the CCD chip cold reduces the amount of noise or static in the image and this is important for getting accurate data in your images. I bought this camera used a little over a year ago for 250 dollars.
The SBIG ST-8E has a 5 filter wheel attached to it. The filters in it are photometric. These filters only pass a small wavelength of light in each color area. For example the g filter is equivalent to the green part of the spectrum. The r is red, the b blue and i infrared. With these Sloan photometric filters and the camera you can precisely measure the light of a variable star. The filters came with another camera that I got on another telescope I purchased.
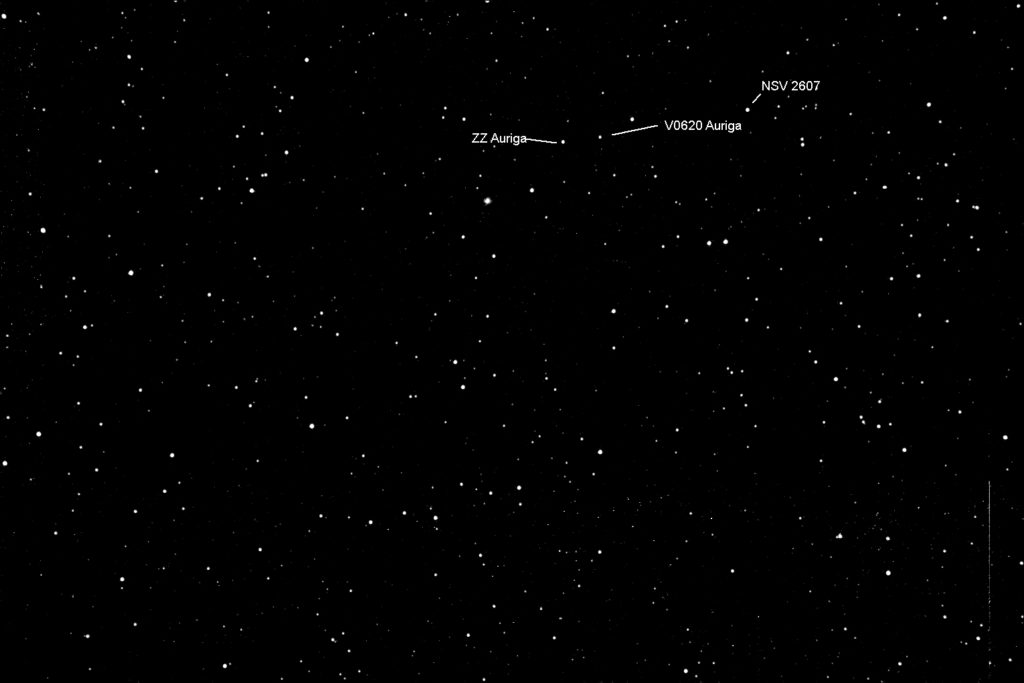
One of the other pluses of this modest system is the wide field of view. In fact the area seen in one image is twice the size of the full moon which is huge in imaging terms. With this much field of view it allows for wide views that often include other variable stars in the same field. You also need stars with known magnitudes to compare the variables with. These are called comp stars. A wide FOV (field of view) makes finding suitable comp stars much easier as well.
Here ZZ Aur plus 2 others in 1 image!
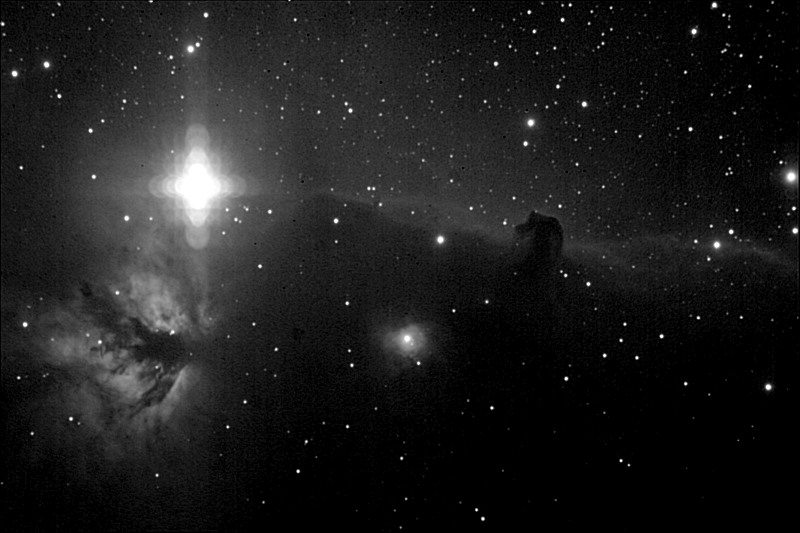
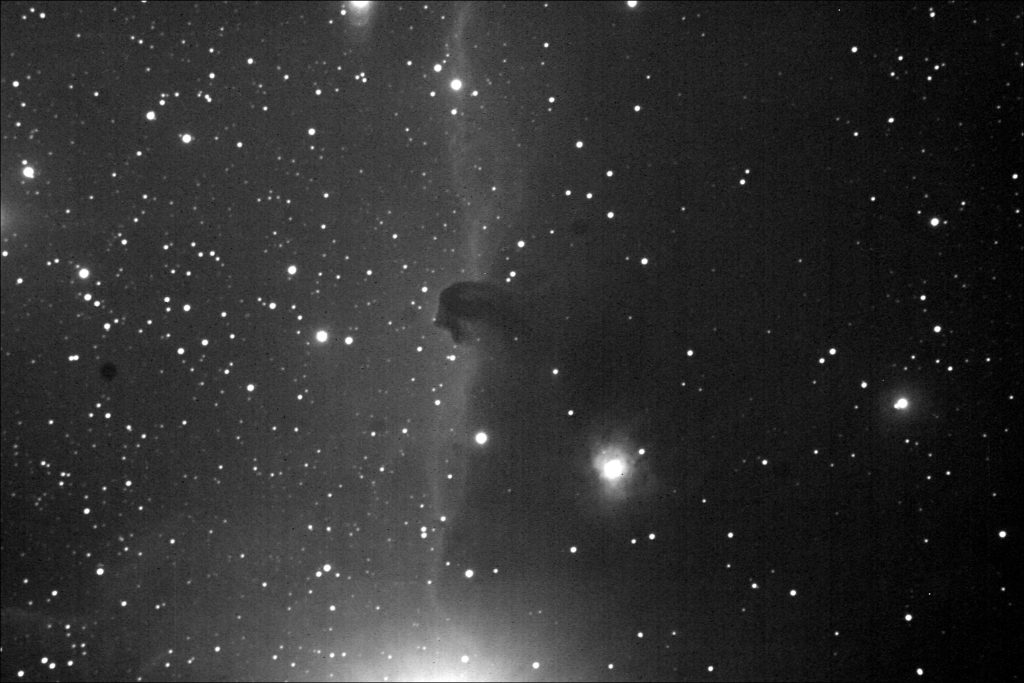
This image shows the wide field of the AR102 and SBIG ST-8E in a more dramatic fashion. The Horse head and Flame Nebula in one image!
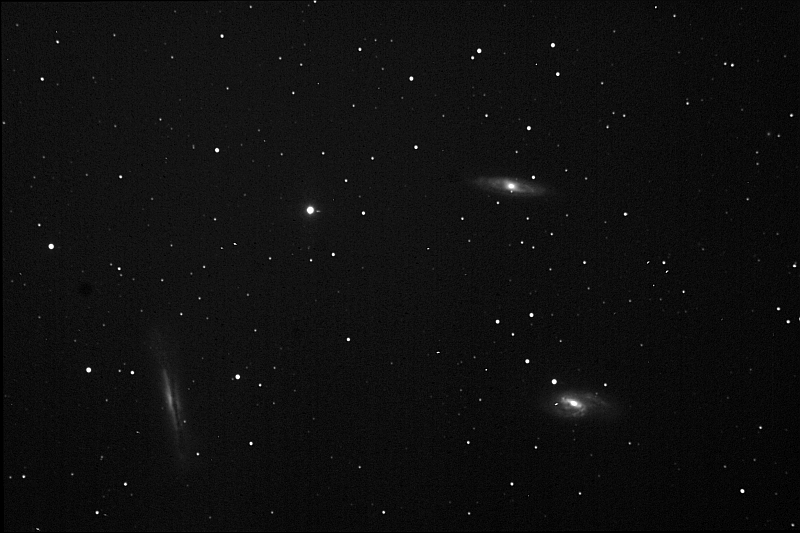
Triplet galaxies in Leo! One of the standard tests for wide field views.
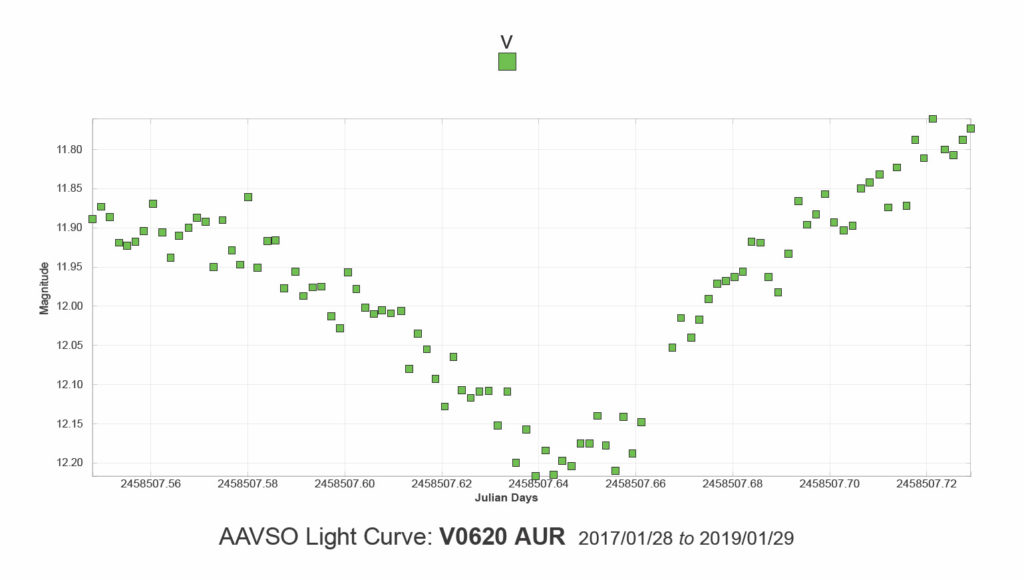
One of the pluses of a wide field is other variables in the field of view. Near ZZ Aur is a variable called V0620 Aur. Turns out this variable had never been imaged since the initial survey. It is a great feeling to see that your observations are the first ones done on a star! V0620 Aur is also a close binary with a similar period.
Above is the light curve of V0620 Aur. It is similar to ZZ Aur but differs in several ways. The curve is not as steep which means that the period and eclipse is longer. Plus the top right of the curve is obviously higher than the left side.
Here is an artists rendition of what and “overcontact binary” star may look like.
Overall with a modest investment of 1000 dollars over a several year period I am doing actual science! This is something I have wanted to do for many years but never thought would be possible for the poor amateur like me! If you have an interest, even if you don’t have binoculars or a telescope, you can still do science! So contact the AAVSO at https://aavso.org/
Sometimes you have to go small if you want to go big! For a number of years I have been using 6″ to 11″ telescopes, most from F/8 to F/6.3. These provide a fairly detailed view but with a smaller field of view. A few weeks ago I decided to move my SBIG ST-8E camera to the AR102 refractor and Sirius mount. The results with this small refractor really go big!
The AR102 is an achromatic refractor from Explore Scientific. It was purchased several years ago from Highpoint Scientific. The original intention was to use this as a grab and go telescope but it worked so well as an imaging scope that is pretty much all it has been used for in recent years. Chromatic aberration is not a big issue when you use photometric filters. The only real issue is that you have to refocus each filter. However, you eliminate the blobs around bright stars by using filters. This type of telescope would also work well for RGB filters as well. An ED or APO scope is needed if you want to use a one shot color camera. You can make a poor man’s ED scope by using a Minus V filter when you image with a color camera. It doesn’t eliminate the CA but it brings it to a level you can often eliminate with processing.
One of the real pluses of a telescope and camera combination like this is field of view. The combination of medium sized ccd chip and short focal ratio give a field of view of approx 72’x 42′. Compared to the FOV that many of us had with our first cameras this is huge! So if you want to go big (FOV) you gotta go small (Focal Ratio and Focal Length).
The Sirius mount was purchased used, hypertuned by a friend and then put on an Atlas Tripod. The original Sirius tripod uses 1.5″ legs and the Atlas uses 2″ legs. This probably adds about 5 lbs to the amount of weight the Sirius can carry. My Celestron AR152, F/8 refractor actually works quite well on this mount and you can even add the SBIG ST-8E camera and it does not overload the mount and impair the mounts tracking. There was no hand control with the telescope when I got it but it has been used with EQMOD and EQASCOM. These programs work well.
So what can it do! Here are some images from the AR102, Sirius and ST-8E combination!
120 second exposure with a Sloan g filter
25X60 second images, clear filter processed in Maxim DL5 and Photoshop
39×120 seconds with a g filter processed with Maxim DL5
Sometimes you have to go small if you want to go big!
In the fall of 2014 a friend of mine told me he was getting out of astronomy. At the time Temple 20 (8″ Meade LX200) was taking automated data for a group in Europe at his observatory. He wanted me to come and get my scope. Upon arriving he offered to sell me a Meade 14″ or a Celestron 11″ CPC for pennies on the dollar. After thinking about it for a moment I chose the 11″ knowing that I just could not physically handle a 14″. My friend dubbed the scope Temple 28 since it was a twin of Wright 28 which at one time was part of the AAVSO telescope system. The naming system was the last name of the owner and a telescope number. Never did figure out how they came up with the number!
After 2 years in storage the telescope was setup in Espanola New Mexico in a roll off shelter. It survived the great SBIG fire when my ST-2000 camera caught fire, along with several local windstorms. During this time in northern New Mexico it imaged, but not well!
In the Spring of 2017 we moved to Missouri. Temple 28 was put in our backyard on a semi permanent mount. Though the site is light polluted it borders on a historic graveyard with limited lights and night time access. Not ideal but workable.
If you have followed the blogs on this site you will have read about the struggles to get this telescope up and running. The first big issue was the wedge. We are around 40 degrees north and the wedge was built for 33 degrees south. The wedge that came with the scope had been welded out of metal plates. You had to adjust the whole scope physically, turning the mount and tilting the legs. This is not a recipe for good polar alignment. So a Celestron Super wedge was obtained.
The next issue was weather. The first year here we only had a few clear nights all year long. It was almost impossible to make an adjustment then be able to test it in a timely fashion. The weather in 2018 has been a bit more amenable.
Balance was the next challenge. A weight system was constructed to balance the scope but I found out I was doing the balancing wrong! To balance a SC you tilt it vertically, balance it, tilt it horizontally, balance it, then finish the balancing by swinging it from side to side. The balance was achieved on Temple 28 pretty easily but there were still problems with tracking, especially in RA. I had used a medium sized C clamp attached to the west side handle to balance out the scope. After much testing it turns out that it was slightly too heavy. Your east side should be slightly heavier than your west side and though the scope appeared balanced it was still slightly off. It has now been replaced with some lighter weights attached to the west side. This has reduced the tracking errors with auto-guiding to less than 1 pixel. Though not the gold standard of auto-guiding it is adequate for the science imaging that I do.
After much trial and error the telescope will now plate solve. Turns out that the Celestron 6.3 focal reducer is not exactly 6.3. I actually prefer plate solving in CCDSoft and TheSky6 Pro but it is really sensitive to settings. So after finally achieving a solid plate solve in Maxim, I then took the plate scale and plugged it into CCDSoft, then played with the settings until it worked. It will now plate solve in either program.
For years I have used CCDCommander as a control program. This adequately controls all functions of imaging and allows the telescope to be used remotely. In the near future I will be trying Sequence Generator Pro to automate the imaging. This program allows you to use PHD guiding as well as several other features not included in CCDCommander.
Over all it seems Temple 28 is finally ready to do nightly work. Measuring the light curves of over-contact binary stars is something that I enjoy doing. There are thousands of stars listed in VSX (Variable Star Index on the AAVSO web page) as variable that have no measurements done on them besides the initial survey, which may or may not be accurate. There is a great deal of satisfaction to do measurements on these stars and know you are contributing to real science.